


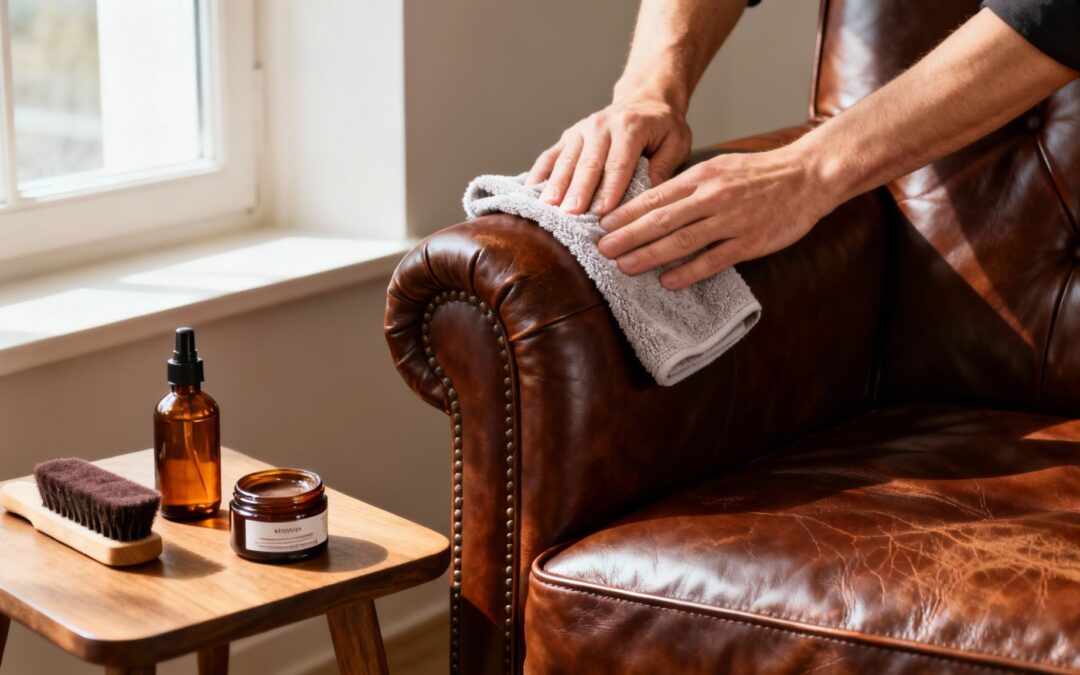
A beautiful leather sofa, a cherished jacket, or the immaculate interior of your car aren't just things you own; they're investments. Knowing how to clean leather properly is the key to protecting that investment, stopping the premature cracking and fading that happens all too often.
This guide isn't about generic advice. It's about giving homeowners and property managers across Melbourne practical, real-world steps to keep their leather looking fantastic. My goal is to give you the confidence to maintain your leather’s natural lustre and make sure it lasts for years to come.
Why You Can't Just 'Wipe It Down'
Leather is a natural material. Think of it like skin—it needs care to stay hydrated and healthy. When its natural oils dry up, the surface becomes brittle and susceptible to all sorts of damage.
Proper cleaning and conditioning do a few crucial things:
- Prevents Damage: It gets rid of the abrasive dust and grime that cause tiny scratches and wear down the protective topcoat.
- Restores Appearance: It lifts away the body oils, dirt, and minor stains that make the finish look dull and tired.
- Extends Lifespan: By putting essential moisture back into the material, conditioning keeps it flexible and resilient, adding years to the life of your furniture.
The biggest mistake I see people make is reaching for an all-purpose cleaner. Products with ammonia or harsh alkaline ingredients will strip the leather's natural oils, causing irreversible drying and cracking. Always, always use a pH-neutral solution made specifically for leather.
From Sofas to Car Seats: The Same Rules Apply
The core principles of leather care are universal, whether you're working on your favourite armchair or the high-traffic interior of your family car. It always starts with figuring out what type of leather you have, doing a quick spot test in a hidden area, and using gentle, circular motions when you clean.
While the steps in this guide cover all sorts of leather items, you can find more specific advice on how to clean leather car seats like a pro if that's your main focus.
Learning these techniques will save you a fortune in costly repairs or replacements down the line. You’ll learn not just how to handle spills when they happen, but how to build a simple, proactive maintenance routine that keeps every leather piece in your home looking as luxurious as the day you brought it home.
The Critical First Steps Before You Clean
Jumping straight into cleaning leather without a plan is a bit like painting a room without putting down drop cloths—it’s a recipe for a mess you’ll regret later. Before a single drop of cleaner touches your furniture or jacket, a few non-negotiable checks will save you from costly, and often irreversible, mistakes. This isn’t about adding extra work; it’s about protecting your investment.
The most important thing to do first is understand exactly what you're working with. Not all leather is created equal, and a cleaning method that works wonders on a protected family sofa could permanently damage a delicate aniline armchair. Each type has its own unique properties, so using the wrong product can lead to discolouration, stiffness, or ugly stains.
Identify Your Leather Type
To choose the right approach, you first need to play detective. The "water drop test" is a simple and surprisingly effective starting point. Just place a single drop of water on an inconspicuous part of the leather and watch what happens.
- Protected or Pigmented Leather: If the water bead sits right on the surface, you likely have protected leather. This type has a polymer coating, making it the most durable and easiest to clean. Phew!
- Aniline Leather: If the water darkens the leather slightly and soaks in slowly, it's likely aniline. This type is dyed but lacks a heavy protective topcoat, making it much more absorbent and prone to staining. Handle with care.
- Nubuck or Suede: If the water immediately soaks in and darkens the spot, you're dealing with nubuck or suede. These leathers have a napped, velvety texture and require specialised cleaning techniques—often avoiding liquid cleaners altogether.
This simple identification process is the foundation of your entire cleaning strategy, helping you decide on the right tools and products from the get-go. This decision tree infographic gives a great visual of the basic care path, from identification all the way through to maintenance.
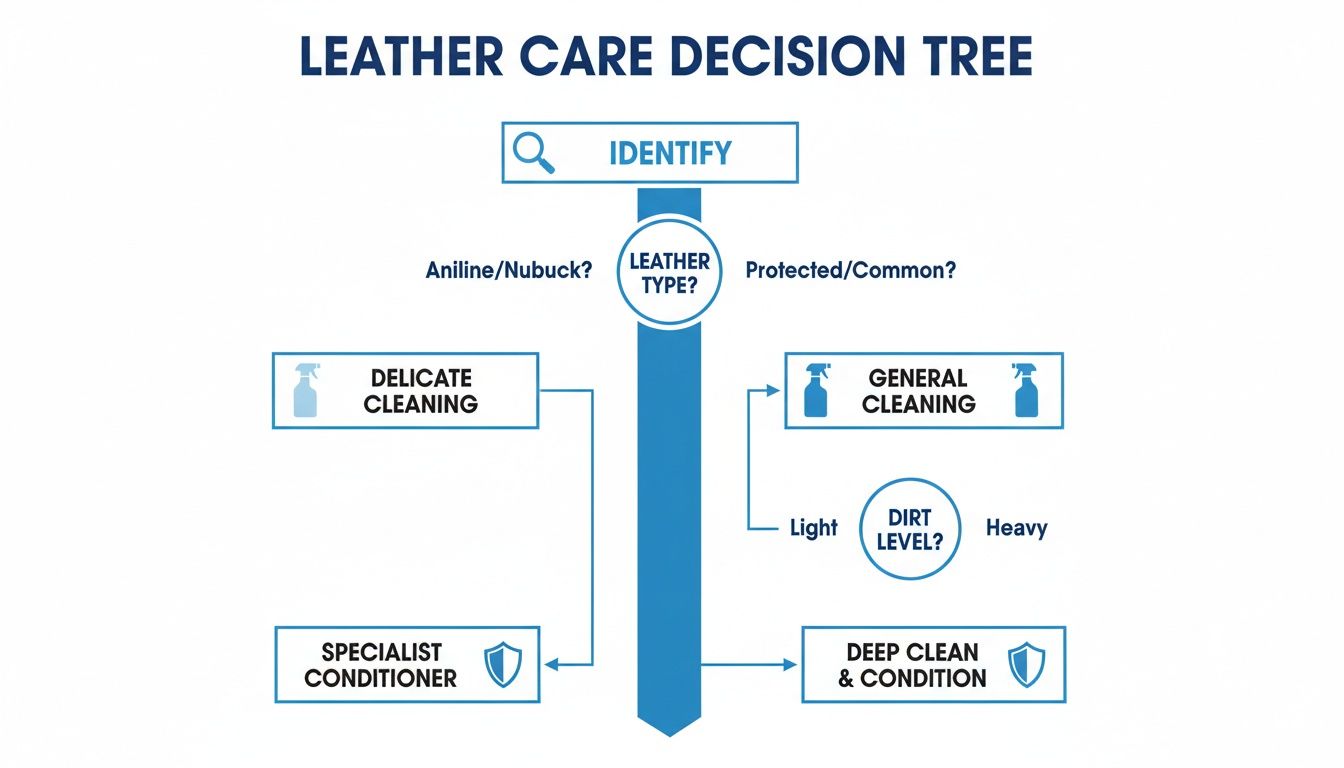
As you can see, everything starts with properly identifying the material, which then dictates the right cleaning method and long-term care routine.
To make things even easier, here’s a quick reference table to help you nail down your leather type before you start.
Leather Type Identification Guide
| Leather Type | Key Characteristics | Water Drop Test Result | Recommended Cleaning Approach |
|---|---|---|---|
| Protected (Pigmented) | Smooth, uniform finish; feels coated and resilient. Scratches don't show easily. | Water beads up and sits on the surface. | Mild, pH-neutral leather cleaner. Most forgiving type. |
| Aniline | Soft, natural feel; shows natural grain and markings. Scratches easily. | Water darkens the spot and absorbs slowly. | Specialised aniline cleaner. Gentle blotting, no harsh scrubbing. |
| Nubuck/Suede | Velvety, napped texture. Feels soft and fibrous. Marks and darkens easily with moisture. | Water absorbs instantly, leaving a dark spot. | Suede brush and eraser. Avoid liquid cleaners. Professional help often needed. |
Once you’ve used this guide to identify your leather, you’re one step closer to cleaning it safely and effectively.
Always Perform a Patch Test
Once you've identified your leather and picked a cleaner, this next step is crucial: the patch test. Never, ever apply a new product to a visible area without testing it somewhere hidden first. Good spots include the underside of a cushion, a seam on the back of the sofa, or the inside of a jacket cuff.
Apply a small amount of the cleaner with a cloth, let it sit for a few minutes, then wipe it away. Now, let the area dry completely—sometimes this can take up to 24 hours—and check for any adverse reactions. Look for any colour lifting, darkening, or changes in texture. If it looks exactly the same, you're safe to proceed.
This might feel tedious, but skipping this step is the single biggest risk you can take. It’s far better to spend five minutes testing than to discover you've ruined your entire piece of furniture.
Gather the Right Tools and Avoid the Wrong Ones
Having the correct supplies on hand makes the whole process smoother and safer. You don’t need an extensive kit, just a few key items that will get the job done right.
Your Essential Toolkit:
- Microfibre Cloths: You’ll need at least two—one for cleaning and one for buffing dry. Their soft, non-abrasive texture is perfect for leather.
- Soft-Bristled Brush: A brush attachment for your vacuum or a separate soft brush is great for removing surface debris without scratching.
- pH-Neutral Leather Cleaner: Steer clear of all-purpose sprays. A dedicated, pH-balanced leather cleaner is specifically formulated to clean effectively without stripping away essential oils.
Just as important is knowing what not to use. Common household products like vinegar, baking soda, dish soap, and ammonia-based cleaners are far too harsh. They can strip the finish, cause drying and cracking, and create permanent damage. Trust me, I've seen the aftermath.
Many homeowners and businesses in regions like Victoria, a hub for leather processing, understand this well. They often use mild pH-neutral soaps diluted at a 1:10 ratio for routine cleaning, which helps prevent the 15-20% shrinkage that can happen with improper methods. This practice is crucial, as polyurethane resins—key components in protective coatings and cleaners—account for 25% of the chemicals used in the industry. With proper care extending a leather product's life by up to 50%, these careful methods directly support the longevity of items tied to a nearly $471 million local manufacturing sector. You can explore more data on the Australian leather chemical market and see how professional practices influence product care.
A Practical Method for General Leather Cleaning
With your prep work out of the way, it’s time for the main event. Don’t reach for harsh chemicals or start scrubbing aggressively—that’s the fastest way to damage the finish. The best approach for general leather upkeep is a gentle, methodical one that lifts grime without stripping the material.
Think of this as the regular maintenance that keeps your leather looking its best. It’s perfect for tackling the everyday build-up of dust, body oils, and minor surface dirt that can make a beautiful piece of furniture look tired and dull over time.
Start With a Thorough Dust and Debris Removal
Before any liquid touches your leather, you need to get rid of all the dry debris. This might seem like a small detail, but it’s crucial. Dust, crumbs, and pet hair are surprisingly abrasive. If you just wipe them with a damp cloth, you’re essentially scrubbing the surface with fine-grit sandpaper, which can create tiny scratches in the finish.
Grab your vacuum and use the soft brush attachment. Go over the entire surface, paying extra attention to the seams, button tufts, and crevices where dirt loves to hide. Taking a few minutes to do this properly can remove up to 70% of the abrasive particles that cause damage during wet cleaning.
Choosing Your Cleaning Solution
Next up is your cleaning solution. While there are plenty of great commercial products out there, a simple homemade cleaner works wonders for routine cleans. The golden rule is to always use a pH-neutral formula. Anything too acidic or alkaline will strip the leather’s natural oils and lead to cracking.
Here are your best options:
- DIY Solution: Mix a few drops of a mild, pH-neutral soap (like a gentle liquid hand soap) into a bowl of lukewarm, distilled water. Steer clear of dishwashing liquid, as it's often too harsh for leather.
- Commercial Cleaner: A high-quality, water-based leather cleaner is specifically formulated to be tough on dirt but gentle on the finish.
For specific applications, you might even consider specialised options like a Marine Leather Cleaner And Conditioner, which is designed to handle various tough conditions safely. No matter what you choose, don't skip the patch test.
One of the most common mistakes I see is people using way too much soap. You’re aiming for a solution that’s barely sudsy, not a bubble bath. Too much product just leaves behind a sticky residue that attracts even more dirt.
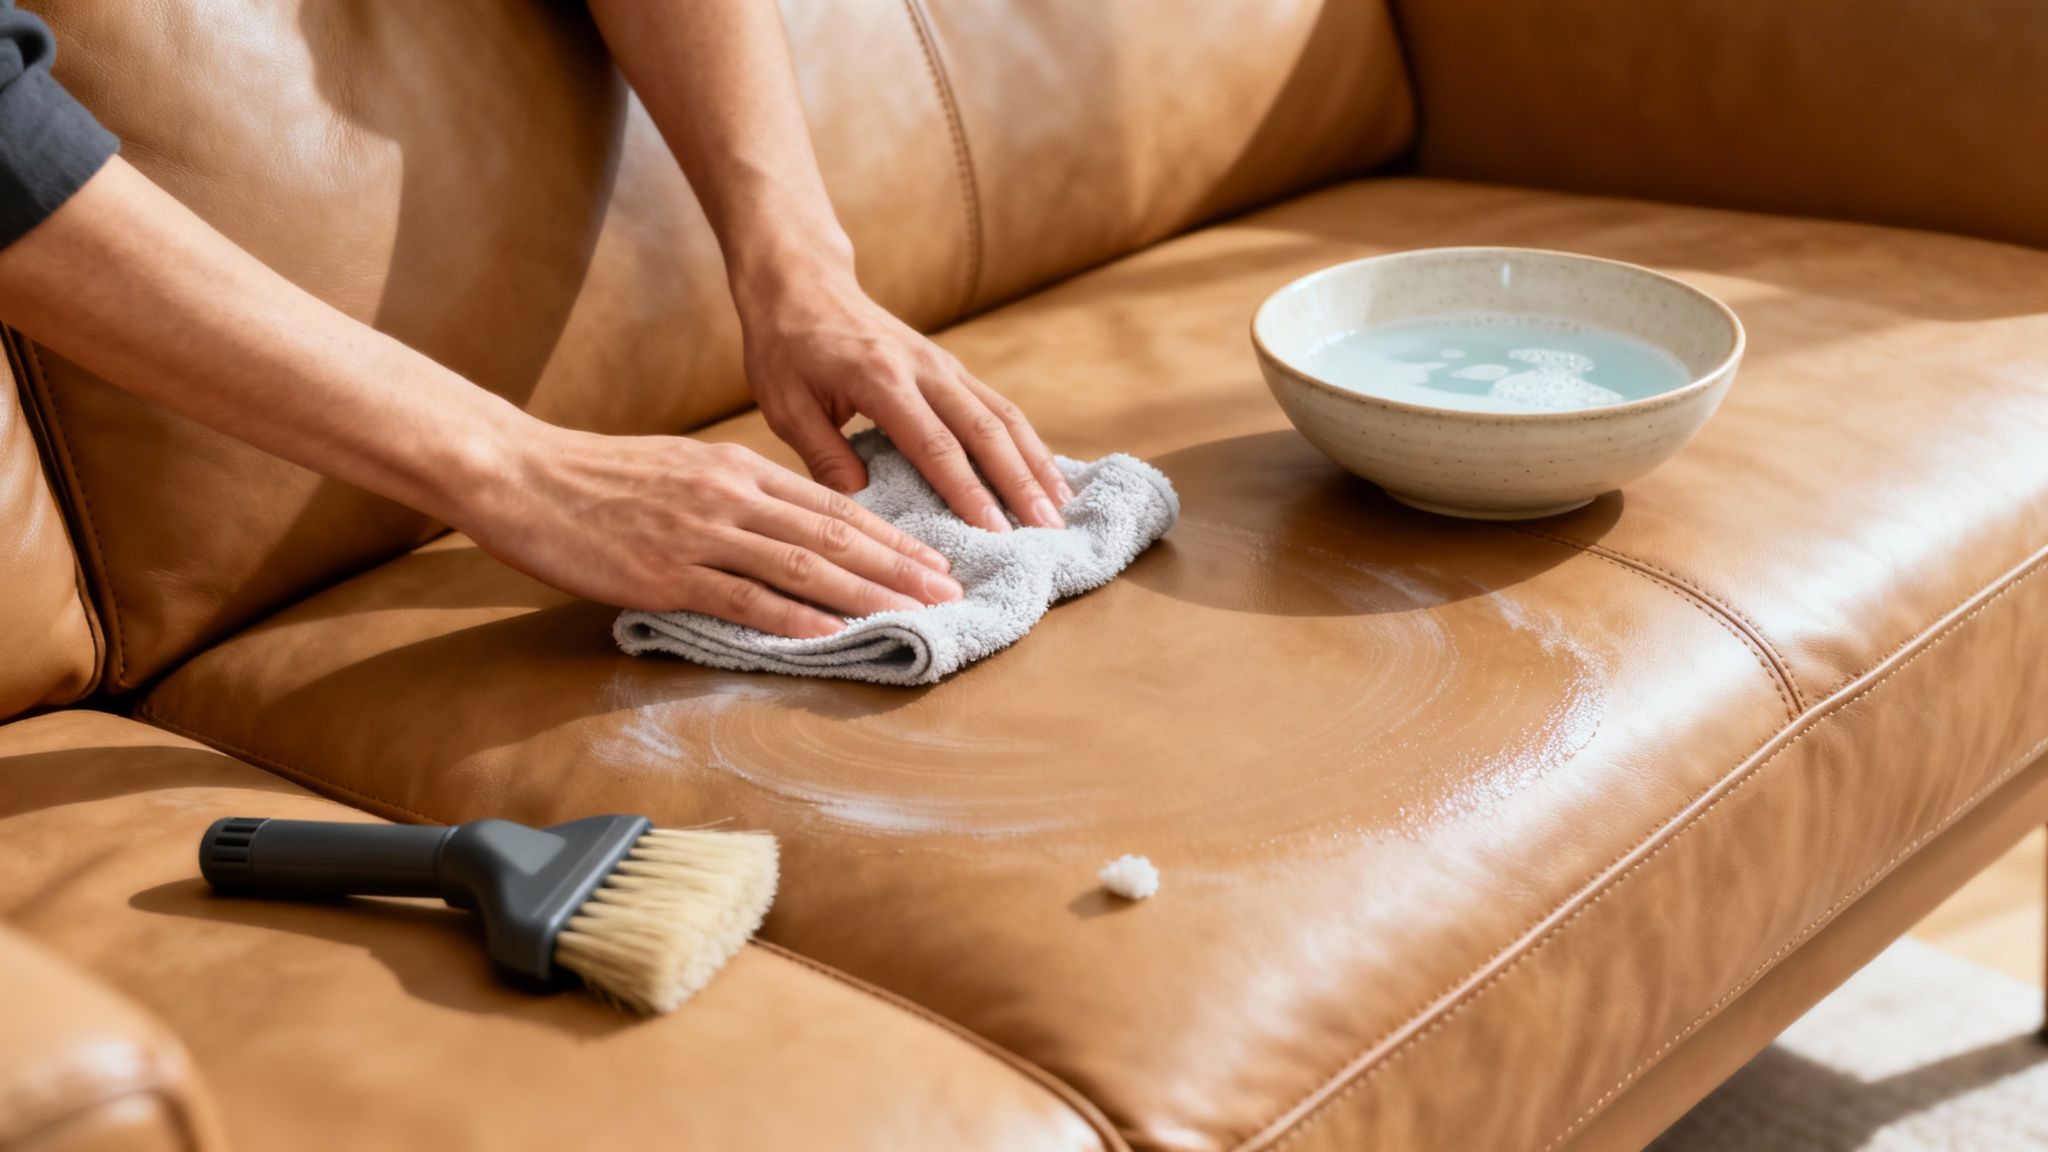
The Gentle Application Technique
Now it's time to clean. Your technique here is just as important as the solution you're using. If you just wipe haphazardly, you’ll end up with streaks and an uneven finish. A methodical approach is the secret to getting it right.
Take a clean microfibre cloth, dip it into your solution, and then wring it out until it’s almost dry. The cloth should be damp, not wet. Excess water is leather’s worst enemy; it can soak in and cause water spots or stiffness.
Start at the top of a panel and work your way down in small, manageable sections. Use light pressure and gentle, overlapping circular motions to lift the dirt out of the grain. As soon as you finish a section, grab a second, completely dry microfibre cloth and immediately wipe away any remaining moisture.
Working panel by panel like this ensures you don’t miss any spots and, more importantly, prevents the solution from drying on the surface and leaving ugly marks. It feels less overwhelming and delivers a clean, uniform finish every single time.
How to Tackle Common Stains on Leather
Even with the most diligent care, life happens. A splash of red wine, a dropped piece of pizza, or an accidental pen mark can feel like a disaster on your prized leather furniture. Before you panic, just remember: quick, correct action is your best defence against a permanent blemish.
This section is your emergency guide for dealing with the most common culprits. The key is to act fast and use the right method for the specific type of stain. Trying a one-size-fits-all approach is where most people go wrong, and it often just makes the problem worse.
Dealing with Grease and Oil Stains
There's a sinking feeling that comes with seeing a greasy mark on a beautiful leather armchair, often from food or even hair products. The first rule here is to avoid water at all costs. It will only spread the oil and potentially cause a larger, more stubborn stain.
Instead, your goal is to absorb as much of that grease as possible, as quickly as you can. Your best friend here is a dry, absorbent powder.
- Blot, Don't Rub: Immediately blot any excess oil with a clean, dry microfibre cloth to soak up what's on the surface.
- Apply Powder: Generously sprinkle cornstarch or talcum powder directly onto the stain, creating a thick layer.
- Wait Patiently: Let it sit for at least a few hours, or even overnight. The powder will slowly draw the oil out of the leather's pores.
- Brush Away: Gently brush the powder off with a soft-bristled brush.
For any faint residue that might linger, you can try a commercial leather degreaser, but always remember to do that patch test first. This absorption method is remarkably effective if you catch the stain before the oil has time to fully set.
Removing Ink and Dye Transfer
An accidental pen mark or the blue dye from new jeans rubbing off on a light-coloured sofa are two of the most common—and frustrating—stains we see in Melbourne homes. These require a more targeted approach, where precision is everything.
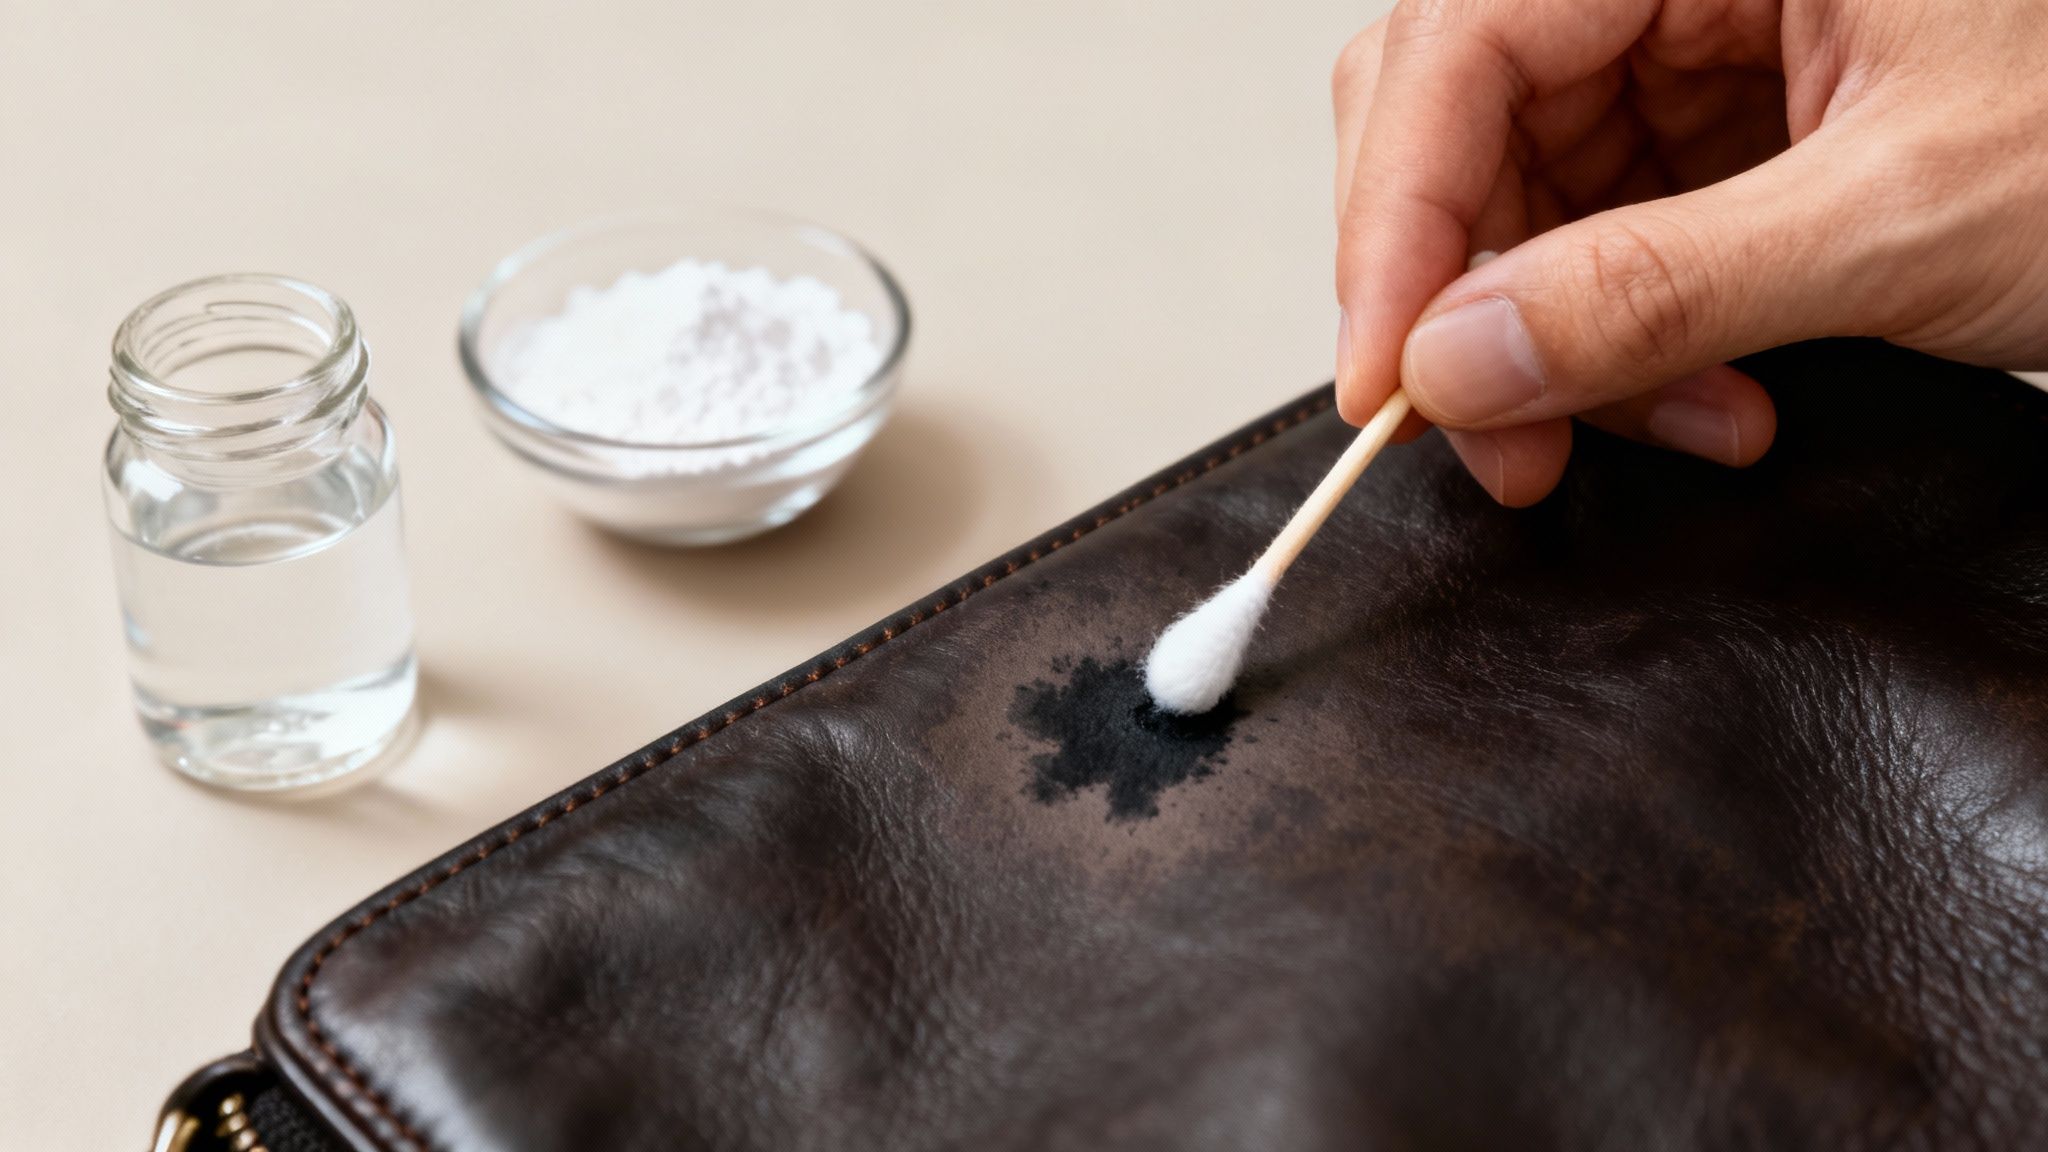
For a fresh ink stain, isopropyl alcohol (rubbing alcohol) can be your go-to, but you absolutely must use it sparingly.
- Ink Stain Method: Lightly dampen a cotton swab with rubbing alcohol. Gently dab the ink mark, working from the outside edges inward to stop it from spreading. Be sure to use a fresh part of the swab for each dab to avoid reapplying the ink you've just lifted. Never pour alcohol directly onto the leather.
Dye transfer from clothing is a bit different. It often needs a specialised cleaner formulated specifically for this issue. Your regular leather cleaner usually won't be strong enough to lift the dye pigments that have settled into the leather's topcoat.
When tackling stubborn spots like ink, the temptation is to scrub hard. This is the worst thing you can do. Aggressive rubbing can remove the leather's protective finish or even its colour, leaving you with a faded patch that's more noticeable than the original stain.
Handling Water Stains and Rings
It might seem counterintuitive, but water itself can stain leather, especially aniline or unfinished types. This usually happens when a small spill is left to dry, creating a distinct ring or dark spot. The trick to removing a watermark is often to re-wet a larger area, blending the stain away seamlessly.
Start by dampening a clean microfibre cloth with distilled water (tap water can contain minerals that leave their own deposits). Begin at the centre of the water stain and work your way outwards, gently wiping the entire panel or cushion from seam to seam. This ensures the whole section dries evenly, which eliminates the original watermark without creating new ones.
In Melbourne's design-conscious homes, dust and grime can reduce a piece's lifespan by as much as 25% if not cleaned monthly. Simple solutions like lukewarm water, sometimes with a touch of white vinegar (around a 5% solution), can be effective for up to 90% of common household stains. Following these protocols can save you up to $200 per item in professional restoration costs. For more on the local market, check out Australia's leather product manufacturing industry.
Stain Removal Cheat Sheet for Leather
Caught a stain and need a quick answer? This table is your go-to reference for tackling the most common leather mishaps with confidence.
| Stain Type | Recommended DIY Solution | Application Method | Critical Warning |
|---|---|---|---|
| Grease or Oil | Cornstarch or Talcum Powder | Blot excess oil, cover the stain with powder, let it sit for several hours, then gently brush it off. | Never use water. It will spread the grease and set the stain deeper into the leather. |
| Ink (Ballpoint) | Isopropyl (Rubbing) Alcohol | Apply a small amount to a cotton swab. Dab gently from the outside of the stain inward. | Do not pour alcohol directly on the leather. Always test in a hidden area first. |
| Dye Transfer | Specialised Dye Transfer Remover | Apply the cleaner to a cloth and gently work on the stain, following the product's instructions precisely. | General leather cleaners are often ineffective. Avoid any harsh scrubbing. |
| Water Marks | Distilled Water | Dampen a cloth and wipe the entire panel evenly from seam to seam to blend the stain as it dries. | Do not use a hairdryer to speed up drying; this can cause the leather to crack. |
Think of these tips as your first line of defence. With the right technique, many common stains can be handled before they become a permanent problem.
The Art of Drying and Conditioning Leather
Cleaning your leather is only half the battle. What you do next—drying and conditioning—is what locks in the results, restores that soft, supple feel, and protects your furniture for the long haul. Think of it like skin: after a deep clean, it needs moisture to stay healthy and flexible.
Rushing this stage is the quickest way to undo all your hard work. The biggest mistake people make is trying to speed up the drying process. Whatever you do, never reach for a hairdryer or drag your leather furniture into the direct sun. This kind of intense, direct heat is incredibly damaging. It zaps the essential oils right out of the material, leaving it brittle, stiff, and prone to cracking.
The Right Way to Dry Leather
Patience really is a virtue here. The only safe way to dry leather is with gentle, natural air circulation.
Once you’ve finished cleaning, grab a clean, bone-dry microfibre cloth and give the entire surface a gentle buff. This isn't about scrubbing; it’s just a soft wipe-down to pick up any leftover moisture. After that, simply leave the piece to air dry in a well-ventilated room, well away from heaters, fireplaces, or sunny windows.
Depending on the humidity in your home, this could take a few hours. Before you even think about conditioning, the leather must feel completely dry to the touch—no cool or damp spots anywhere.
Why Conditioning Is Non-Negotiable
With your leather clean and perfectly dry, it’s time to put back the oils you’ve just cleaned away. This is where a high-quality leather conditioner comes in, and honestly, it’s the most important step for preventing future damage. A good conditioner gets deep into the leather’s pores, restoring its flexibility while creating a protective barrier against spills and everyday wear.
Here’s what to do:
- Pick a Quality Conditioner: Go for a water-based, pH-neutral conditioner with natural ingredients. Steer clear of anything with silicones, waxes, or petroleum distillates. These can clog the leather’s pores and leave a greasy film.
- A Little Goes a Long Way: Squeeze a small, coin-sized amount onto a soft applicator pad or microfibre cloth—never apply it directly to the leather.
- Use Gentle, Circular Motions: Work the conditioner into the leather one section at a time, using soft, circular motions to apply a thin, even layer.
- Buff It to a Sheen: Let the conditioner sit and soak in for about an hour (or whatever the product label says). Then, take another clean, dry cloth and gently buff the whole surface. This removes any excess product and brings out a beautiful, natural lustre.
Did you know that Australian environmental regulations have changed how leather is treated and maintained? Finishing chemicals now account for around 40% of market spending, including polyurethane resins that provide crucial UV protection. This is vital, as the harsh Australian sun can fade leather 50% faster than in other parts of the world. By following proper care—like air drying to avoid mould and conditioning every three months—you can save an estimated 40% on future replacement costs. You can find out more about these industry standards and their environmental impact in Australia.
Knowing When to Call a Professional
Knowing how to clean your leather furniture is a fantastic skill, but sometimes a DIY approach can do more harm than good. It takes experience to recognise when you’re out of your depth, and pushing forward can turn a fixable problem into a permanent one.
Some situations just demand the specialised tools, chemicals, and know-how that only a professional service can provide. It's always better to invest in an expert than risk devaluing or completely ruining a piece of furniture you love.
Signs You Need an Expert
There are a few clear red flags that tell you it’s time to step back and pick up the phone. If you run into any of these, stop what you’re doing—continuing with home remedies is a serious gamble.
- Deep-Set Mould or Mildew: You might be able to handle a bit of surface mould, but if it has worked its way deep into the leather's pores, you need professional help. They have the right treatments to kill the spores for good without destroying the material.
- Stubborn, Unidentified Stains: If a stain doesn’t lift after your first gentle attempt, that’s your cue to stop. Aggressively scrubbing or throwing a bunch of different cleaners at it can set the stain permanently or even strip the leather's colour right off.
- Extensive Water Damage: We’re not talking about a small spill. Large-scale saturation from a flood or a major leak can cause leather to warp, shrink, and go rock-hard as it dries. Professionals use controlled drying methods to prevent this from happening.
- Delicate or Speciality Leathers: Materials like suede and nubuck are notoriously unforgiving. Their napped, velvety texture soaks up stains in an instant, and the wrong cleaning technique will absolutely ruin their unique finish.
A professional cleaner has access to an arsenal of products that just aren't available to the public. These are formulated for specific types of leather and stains, allowing for a targeted and much safer approach than the all-purpose solutions you'd find in a store.
What a Professional Service Offers
When you bring in a specialist, you’re not just paying for a cleaner; you’re paying for expertise. A trained technician starts by accurately identifying your leather type and figuring out the exact nature of the stain or damage.
From there, they might use advanced methods like controlled steam extraction for a deep-down clean or specialised solvents to tackle tough stains like paint or permanent marker. For delicate materials like suede, they use specific dry-cleaning techniques and tools designed to lift dirt without any moisture.
Their process always finishes with a professional-grade conditioning treatment. This crucial step restores the leather's natural oils and protective finish, making sure it stays soft, supple, and protected for years to come. Sometimes, making the call for help is the best way to care for your leather.
Your Leather Care Questions Answered
Even with the best guide, it's natural to have a few questions when you're looking after a big investment like a leather sofa. Getting the right answers gives you the confidence to do the job properly. Here are some of the most common things Melbourne homeowners ask me.
How Often Should I Clean and Condition My Leather?
For day-to-day upkeep, a quick dust or a gentle vacuum with a soft brush attachment once a week is perfect. This stops tiny abrasive particles from scratching the surface.
As for a proper clean with a dedicated leather product, aim for every 3 to 6 months. It really depends on how much action your furniture sees. The family sofa that everyone piles onto will need more love than a formal armchair that’s rarely used.
Conditioning is the other half of the equation. Plan to condition your leather at least twice a year, or whenever it starts feeling a little stiff or dry to the touch. This simple step puts essential moisture back into the hide, keeping it soft and supple.
Think of it like this: cleaning removes the bad stuff (dirt and grime), while conditioning adds back the good stuff (moisture and protection). Skipping one part of the process leaves the job half-done and your leather vulnerable.
Can I Use Baby Wipes or Household Cleaners on Leather?
I hear this one all the time, and the answer is a hard no. It’s a tempting shortcut, but it will cause damage down the line.
While baby wipes might seem harmless, they often contain chemicals and moisturisers that aren't designed for leather. Over time, they can strip the protective finish, leaving behind a dull, sticky film that actually attracts more dirt.
Likewise, things like all-purpose sprays, vinegar, or dish soap are far too aggressive. Their pH levels are all wrong for leather, and they'll strip out its natural oils. This leads to dryness, discolouration, and eventually, irreversible cracking. Your best bet is always to use products specifically made for leather.
Is It Possible to Repair Scratches on Leather?
For minor surface scuffs and light scratches, you can often make them much less noticeable. On many types of leather, you can just gently rub the scratch with a clean fingertip. The natural oils from your skin are sometimes enough to help the mark blend back in. Dabbing on a tiny amount of leather conditioner can also help.
Deeper gouges or cuts that have actually broken through the surface of the leather are another matter entirely. Those usually need a professional repair kit or the hands of a leather restoration specialist to fix them without making the damage look even worse.
If you're dealing with stubborn stains or deep-seated grime that DIY methods just won't shift, don't risk damaging your valuable furniture. The team at Right Price Carpet Cleaning provides specialised leather and upholstery cleaning services across Melbourne. We use professional-grade techniques to safely bring your furniture back to life. Get a quote and see how we can help.
Recent Comments