


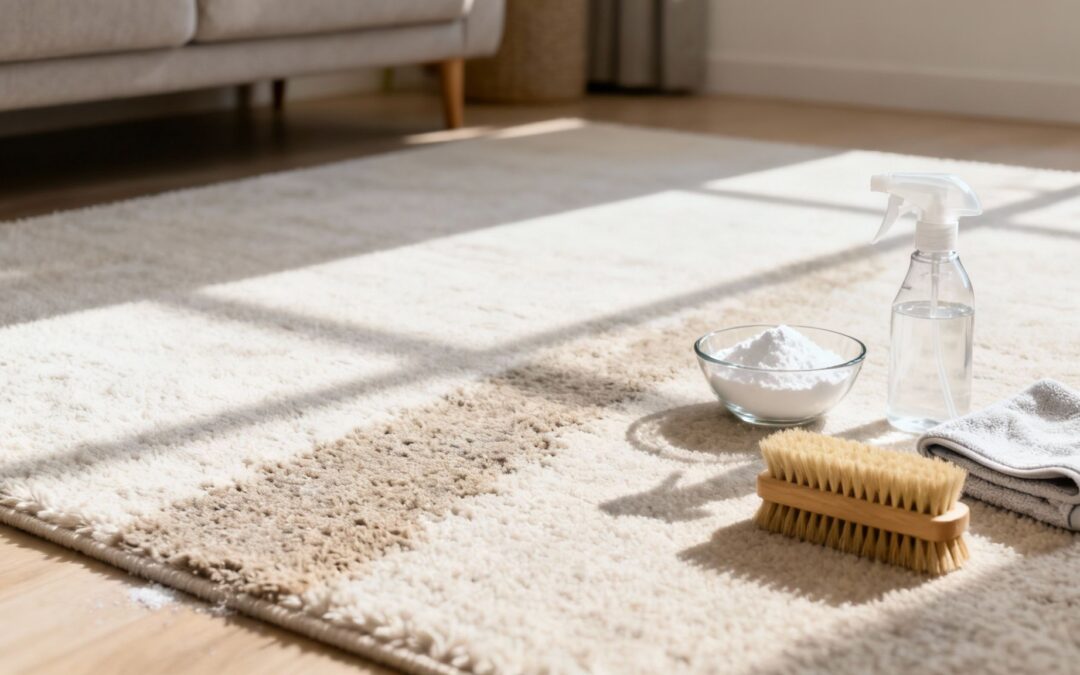
Making your own carpet shampoo is one of those simple but brilliant little hacks that can save you a bundle. With just a few common household items like white vinegar, baking soda, and a touch of dish soap, you can whip up a powerful cleaning solution that cuts through dirt, lifts stains, and neutralises odours—all for a fraction of what you'd pay for a store-bought cleaner. Plus, you get total control over what goes into your home.
Why DIY Carpet Shampoo Is a Game Changer for Your Home

Ditching commercial carpet cleaners is about so much more than just saving a few dollars; it’s about creating a home environment that's healthier and more sustainable. More and more homeowners are discovering just how practical it is to mix their own solutions, and it's completely changing how they look at floor care.
For many, the biggest motivation is knowing exactly what’s in the cleaner. When you’re mixing up a batch from pantry staples, you know precisely what's soaking into your carpet fibres. That brings a lot of peace of mind, especially in homes with young kids and pets who live their lives down on the floor.
The Clear Advantages of a DIY Approach
Opting for a homemade carpet shampoo comes with some pretty compelling perks that really appeal to modern Aussie homeowners. The biggest one? Being able to tweak your cleaning solution for your specific needs, which is something you just can't get from a one-size-fits-all commercial product.
Here are the key reasons people are making the switch:
- Significant Cost Savings: The ingredients for DIY shampoo—vinegar, bicarb soda, dish soap—are incredibly cheap and you probably already have them. A single batch often costs less than $2 to make, which is a huge difference from the $20-$40 price tag on many big-brand cleaning solutions.
- Eco-Friendly and Non-Toxic: By sidestepping harsh chemicals, you’re shrinking the environmental footprint of your cleaning routine. Natural ingredients are biodegradable and won't release nasty volatile organic compounds (VOCs) into your home's air.
- Pet and Child Safety: You can clean your carpets without worrying about toxic residues being left behind for curious pets or crawling babies to come into contact with.
For pet owners, DIY carpet shampoo is an absolute lifesaver. It helps you deal with the inevitable messes that come with pet ownership, like figuring out what causes urinary incontinence in dogs and cleaning up afterwards.
A homemade solution allows for immediate, safe, and effective cleanup of pet accidents without worrying about harsh chemicals harming your furry family members. This control makes managing a clean home with pets far less stressful.
Addressing Common Carpet Challenges
Beyond a general refresh, a DIY approach gives you the tools to handle the specific issues your carpets face every day. Think high-traffic hallways, surprise spills, and the slow buildup of allergens. A homemade carpet shampoo can directly tackle these common problems with targeted, gentle, yet surprisingly powerful ingredients you can trust.
Getting to Know Your DIY Cleaning Toolkit

Before you start mixing up your first batch of homemade carpet shampoo, it’s worth taking a moment to understand why these simple pantry items work so well. Each ingredient has a specific job, turning everyday kitchen staples into a surprisingly effective cleaning arsenal.
There's no magic here, just a bit of basic chemistry. By combining the right ingredients, you create a balanced solution that can break down dirt, dissolve grime, and neutralise odours, all without resorting to harsh commercial chemicals. Knowing what each component does helps you clean with confidence.
The Power Players in Your Pantry
Think of these common household items as your go-to cleaning crew. Each one brings a unique skill to the table, from lifting stubborn dirt to tackling the lingering smells left by pets or unfortunate spills.
White Vinegar (Acetic Acid): This is your natural grime-cutter and deodoriser. The mild acidity in vinegar is brilliant for dissolving sticky residues that trap dirt deep in carpet fibres. It's also fantastic at neutralising alkaline odours like pet urine.
Baking Soda (Bicarb Soda): A true champion of deodorising. Bicarb soda is a mild abrasive that excels at absorbing nasty smells. You can sprinkle it dry over carpets to soak up odours before vacuuming, or use it in a wet solution to help gently scrub dirt from the pile.
Mild Dish Soap: A little of this goes a very long way. Dish soap acts as a surfactant, which is a fancy way of saying it helps water penetrate greasy or oily stains instead of just sliding over them. It's the key to lifting out those stubborn, greasy spots.
Hydrogen Peroxide (3% Solution): When you're up against tough organic stains—think coffee, red wine, or pet accidents—hydrogen peroxide is an incredible ally. It works by oxidising the stain, breaking down its chemical bonds and lifting the colour out. But be warned: always patch-test this one, as it can have a mild bleaching effect on some carpets.
To help you get a quick handle on what to use and when, here’s a simple breakdown of the most common ingredients you'll find in DIY recipes.
Common DIY Carpet Shampoo Ingredients and Their Purpose
| Ingredient | Primary Function | Best For | Cautionary Note |
|---|---|---|---|
| White Vinegar | Deodoriser, Stain Dissolver | Neutralising pet odours, breaking down sticky grime | Can be too harsh for some delicate natural fibres. |
| Baking Soda | Deodoriser, Mild Abrasive | Absorbing odours, general freshening | Can leave a chalky residue if not rinsed thoroughly. |
| Mild Dish Soap | Surfactant (Grease Cutter) | Oily or greasy food stains, high-traffic areas | Use sparingly; too much creates excess suds. |
| Hydrogen Peroxide (3%) | Oxidising Agent (Stain Lifter) | Organic stains like wine, coffee, blood, pet messes | Must be spot-tested as it can lighten fabric colours. |
| Warm Water | Solvent | The base for dissolving and activating other ingredients | Avoid hot water, which can set protein stains like blood. |
This table should give you the confidence to not only follow a recipe but also understand how it’s working its magic on your floors.
Ingredients to Absolutely Avoid
Knowing what not to use is just as crucial as knowing what works. Some common household cleaners can cause irreversible damage, from completely stripping the colour to dissolving the carpet fibres themselves.
Using the wrong chemical on your carpet isn't just a cleaning mistake; it can be an expensive disaster. Bleach, for example, can permanently strip the colour from your carpet, leaving you with a faded patch that's impossible to fix.
Here’s what you need to keep far away from your carpets:
- Bleach: An absolute no-go. It will permanently remove the colour from most carpets and can seriously weaken synthetic fibres.
- Ammonia: While it's a powerful cleaner, ammonia can discolour wool and is particularly damaging to other natural fibres.
- Highly Scented Dish Soaps: Steer clear of any soaps with added lotions or moisturisers. They leave behind a sticky residue that will attract even more dirt. Stick to a basic, clear dish soap.
- Too Much Soap: This is a classic mistake. Using more dish soap than a recipe calls for creates a mountain of suds that are a nightmare to rinse out. It will leave your carpet feeling stiff, sticky, and dirtier than when you started.
Getting a handle on these simple do's and don'ts is the first real step toward creating a homemade carpet shampoo that’s both safe and powerful. It puts you in control, so you can get a deep, satisfying clean without risking your flooring.
Three Tried-and-True Homemade Carpet Shampoo Recipes
Now that you know the surprising cleaning power hiding in your pantry, it's time to get mixing. We've personally tested these three homemade carpet shampoo recipes, each one tweaked to handle a specific cleaning headache. Forget the one-size-fits-all approach; the right solution really depends on what you're up against.
Whether you're bringing a tired hallway back to life, dealing with a pet's little "oops," or gently cleaning a delicate wool heirloom, one of these formulas will be your new best friend. Each recipe uses precise measurements for a balanced, effective cleaner. We’ll also break down the simple science behind why each combo works so well, so you can clean with confidence.
Recipe 1: The All-Purpose Power Cleaner
This is your workhorse. It's the perfect solution for general, whole-room cleaning and for revitalising those high-traffic areas that take a daily beating. Think hallways, the path from the kitchen to the living room, and that spot right in front of the sofa. It’s designed to be used in a carpet cleaning machine to lift out the everyday grime that makes carpets look dull.
This formula is a powerhouse because it combines the grease-cutting muscle of dish soap with the gentle stain-lifting ability of hydrogen peroxide. It's a simple, effective mix that your machine can easily handle.
Ingredients You Will Need
- 3.75 litres of Warm Water: This is the base that carries all the active ingredients deep into the carpet fibres.
- ¼ cup of 3% Hydrogen Peroxide: A fantastic, gentle alternative to bleach. It lifts organic stains and brightens fibres without harsh chemicals.
- 2 Tablespoons of White Vinegar: This is your secret weapon for neutralising odours and dissolving that sticky, dirt-trapping residue.
- 1 Tablespoon of Clear, Mild Dish Soap: Absolutely essential for breaking down oils and grime. Don't be tempted to add more! Too much soap will create a suds explosion in your machine and leave a sticky film behind.
Putting it together is easy. Pour the warm water into a large, clean jug, but leave a little room at the top. Add the hydrogen peroxide, white vinegar, and dish soap. Gently swirl the jug to combine everything—avoid shaking it like a cocktail, or you'll have a foamy mess before you even start. This batch is now ready to pour straight into your carpet cleaner's solution tank.
Recipe 2: The Pet Stain and Odour Eliminator
When a pet has an accident, you're fighting two battles: the visible stain and that awful, lingering smell. This two-step method is specifically designed to knock out both. It uses that classic, fizzing reaction between baking soda and vinegar to powerfully lift stains and neutralise the uric acid that causes those persistent odours.
This is strictly a spot-treatment method. Don't even think about putting this mixture in a machine—the fizzing reaction can damage it.
What You'll Need for the Job
- Baking Soda (Bicarb Soda): A natural absorbent that soaks up moisture and odours.
- A Spray Bottle: For applying the vinegar solution evenly.
- White Vinegar: The acid that reacts with the bicarb to tackle the stain.
- Warm Water: To dilute the vinegar slightly.
- An Old Towel and a Vacuum Cleaner: For the final cleanup.
First things first, blot the spot like crazy with a dry cloth. You want to absorb as much of the liquid as you can right away. Next, sprinkle a generous layer of baking soda directly over the entire stain. Don't be shy with it! Let it sit for at least 15-20 minutes; you're giving it time to pull the moisture and odours out of the fibres.
While that's working, mix a 50/50 solution of white vinegar and warm water in your spray bottle. Spray this directly onto the baking soda. You’ll see it fizz and bubble up, which is exactly what you want. That reaction is actively lifting the stain and neutralising the smell. Let it do its thing for another 10-15 minutes.
Finally, grab an old towel and blot the area firmly to soak up as much moisture as possible. The spot will need to dry completely, which could take a few hours. Once it's bone dry, vacuum thoroughly to suck up all the dried baking soda. You'll be left with a stain-free, smell-free patch of carpet.
Guides from local Brisbane cleaners suggest that methods like this can lift up to 80% of common stains, and it's a safe bet in the 42% of Victorian homes with pets. While the bicarb-vinegar fizz is great for short-term odour control, sometimes only a professional can guarantee a deep clean. You can learn more about these stats and tips on how to make your own effective carpet cleaners.
Recipe 3: Gentle Solution for Wool and Natural Fibres
Wool, silk, and other natural fibre rugs demand a much gentler approach. Harsh chemicals, and even strong acidic solutions like straight vinegar, can seriously damage these delicate fibres, leading to discolouration or weakening their structure. This pH-neutral recipe is formulated to clean effectively without causing any harm.
It relies on a tiny amount of a wool-safe soap and cool water, skipping the aggressive ingredients found in the other recipes.
When cleaning wool, the golden rule is always "less is more." The goal is simply to lift surface dirt without soaking the fibres or stripping their natural lanolin.
A Safe Mix for Delicate Rugs
- 4 Litres of Cool Water: Never use hot water on wool! It can cause the fibres to shrink or felt. Cool or lukewarm is the only way to go.
- 1 Teaspoon of a pH-Neutral, Clear Dish Soap: Look for a soap that’s labelled "gentle" or "for sensitive skin." Crucially, it must not contain any dyes, fragrances, or lotions.
Combine the cool water and that tiny drop of soap in a bucket. Gently stir to dissolve the soap without making a mountain of foam. This solution is for hand-cleaning only—keep it far away from your carpet machine.
Grab a clean white cloth, dip it into the solution, and wring it out until it’s just damp, not dripping wet. Gently blot the soiled area of the rug, working from the outside of the stain inwards to stop it from spreading. Resist the urge to scrub; you'll just fray the delicate wool fibres.
Once the spot looks clean, use a separate cloth dampened with plain cool water to blot the area and "rinse" away any soap residue. To finish, blot with a dry towel and let the rug air dry completely, away from any direct heat or sunlight. This careful method ensures your precious rug stays clean and undamaged.
How to Apply Your Homemade Shampoo Like a Pro
Having the perfect homemade carpet shampoo recipe is one thing, but how you use it is what separates a fresh, clean result from a DIY disaster. The right technique is everything. It ensures you’re lifting dirt effectively without leaving behind that sticky film that just seems to attract more grime.
This is your guide to getting it right. We'll walk through the essential prep work, how to correctly use a carpet cleaning machine, and some solid tips for hand-cleaning. More importantly, we'll focus on the one step people always rush—rinsing and extraction—which is the real secret to keeping your carpets looking better, for longer.
This visual guide breaks down our three key homemade carpet shampoo formulas and what they're best used for.

As you can see, each formula is tailored for a specific job, from the general-purpose cleaner for high-traffic zones to specialised solutions for pet messes and delicate wool fibres.
Essential Prep Work Before You Start
Jumping straight into shampooing is a classic mistake. If you don't prep properly, you're just turning dry dirt into mud and grinding it deeper into the carpet fibres. A quick ten minutes of prep work will make a world of difference to your final result.
First up, give the carpet a really thorough vacuum. Go over the area slowly from a few different directions to pull up as much loose dirt, pet hair, and dust as you can. This stops your cleaning solution from getting bogged down and allows it to get to work on the properly embedded grime.
Next is the one step you absolutely cannot skip: the patch test. Find a hidden spot—under the sofa, inside a wardrobe, or in a forgotten corner—and dab on a small amount of your homemade solution. Let it sit for about 15 minutes, then blot it firmly with a clean white cloth. You're checking for any colour bleeding or damage to the fibres. It’s a simple check that can save you from an expensive, irreversible mistake.
Using a Carpet Cleaning Machine
For a deep, even clean across an entire room, you just can't beat a carpet cleaning machine. These things are designed to inject the cleaning solution deep into the fibres and then powerfully suck all the dirty water back out, which is the key to a professional, residue-free finish.
Here's how to get the most out of your machine:
- Fill the Tank Correctly: Pour your freshly mixed homemade shampoo straight into the machine's solution tank. Don't overfill it, and definitely don't add extra soap. Stick to the recipe's measurements to avoid turning your living room into a foam party.
- Work in Sections: Start in the corner farthest from the door so you don't have to walk over your clean carpet. Tackle the room in small, manageable sections, like a one-metre square, and overlap each pass slightly to get consistent coverage.
- Go Slow and Steady: Resist the urge to race through it. Make a slow forward pass while pressing the trigger to release the solution. Then, pull back slowly over the same strip without pressing the trigger to suck up the dirty water. I always recommend doing a second "dry" pass to pull up even more moisture.
The most common DIY mistake is over-wetting the carpet. More solution doesn't mean a better clean. It just means a ridiculously long drying time and a higher risk of mould, mildew, and that dreaded sticky residue. Trust the machine's suction to do the heavy lifting.
Effective Hand-Cleaning Techniques
No machine? No worries. You can still get an excellent clean on smaller areas or entire rugs with a bit of elbow grease. The principles are exactly the same—clean and rinse—it's just a more manual process.
For hand-cleaning, grab two buckets: one for your cleaning solution and another with plain, clean water for rinsing. You'll also need a soft-bristled brush and a stack of clean, absorbent cloths.
Dip your brush into the homemade shampoo solution and gently scrub a small section of the carpet using circular motions. Don't go crazy and soak the carpet backing. Once you've scrubbed an area, dip a clean cloth into the rinse water, wring it out really well, and blot the spot to "rinse" away the soap. Finish by pressing a dry cloth firmly onto the area to absorb as much moisture as possible.
This two-bucket method is absolutely vital for preventing that rapid re-soiling effect. Here in Australia, where 72% of homes in cities like Melbourne have wall-to-wall carpets, sticky residue from poor rinsing is a massive issue. In fact, some reports show that 50% of DIYers complain their carpets get dirty again within just four weeks, and this is almost always the reason. For a deeper look at what the pros do, you can discover more about effective carpet cleaning techniques.
Troubleshooting Common DIY Carpet Cleaning Issues
Even when you follow a recipe to the letter, things don't always go to plan. Don't panic—most of the common hiccups with DIY carpet cleaning are surprisingly easy to fix. This isn't about getting it perfect on your first try; it's about knowing how to course-correct when something goes wrong.
From a carpet that just won’t dry to stains that seem to have a life of their own, a few common problems can pop up. Knowing how to handle them turns a potential cleaning disaster into a valuable learning experience, giving you the confidence to get it right next time.
Why Is My Carpet Still Damp?
One of the most frequent worries is a carpet that takes forever to dry. If your carpet feels soggy hours after you've finished, you've probably just used a bit too much water. This not only drags out the drying time but can lead to musty smells or even mildew if it’s left to sit.
The first thing to do is get the air moving.
- Open up all the windows and doors to create a good cross-breeze.
- Grab any fans you have and point them directly at the damp patches.
- If you own a dehumidifier, now is its time to shine. It will pull all that extra moisture right out of the air.
For next time, remember that a light touch is your best friend. When you do your final pass with the cleaning machine, do an extra 'dry' run without releasing any solution. This pass is just for suction, and it’s brilliant for pulling up as much excess water as possible.
The Mystery of Reappearing Stains
Have you ever cleaned a stain perfectly, only to have it magically reappear a day or two later? It’s incredibly frustrating, and it has a name: wicking. The stain you cleaned from the surface was likely just the tip of the iceberg, with the real source of the grime sitting deep in the carpet fibres and backing.
As the top of the carpet dries, moisture from below wicks its way up to the surface, bringing all that hidden dirt and grime back up with it.
To beat wicking, grab a thick, clean, white towel and place it over the damp spot. Weigh it down with something heavy, like a stack of books. The towel will act like a sponge, drawing the stain up and out of the carpet fibres as the area dries.
If you're tackling particularly tough spots on other household fabrics, you might find some useful tips in this practical guide to stain removal from upholstery, as many of the techniques can be adapted for carpets.
Fixing a Sticky or Stiff Carpet
If your carpet feels stiff, crunchy, or even a little bit sticky after it's dried, the culprit is almost always soap residue. Using too much dish soap in your homemade solution is a classic mistake. That leftover film becomes a magnet for new dirt, making your carpet look grubby again in no time.
The fix is simple: just rinse the area again. This time, use only plain warm water in your machine, or a clean, damp cloth if you're cleaning by hand. This will help dissolve and lift that excess soap. For our recipes, remember that one tablespoon of soap is plenty.
While DIY solutions are great, professional cleaners often warn that incomplete rinsing is a common pitfall. The sticky residue it leaves behind can make carpets look dirty again within weeks. For a truly deep, residue-free clean, a professional service can deliver a healthier finish and might even save you from replacing a carpet down the line.
When Is It Time to Call a Professional Cleaner?
A good homemade carpet shampoo is a brilliant tool to have in your cleaning arsenal. It’s perfect for routine upkeep and lets you jump on minor spills the moment they happen, keeping your floors looking fresh. But even the best DIY solution has its limits. Knowing when to put down the spray bottle and call in a professional is crucial for protecting your carpet investment.
Pushing a homemade solution too far can sometimes lead to permanent damage. Certain situations are just too risky for a DIY approach, and the potential for disaster far outweighs the few dollars you might save. Think about that delicate antique rug or a valuable silk runner—these require a specialised touch and an understanding of fibre types and pH-balanced solutions that only the pros are trained to handle.
When DIY Just Won’t Cut It
Some cleaning jobs are simply best left to experts with industrial-grade equipment and years of experience. If you find yourself facing any of the scenarios below, your smartest move is to pick up the phone.
These situations include:
- Widespread Water Damage: After a leak or a minor flood, you're fighting against time. Professionals use powerful extraction and drying equipment to stop mould and mildew from taking root deep within your carpet and underlay.
- Large, Set-In Stains: Big spills from things like red wine, ink, or coffee that have had time to settle in are a different beast altogether. They require potent, targeted treatments that go well beyond what vinegar and bicarb soda can manage.
- Delicate or Antique Rugs: Natural fibres like wool, silk, or jute are incredibly sensitive. The wrong pH level or too much moisture can cause irreversible discolouration or fibre damage. It’s just not worth the risk.
The Professional Advantage for a Truly Deep Clean
Beyond emergencies, there’s the simple fact of a deep, restorative clean. While your homemade shampoo is fantastic for surface-level grime, it's no match for the power of a professional truck-mounted steam cleaner. These machines generate incredible heat and suction that household machines just can't replicate.
Professional equipment is designed to flush out and extract deep-set allergens, dust mites, and bacteria that have settled right at the base of your carpet fibres. This process significantly improves your home's indoor air quality in a way surface cleaning simply cannot.
This is especially important for households with allergy sufferers, young children, or pets. An annual professional clean doesn't replace your regular maintenance; it works with it, tackling the deep-down grime your DIY efforts can’t reach.
Got Questions About DIY Carpet Shampoo? We’ve Got Answers
To wrap things up, here are some quick answers to the questions I hear most often about homemade carpet shampoo. These are the little details that will give you peace of mind and help you get the best possible results.
How Often Should I Be Deep Cleaning My Carpets?
For a typical home, pulling out the machine for a deep clean every 12 to 18 months is a good rule of thumb.
But if you've got pets, kids, or anyone with allergies, you'll probably want to do it more often. Stepping it up to every six months can make a huge difference in cutting down on dirt, dander, and allergens. Don't forget that high-traffic spots like hallways might need a bit of extra attention in between full cleans.
Can I Make a Big Batch and Store It for Later?
I really recommend making a fresh batch every time you clean. The simple reason is that the active ingredients, like hydrogen peroxide, start to lose their punch once they're mixed and exposed to air.
Unlike store-bought formulas, these recipes don’t have preservatives, so they won't stay stable. Mixing just what you need for the job ensures you’re cleaning with maximum power every single time.
Is Vinegar Going to Wreck My Carpet?
This is a great question. For most synthetic carpets out there—think nylon or polyester—a properly diluted vinegar solution is perfectly safe and works wonders as a cleaning agent. The caution comes in with natural fibres.
On wool, silk, or other delicate natural-fibre rugs, vinegar’s acidity can be a real problem, potentially causing permanent damage or discolouration. Always reach for a pH-neutral cleaner for these materials and never, ever skip the patch test.
Could a DIY Shampoo Void My Carpet Warranty?
Yes, it absolutely could, and it's something you need to take seriously. Many carpet manufacturers are very specific about what products are approved for use on their carpets, and using a homemade solution often falls outside those guidelines.
Ingredients like vinegar could be flagged as too harsh, potentially voiding your warranty if something goes wrong. Before you mix up any DIY solution, take a few minutes to check the fine print from your carpet's manufacturer.
When you need a guaranteed deep clean that protects your investment and keeps your warranty intact, it's time to call in the pros. Right Price Carpet Cleaning uses powerful, truck-mounted steam cleaning to deliver results that DIY solutions just can't touch. Get your instant online quote today!
Recent Comments