


What’s the best way to clean grout? The answer really depends on what you’re up against. For that light, everyday grime that builds up over time, a simple paste of baking soda and hydrogen peroxide is a fantastic, safe starting point. But for deep-set stains and stubborn mould, you'll need to bring out the bigger guns, like oxygenated bleach or even professional steam cleaning to get lasting results.
Why Finding the Right Grout Cleaning Method Matters
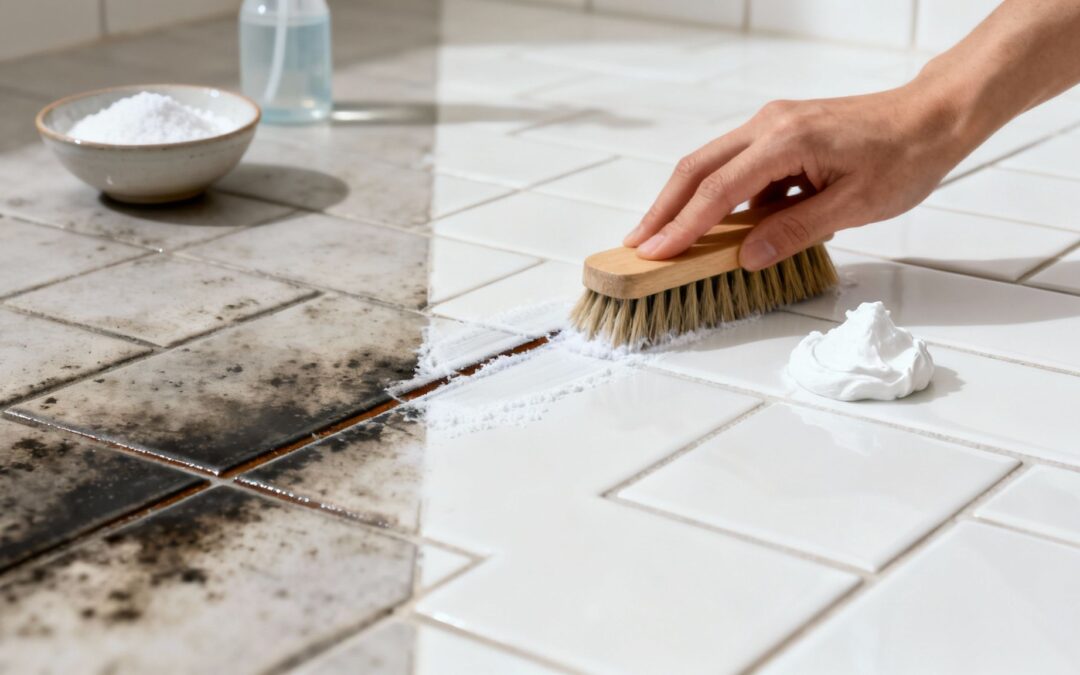
Dirty grout lines can make even the most beautiful tiles look tired and grubby. They’re like magnets for dirt, soap scum, and moisture, slowly turning those crisp, clean lines into a discouraging shade of grey or brown.
This isn’t just about looks, either. Because grout is porous, it can become a breeding ground for bacteria and mould. This is a real issue for your home's air quality, especially in damp spots like bathrooms, laundries, and kitchens.
Finding the best way to clean your grout is about more than just grabbing a random cleaner and scrubbing away. The internet is full of conflicting advice, from harsh chemical mixes to gentle pantry remedies. Picking the wrong one can be a waste of time at best. At worst, you could cause permanent damage.
The Risk of a One-Size-Fits-All Approach
Here’s a classic example: using an acidic cleaner like vinegar on unsealed cement grout. It might seem to work at first, but over time it can actually eat away at the grout, weakening its structure. On the flip side, using a harsh, bleach-based product on coloured grout can strip the pigment right out, leaving you with a patchy, uneven mess. The goal here is to restore your grout, not ruin it.
This guide cuts through the noise. We’ll walk you through how to:
- Figure out the problem: Are you dealing with surface dirt, a deep stain, or something more sinister like mould?
- Pick the right tools: Know when a simple brush is enough and when it’s time for something with a bit more power.
- Choose safe and effective cleaners: Learn the difference between a DIY paste and specialised commercial products that get the job done right.
By matching your cleaning approach to your specific tile and grout, you don’t just get a brilliant clean—you protect your surfaces for years to come. This targeted strategy is the secret to taking your tiled areas from grimy to gleaming without causing any accidental harm. Let's get into the methods the pros use for a truly restorative clean.
Before You Start: What Kind of Grout Are You Cleaning?
Jumping straight into cleaning without knowing your surfaces is a recipe for disaster. I’ve seen it happen: using the wrong product can etch beautiful natural stone, discolour vibrant tiles, or even eat away at the grout itself. Before you grab a single brush, a quick assessment is the single most important step.
Think of it like this: you wouldn't use a harsh degreaser on a silk shirt. The same principle applies here. Different tile materials have vastly different needs.
- Ceramic and Porcelain Tiles: These are the tough workhorses of the tile world. Generally non-porous and durable, they can handle a wider variety of cleaners without much fuss.
- Natural Stone Tiles: Materials like marble, slate, travertine, or limestone are porous and much more sensitive. Acidic cleaners—even natural ones like vinegar or lemon juice—can cause permanent etching and dull the finish. Stick to pH-neutral cleaners specifically designed for stone.
Your grout type also dictates your approach. Sanded grout is common for wider joints, while unsanded is used for thinner lines to avoid scratching delicate tile. Epoxy grout is a premium, non-porous option that resists stains beautifully but is less common in older homes.
Identifying Your Grout Situation
Once you know your tile, you need to get a read on your grout's condition. Is it sealed? Is it just dirty, or is there something more lurking beneath? A few simple checks will give you the answers you need.
A quick way to tell if your grout is sealed is the water drop test. Just place a few drops of water onto a grout line in a hidden spot.
If the water beads up on the surface, your sealer is doing its job. But if it soaks in and darkens the grout within a few minutes, it’s either unsealed or the sealant has worn away. Unsealed grout is like a sponge, soaking up dirt and moisture, which makes it much harder to clean.
Next, diagnose the problem. Are you dealing with:
- Surface Grime: This is just a light layer of dirt and dust, common in high-traffic areas like entryways.
- Deep-Set Stains: Often found in kitchens and bathrooms from things like coffee spills, wine, or soap scum buildup.
- Mould or Mildew: This usually shows up as black, green, or pink spots in damp, poorly ventilated areas like showers.
Quick Grout Diagnosis Guide
To make it even easier, here’s a quick table to help you identify the issue and decide on the best starting point.
| Symptom | Likely Cause | Recommended First Action |
|---|---|---|
| Dull, greyish appearance in high-traffic areas | Everyday dirt and foot traffic | A gentle scrub with warm water and a pH-neutral cleaner. |
| Dark, localised spots in the kitchen | Food or drink spills (e.g., coffee, wine, oil) | A targeted paste of baking soda and water. |
| Black or green spots in shower corners | Mould and mildew from excess moisture | An oxygen bleach solution or a dedicated mould remover. |
| Pink or orange slime on shower grout | Serratia marcescens (a common airborne bacteria) | A scrub with a vinegar-water solution, followed by thorough drying. |
| Grout looks clean but darkens when wet | Worn or non-existent sealant | Clean thoroughly first, then apply a quality grout sealer once completely dry. |
This table should give you a clear, actionable path forward based on what you’re seeing on your floors or walls.
This decision tree offers a great visual guide to help you figure out if your grout issue is a simple DIY job or something that needs a more powerful solution.
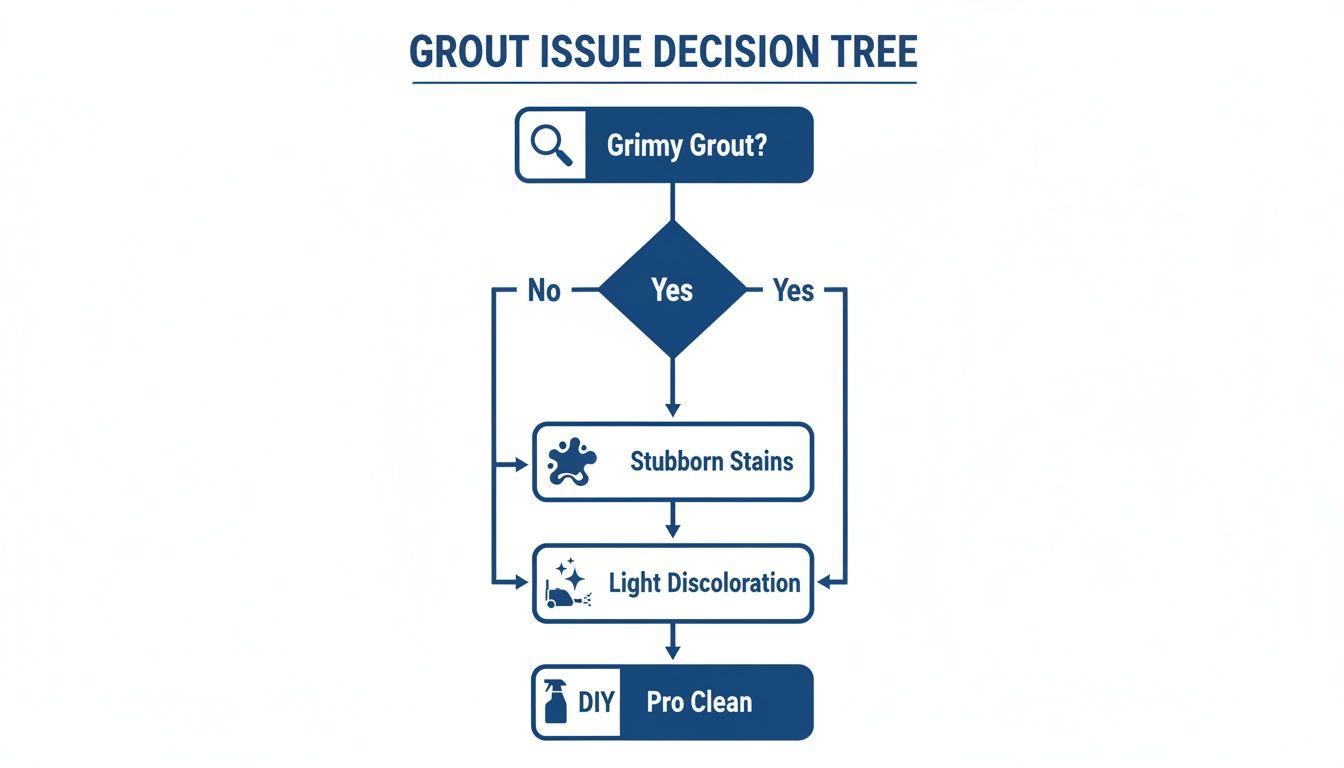
As the flowchart shows, while light discolouration can often be handled with household methods, stubborn stains might mean it’s time to call in a professional to avoid causing damage with overly aggressive scrubbing.
Key Takeaway: Never assume all tiles and grout are the same. A five-minute inspection of your materials and the type of grime you're facing is the difference between a successful clean and an expensive repair job. This initial assessment ensures you choose a safe and effective strategy from the very start.
Your DIY Grout Cleaning Arsenal
For most grout problems, you don’t need a lorry full of industrial chemicals. The best way to clean grout often starts with simple, effective ingredients you probably already have in your pantry, or with one carefully chosen product from the shops.
Let's put together your go-to kit for tackling everything from light discolouration to the kind of grime that’s been there for years.
But before you apply a single drop of anything, remember the golden rule: always patch test. Find a hidden spot—behind the door, under the washing machine, or in a far corner—and test your cleaner. Wait the recommended time, rinse it off, and let it dry completely. You need to be sure it won't bleach your grout or damage your tiles. This simple five-minute step can save you from a massive headache down the track.
The Gentle Powerhouse: Baking Soda and Hydrogen Peroxide
For general brightening and lifting everyday stains, a homemade paste of baking soda and hydrogen peroxide is a fantastic starting point. It’s a brilliant combination because the baking soda acts as a mild abrasive while the peroxide is a gentle bleaching agent, lifting dirt without the harshness of chlorine bleach.
To make it, just mix baking soda with enough hydrogen peroxide to form a thick, spreadable paste. Think toothpaste consistency.
- Application: Grab a grout brush or an old toothbrush and work the paste directly into the grout lines.
- Dwell Time: Let it sit and fizz for about 10-15 minutes. This is when the magic happens, as the chemical reaction actively breaks down the grime.
- Scrub and Rinse: Give the lines a good scrub with your brush, then rinse the whole area thoroughly with warm water.
This method works especially well for standard ceramic and porcelain tiles. Because it's alkaline, it's generally safe, but you should still be cautious if you have sensitive or unsealed surfaces.
Navigating the Vinegar Debate
Vinegar gets a lot of praise as a natural cleaning hero, but when it comes to grout, it’s a tool you need to use with extreme caution. As an acid, vinegar is great at dissolving soap scum and hard water deposits. The problem is, that same acidic power can also eat away at cement-based grout over time, weakening it and making it even more porous.
Crucial Warning: Never, ever use vinegar on unsealed grout or anywhere near natural stone tiles like marble, travertine, or limestone. The acid will cause permanent etching and dull the stone's finish. It's a costly mistake you can't undo.
If you’re certain you have sealed grout on ceramic or porcelain tiles and are battling stubborn hard water stains, a diluted solution of one part white vinegar to one part water can be used sparingly. Spray it on, let it sit for no more than a few minutes, scrub, and then rinse immediately and thoroughly.
Stepping Up to Tougher Stains
When your homemade solutions just aren't cutting it, it’s time to bring in something with a bit more muscle. This is where you'll choose between oxygenated bleach powders and specialised commercial cleaners.
Oxygenated Bleach Powders
Products based on sodium percarbonate (the active ingredient in popular "Oxi" cleaners) are a brilliant alternative to harsh chlorine bleach. When you mix them with water, they release oxygen bubbles that aggressively break down stains and kill mould, all without the toxic fumes or the risk of bleaching your coloured grout.
They are fantastic for deep-set organic stains from things like coffee, tea, or mould. Just mix the powder with water according to the directions, apply it to the grout, and let it sit for up to an hour before scrubbing and rinsing.
Specialised pH-Neutral Cleaners
For the safest possible approach, especially if you're unsure about your tile or grout type, a dedicated pH-neutral grout cleaner is your best bet. These formulas are engineered to dissolve dirt and grime without relying on harsh acids or alkalis that could damage sensitive surfaces.
While they might take a bit more elbow grease than a more aggressive chemical, their biggest advantage is safety. They are the absolute go-to choice for cleaning grout around natural stone and a rock-solid option for any situation where you want zero risk of damage.
Here's a quick comparison to help you decide which is the best way to clean grout for your specific situation.
| Cleaner Type | Best For | Pros | Cons |
|---|---|---|---|
| Baking Soda & Peroxide | General brightening, light grime | Gentle, inexpensive, readily available | May not be strong enough for deep stains |
| Diluted Vinegar Solution | Hard water stains (on sealed grout only) | Effective on mineral deposits | Highly damaging to unsealed grout & natural stone |
| Oxygenated Bleach | Organic stains, mould, mildew | Powerful, colour-safe, less harsh than chlorine bleach | Requires longer dwell time, can be messy |
| pH-Neutral Cleaner | All tile types, especially natural stone | Safest option, no risk of chemical damage | May require more scrubbing effort |
A Practical Guide to Cleaning Different Grout Problems
Let's be honest, not all dirty grout is created equal. That's why a one-size-fits-all approach just doesn't cut it. The real secret to getting those grout lines looking new again is matching your cleaning technique to the specific problem you're staring at.
This guide breaks down the three most common scenarios I see all the time. We’ll start with the everyday grime that slowly dulls high-traffic areas, then move on to those stubborn, deep-set stains that plague kitchens and bathrooms. Finally, we’ll tackle the unwelcome appearance of mould and mildew. Each process is laid out with practical tips to help you get professional-level results without damaging your tiles.
Tackling Light, Everyday Grime
This is the kind of discolouration you find on the kitchen floor in front of the sink or in the main entryway. It’s a slow build-up of dust, dirt, and oils from daily life that gradually turns your once-bright grout lines a dull shade of grey. The good news? This is the easiest problem to fix.
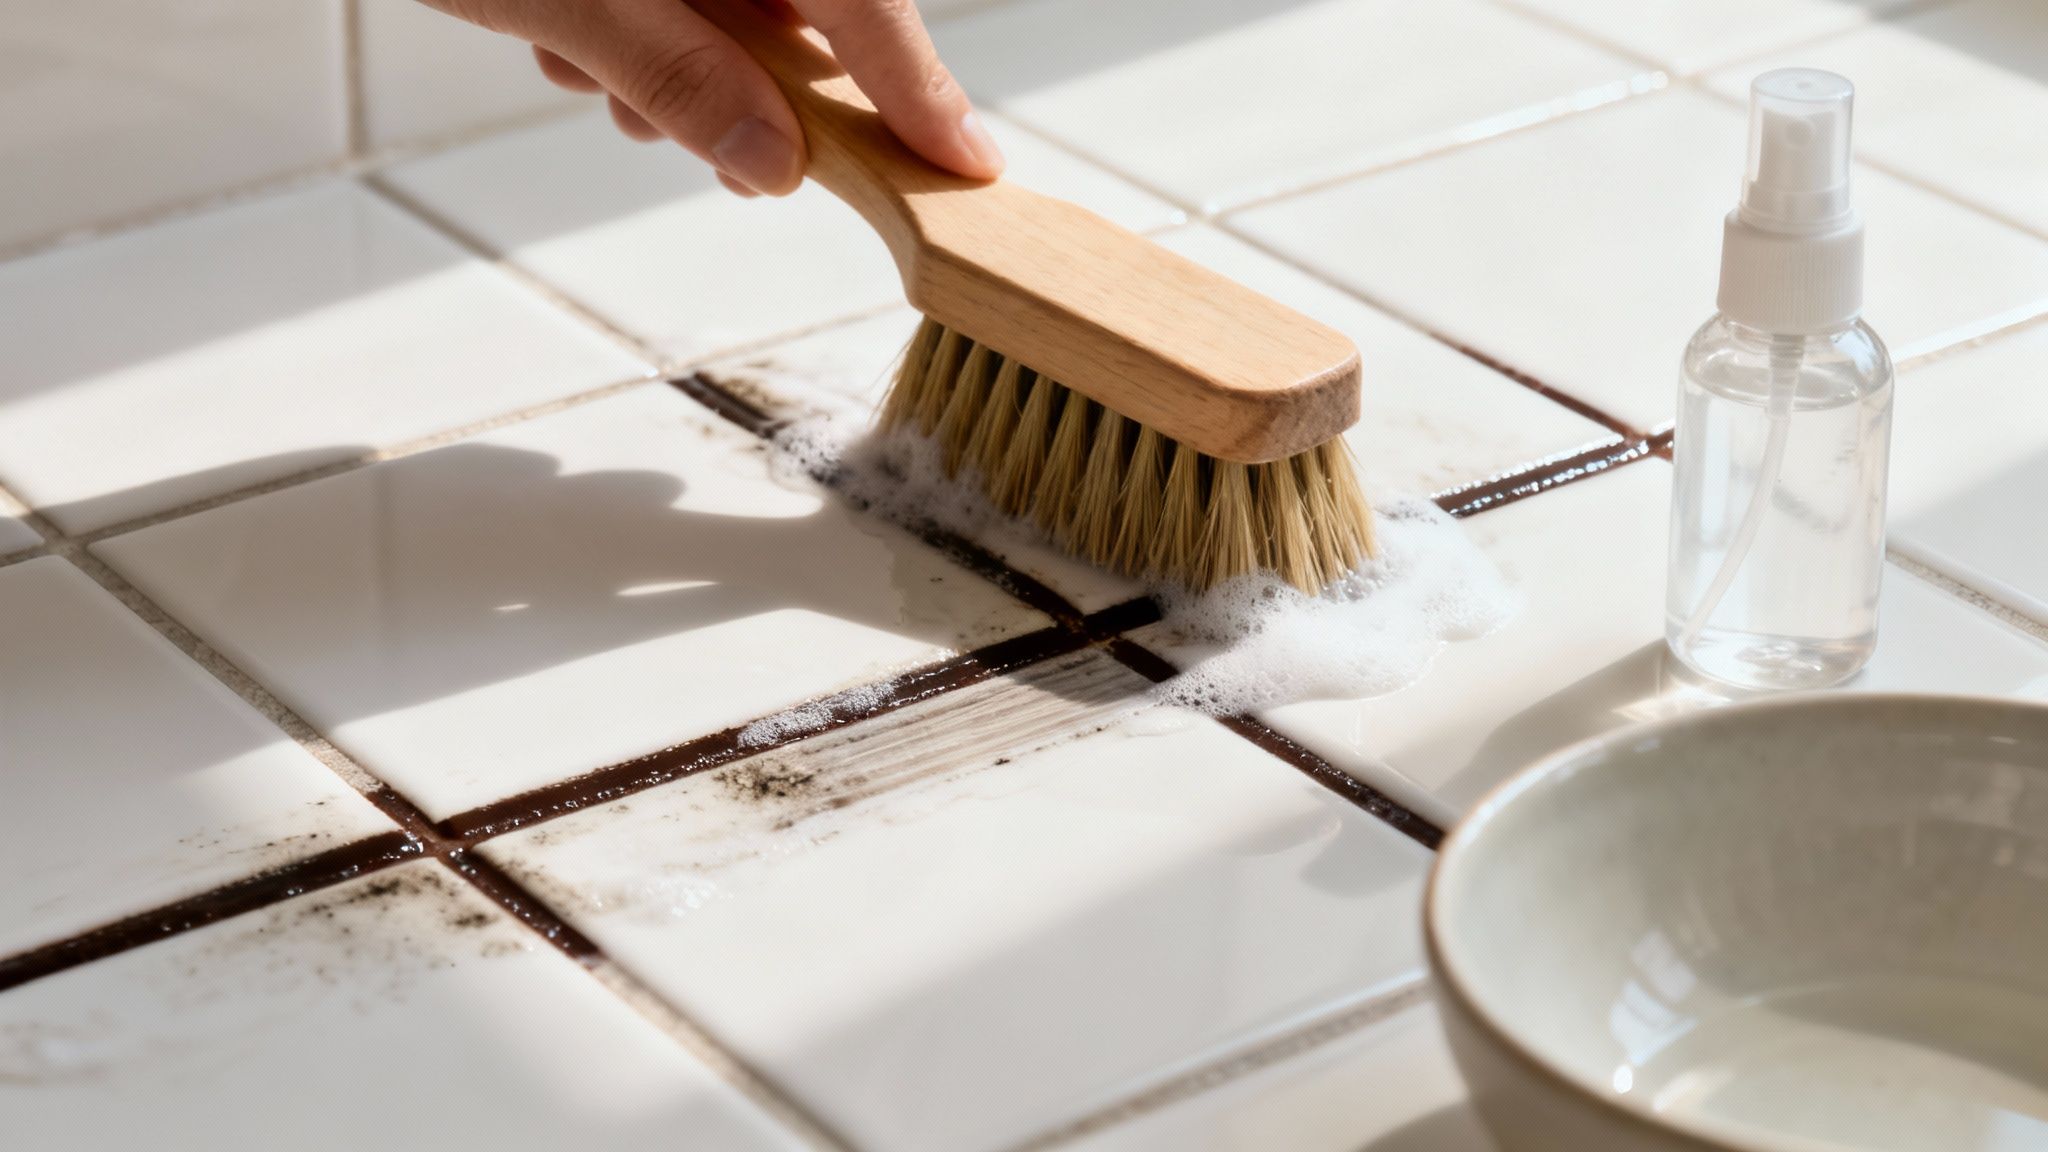
You don't need to bring out the heavy-duty chemicals for this job. A simple, non-abrasive approach is often all it takes. Always start with the gentlest method first: a spray bottle filled with warm water and a few drops of pH-neutral dish soap.
Lightly mist a small section of the grout, let it sit for a minute to penetrate the surface grime, then get to work with a firm-bristled grout brush.
Scrub in small, manageable sections using a circular motion to really loosen the dirt. Keep a bucket of clean water and a microfibre cloth handy to wipe away the dirty suds as you go. This is a crucial step—it prevents the grime from simply resettling back into the grout lines you just cleaned.
Banishing Deep, Stubborn Stains
Now, let's talk about the more challenging stuff. I'm talking about the dark, discoloured lines in your shower from soap scum build-up, or that dreaded coffee spill on the kitchen floor that you didn't notice until it was too late. These stains have worked their way deeper into the porous grout, so they demand a more potent solution.
An oxygenated bleach powder is your best friend here. Unlike harsh chlorine bleach, which can strip the colour from your grout and release nasty fumes, oxygen bleach is colour-safe. It works by releasing tiny oxygen bubbles that break down stains from the inside out.
Here’s how to use it effectively:
- Mix up a paste: Combine the oxygen bleach powder with just enough hot water to form a thick paste, about the consistency of toothpaste. Using hot water is key, as it activates the powder for maximum effect.
- Apply and wait: Use your grout brush or a small spatula to apply the paste directly onto the stained grout lines. Don't be shy with it—make sure the entire stain is completely covered. Now, let it sit for at least 30-60 minutes.
- Scrub and rinse: After the dwell time is up, give the area a good scrub with your grout brush. You should see the stain lifting away. Finally, rinse the area completely with clean water to remove every bit of residue.
Pro Tip: For a truly professional finish, pull out a wet-vac after rinsing to suck up all the excess water. This pulls any remaining dissolved dirt right out of the grout's pores and dramatically speeds up drying time, preventing streaks and water spots.
Eliminating Mould and Mildew
Finding mould or mildew—those nasty black or green spots in shower corners or behind taps—is always disheartening. This job requires a two-pronged attack: you need to kill the fungus itself and remove the ugly stain it leaves behind.
Again, oxygen bleach is a great choice for this task because it cleans and disinfects without the harshness of chlorine bleach. However, if you're dealing with a really persistent mould problem, you might need to step it up to a dedicated commercial mould and mildew remover.
No matter which product you use, make sure the area is well-ventilated by opening windows and turning on an exhaust fan. Apply your chosen cleaner directly to the affected grout and let it sit for the time specified on the product's instructions, which is often around 10-15 minutes. This gives the active ingredients time to get in there and kill the mould spores.
After the recommended dwell time, scrub the area vigorously with your grout brush. You may need to reapply the cleaner to any particularly stubborn spots. Once the stain is gone, rinse the surface thoroughly with clean water and dry it completely with a towel. Keeping the area dry is the most important step in preventing the mould from making a comeback.
The demand for hygienic surfaces has grown significantly. In fact, historical trends in Australia show that demand for professional grout cleaning surged by 40% in Melbourne after 2020, driven by increased hygiene awareness. Professionals often use high-pressure oscillating brushes, which are much safer than harsh DIY pressure washing that can damage up to 30% of grout jobs. For more information on professional cleaning costs and methods, you can explore detailed local data on tile and grout cleaning costs.
Protect Your Hard Work with Grout Sealing and Maintenance
You’ve just spent hours scrubbing, and your grout lines look fantastic—crisp, clean, and bright. But the battle isn’t over. Now comes the most important part: protecting your hard work so you don’t have to do it all over again in a few months.
Think of clean, unsealed grout as a dry sponge. Every splash of coffee, drop of cooking oil, or puddle of soapy water will soak right in, creating a new stain. Sealing is the crucial step that creates an invisible barrier, transforming that sponge into a non-stick surface.
Choosing the Right Grout Sealer
Not all sealers are the same. Your choice really comes down to two main types, and knowing the difference is key to getting durable, long-lasting protection for your floors and walls.
-
Penetrating Sealers: These are the real workhorses. They soak deep into the porous structure of the grout and bond chemically from within. The result is excellent stain resistance without changing the look or texture of your grout. This is the go-to choice for most indoor applications, especially in wet areas like bathrooms and kitchens.
-
Membrane-Forming Sealers: Think of these as a protective film that sits on top of the grout, almost like a coat of paint. They offer fantastic protection and can even add a gloss or satin finish, but they can wear away over time in high-traffic areas. This means you might be reapplying them more frequently.
For most homes, a high-quality penetrating sealer is the best investment. It protects from the inside out and won't peel or flake away.
How to Apply Grout Sealer Correctly
Applying sealer isn't difficult, but it does demand a bit of patience and a steady hand. If you rush the job, you’ll end up with a patchy, ineffective finish that won’t do you any favours.
First things first: the grout must be perfectly clean and completely dry. This is non-negotiable. Sealing over even a tiny bit of dirt will trap it forever, and sealing damp grout locks in moisture, creating a perfect breeding ground for mould underneath the sealer. It's best to wait at least 24-48 hours after a deep clean before you even think about sealing.
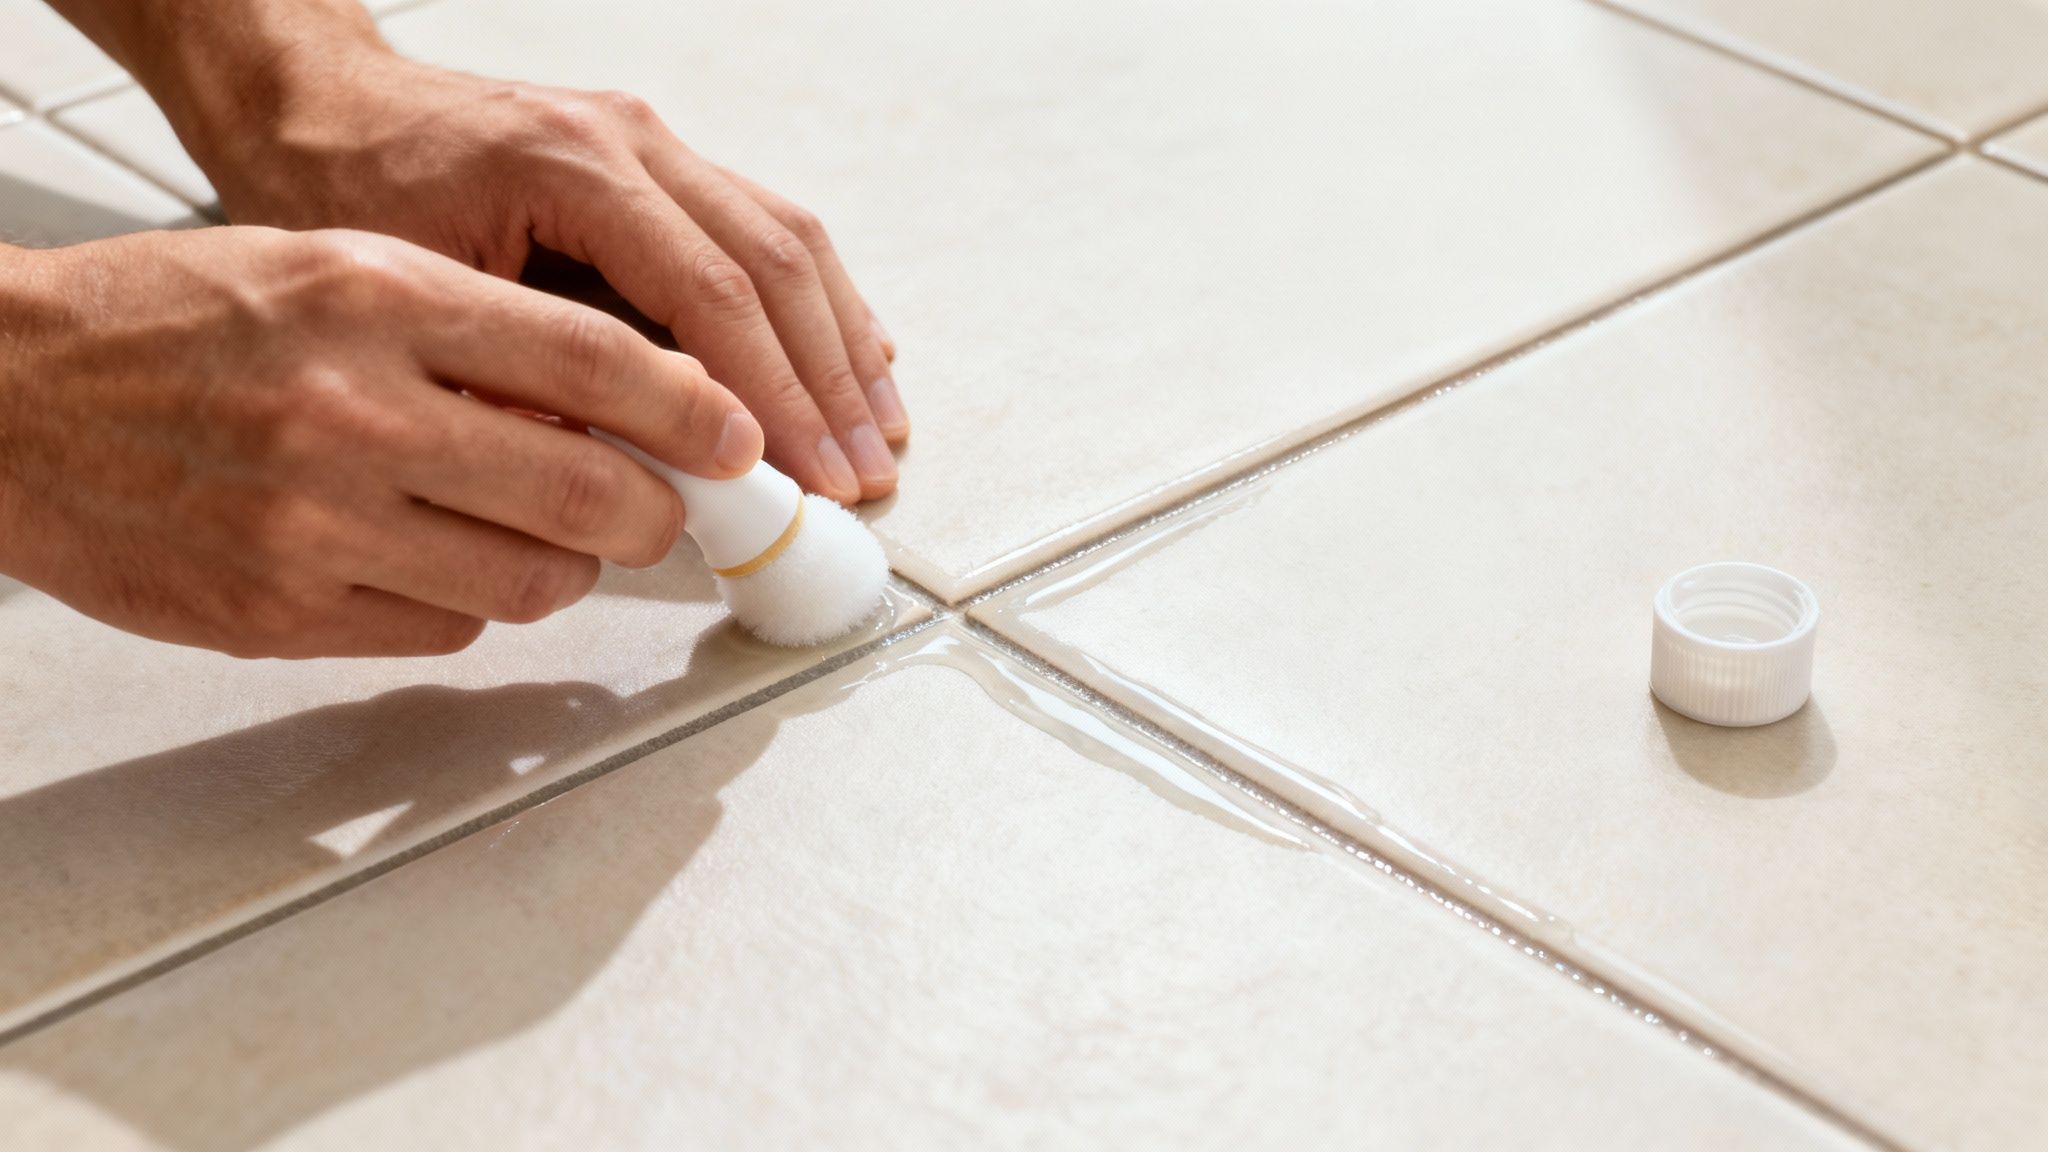
When you're ready to get started:
- Grab a small applicator brush or a sealer bottle with a roller tip. Precision is key here—you want the sealer on the grout lines, not smeared all over your tiles.
- Work in small, manageable sections. Apply a thin, even coat directly onto the grout. Don't try to tackle the whole floor at once.
- Wipe away any excess immediately. Keep a clean, dry microfibre cloth handy. If you get any sealer on the tile surface, wipe it off before it has a chance to dry.
- Let it cure properly. Most sealers need a second coat after about an hour, and then they need to cure for 24-72 hours before being exposed to heavy moisture. Always, always check the manufacturer's instructions on the bottle.
By taking the time to seal your grout, you're not just making it look good; you're actively extending the life of your tiles and making future cleaning sessions infinitely easier. Spills will bead up on the surface instead of soaking in, allowing you to wipe them away effortlessly.
Simple Habits for Long-Term Maintenance
Once your grout is sealed, a simple maintenance routine can keep it looking pristine for years to come.
The single most effective habit is wiping up spills as soon as they happen. This is especially true for acidic or colourful ones like wine, tomato sauce, or coffee. For weekly cleaning, skip the harsh chemicals. Just use a mop with a pH-neutral cleaner, which will get your floors clean without slowly degrading the sealer over time.
If you find that cleaning and proper maintenance are no longer enough to revive your tiles, you might want to explore some alternative solutions. These bathroom tile cover up ideas can offer a fresh new look without the hassle and cost of a full renovation.
When It’s Time to Call in the Professionals
Let’s be honest, sometimes all the elbow grease in the world just won’t cut it. You can scrub for hours, try every DIY concoction you find online, and still be left staring at grubby, stained grout lines. Years of built-up dirt, stubborn stains, or a serious mould problem can be more than a match for household cleaners.
Knowing when to wave the white flag isn't admitting defeat. It's actually a smart move to protect your tiles and get the kind of deep-clean results that DIY methods simply can't deliver. If you’ve given it your best shot and the grout still looks sad, it’s probably time to let an expert take over.
The Telltale Signs That DIY Isn't Enough
So, how do you know you've hit that wall? There are a few clear signs that your grout problem needs more firepower than you can provide.
Keep an eye out for these red flags:
- Stubborn Stains Just Won't Budge: You’ve tried an oxygen bleach paste, scrubbed until your arms ached, and let it sit overnight, but those deep, dark stains in the kitchen floor or shower corner are still there. This usually means the grime has soaked deep into the porous grout, far beyond where a surface cleaner can reach.
- Mould is a Recurring Nightmare: If you’re constantly battling mould in multiple spots, especially across large areas of your bathroom, it points to a deeper moisture issue. A professional clean is designed to eradicate the growth at its source, not just spot-treat the surface.
- The Grout is Cracked or Crumbling: Noticing that your grout is breaking apart is a major warning sign. This is a structural problem, and aggressive scrubbing will only make it worse. This situation calls for professional repair before any deep cleaning can even begin.
- You're Simply Out of Time or Energy: Let's face it, deep cleaning all the grout in a house is a massive, back-breaking job. If the sheer scale of the project feels overwhelming, a professional service can get it done better and in a fraction of the time.
If your grout somehow looks worse after you clean it, or if the colour is patchy and uneven, stop immediately. That’s a classic sign the problem is too deep for a hand-held brush and needs a more powerful solution.
The Professional Advantage: Technology and Technique
What exactly do the pros bring to the table that you can't? It really comes down to one thing: industrial-grade equipment built for this exact job. The hero of professional grout cleaning is almost always a truck-mounted high-pressure steam cleaning system.
This isn't your little handheld steamer from the department store. These are powerful machines that heat water to incredibly high temperatures and blast it deep into the grout lines at high pressure. This combination does a few things that regular scrubbing just can't touch:
- It Gets Deep into the Pores: The high-pressure steam forces its way into the tiny pores of the grout, breaking up and blasting out embedded dirt, grease, and bacteria that are physically impossible to reach with a brush.
- It Properly Sanitises the Surface: The extreme heat of the steam kills 99.9% of germs and bacteria, including nasty mould spores. This delivers a level of hygiene that chemical cleaners alone rarely achieve.
- It Sucks All the Grime Away: This is the game-changer. As the steam dislodges all that gunk, a powerful vacuum immediately extracts the dirty water and residue. Nothing gets left behind to settle back into the grout lines.
While you can tackle many grout cleaning jobs yourself, some situations require a more comprehensive approach. For major projects that might include renovations, it's wise to consult professional bathroom and kitchen services.
The Real Value of a Professional Clean
Hiring a professional is an investment, but it often pays for itself in the long run. Data from Airtasker Australia shows that while a standard grout cleaning job in Melbourne might average between $60-$170, a professional steam clean delivers results that can last 3 to 5 times longer than any DIY effort. A whopping 92% of users reported seeing visibly whiter grout after a pro service.
In Victoria's humid climate, where bathrooms can accumulate 50% more mould, getting a professional clean every 12-18 months is a smart move to cut down on health risks. You can learn more about the costs and benefits of professional tile cleaning.
Ultimately, calling a professional isn't just about appearances. It’s about a restorative, deep clean that protects your investment, makes your home more hygienic, and saves you from hours of frustrating, often fruitless labour.
For a truly deep, hygienic clean that restores your tiles and grout to their former glory, trust the experts at Right Price Carpet Cleaning. Our powerful truck-mounted steam cleaning technology removes years of built-up grime that DIY methods can't touch. Get your instant online quote and see the difference a professional clean can make by visiting us at https://rightpricecarpetcleaning.com.au.
Recent Comments