


The best floor tile grout cleaner really depends on what you're up against. For that tough, greasy grime that builds up in kitchens, a dedicated alkaline formula is your best bet. If you're tackling mould or organic stains in the bathroom, an oxygenated bleach solution will do the trick. But for general upkeep, you can't go wrong with a simple paste of baking soda and water—it's gentle, effective, and free of harsh chemicals.
Why Your Grout Gets So Dirty
It’s frustrating, isn’t it? You can have the most beautiful tiles, but if the grout lines are grubby, the whole floor looks tired and neglected.
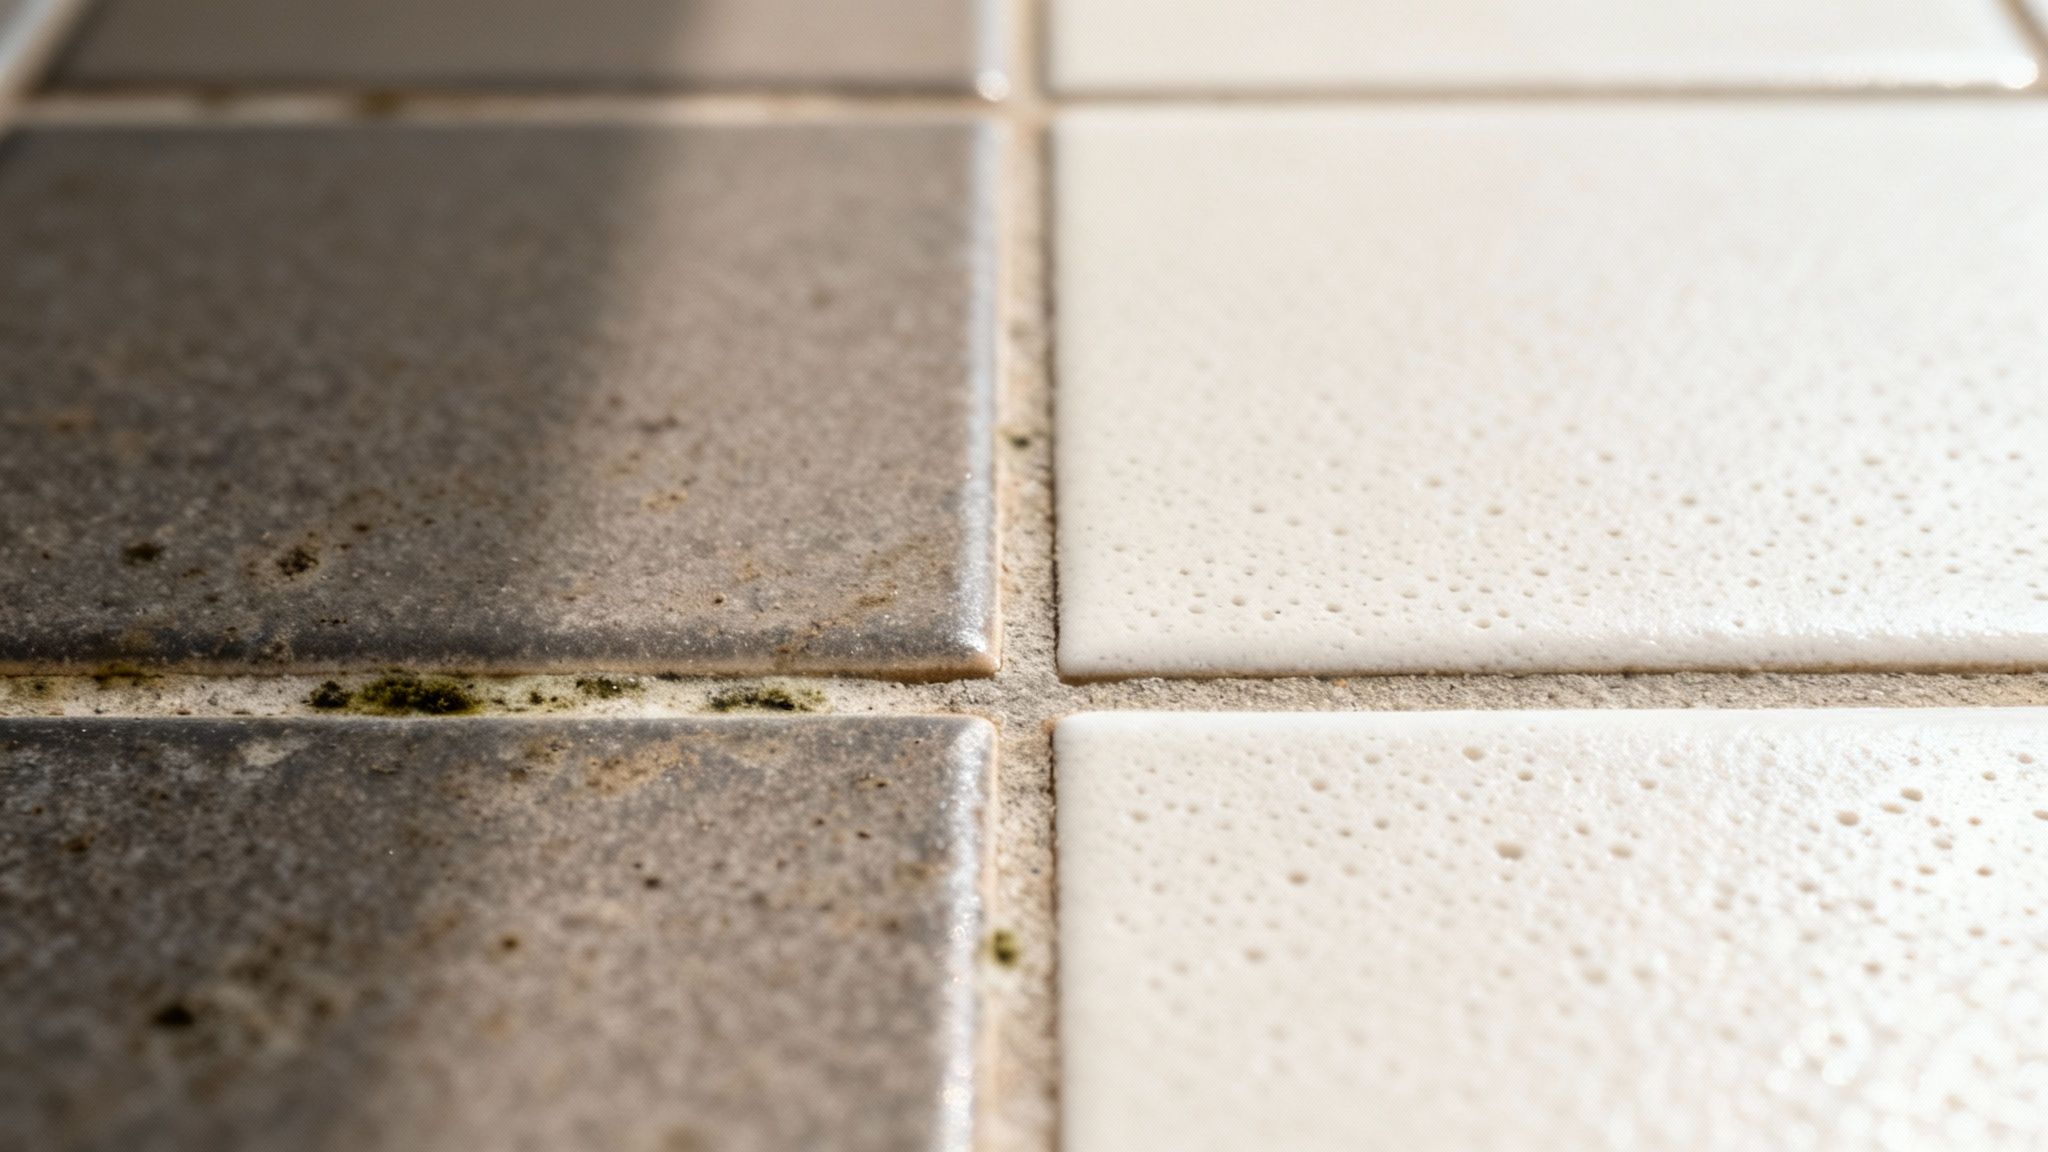
The real problem is the very nature of grout—it's porous. Think of it as a tiny, hard sponge running between your tiles. This structure makes it an absolute magnet for dirt, spills, and moisture.
Unlike the smooth, glazed surface of a ceramic or porcelain tile, grout absorbs just about anything that lands on it. A splash of coffee in the kitchen, soapy residue in the bathroom, or muddy footprints in the entryway can quickly seep into these lines, causing deep-set stains that a quick mop just won't touch.
The Culprits Behind Grimy Grout
That porous quality is especially problematic in humid Australian climates, where trapped moisture creates the perfect breeding ground for mould and mildew. Not only does it look awful, but it can also contribute to poor indoor air quality.
It’s no surprise that keeping grout clean is a major focus for homeowners. In fact, the Australian tile grout market has hit a value of USD 32.90 million, driven by our love for tiled floors and a growing awareness of home hygiene. You can explore more data about this growing market to see just how common this issue is.
Understanding what you’re up against is the first step. The discolouration you see isn't just surface-level dirt; it's grime that has been absorbed deep into the grout itself. This is why a simple wipe-down often fails to deliver lasting results and why a targeted floor tile grout cleaner is so essential.
Choosing Your Cleaning Approach
So, what’s the plan of attack? Fortunately, you have several effective options for tackling this common headache. Your choice will likely come down to how bad the staining is, the type of grout you have, and your personal preference for cleaning products.
The three main methods are:
- Commercial Cleaners: These are powerful, purpose-built formulas designed to break down specific types of grime, from grease to soap scum. They're often the fastest solution for heavy-duty jobs.
- DIY Solutions: If you prefer a more natural or budget-friendly approach, common household items like baking soda and vinegar can be surprisingly effective, especially for routine cleaning and mild stains.
- Steam Cleaning: This method uses high-temperature steam to sanitise and lift dirt without any chemicals at all. It’s an excellent choice for killing mould spores and deep-cleaning porous surfaces.
To make things a little easier, here’s a quick comparison of the three primary grout cleaning methods. This should help you decide which approach fits your needs, budget, and the amount of effort you're willing to put in.
Grout Cleaner Options at a Glance
| Cleaner Type | Best For | Pros | Cons |
|---|---|---|---|
| Commercial Cleaners | Heavy-duty grease, mould, and set-in stains. | Fast-acting and highly effective on specific stains. | Can contain harsh chemicals; requires good ventilation. |
| DIY Solutions | Light discolouration, routine maintenance, and mild stains. | Inexpensive, non-toxic, and uses common household ingredients. | May require more scrubbing and multiple applications. |
| Steam Cleaning | Deep cleaning, sanitising, and killing mould without chemicals. | Eco-friendly, chemical-free, and great for allergies. | Requires purchasing or renting a steam cleaner. |
Ultimately, the right cleaner is the one that gets the job done safely and effectively for your specific situation. Don't be afraid to start with a gentle DIY method before moving on to something stronger if needed.
Key Takeaway: The porous nature of grout is the primary reason it stains so easily. Dirt and liquids don't just sit on top; they soak in, requiring a targeted cleaning strategy to effectively remove them.
Gathering Your Grout Cleaning Toolkit
Jumping into a grout cleaning project without the right gear is a recipe for frustration and less-than-stellar results. Think of this as your essential pre-flight checklist before you start tackling those grimy lines. Having the right tools on hand not only makes the job easier but also keeps you and your beautiful tiles safe.
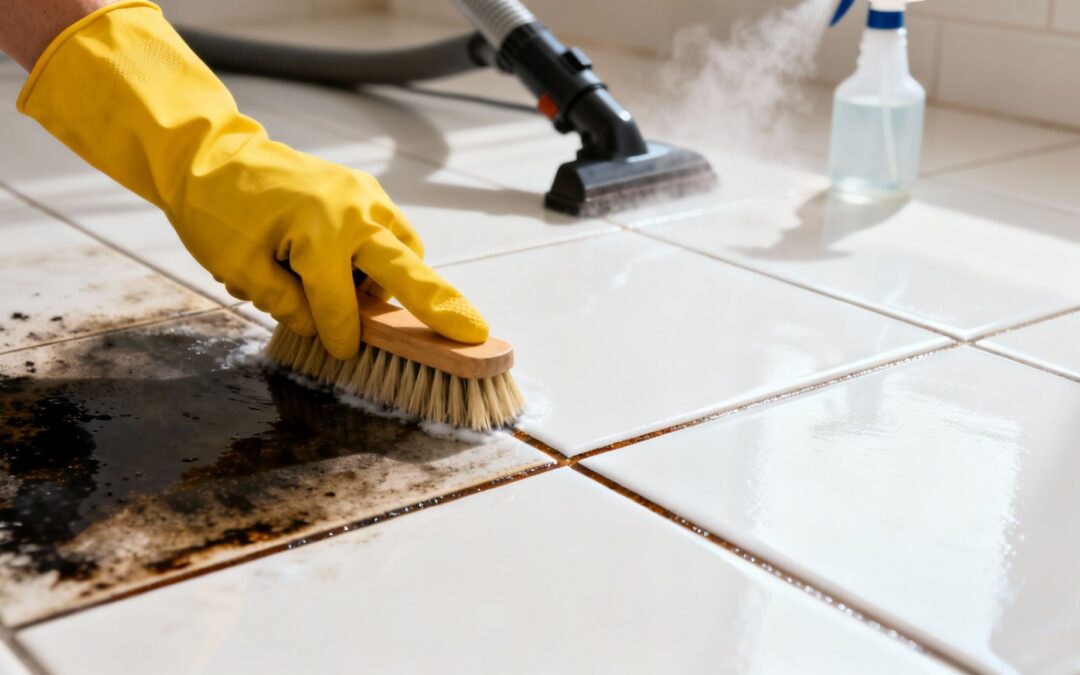
The most critical tool in your arsenal is a stiff-bristled grout brush. Sure, an old toothbrush can work in a pinch for a tiny spot, but a dedicated grout brush is designed for the job. It has firmer bristles and an ergonomic handle that lets you apply consistent pressure without accidentally scratching your tiles.
Essential Safety and Prep Materials
Before you even think about applying any kind of floor tile grout cleaner, let's talk about safety and preparation. These steps are non-negotiable. Good prep work contains the mess and helps your chosen cleaner work its magic properly.
You'll absolutely need:
- Gloves: Chemical-resistant gloves are a must. They’ll protect your skin from both harsh commercial cleaners and the prolonged dampness from DIY solutions.
- Safety Glasses: It’s easy to get an accidental splash in the eye when you're scrubbing away. A simple pair of safety glasses can prevent a lot of pain.
- Painter’s Tape: Use this to protect your skirting boards, cabinetry, and any adjacent carpet from the cleaning solution.
Good ventilation is also crucial, especially if you're using chemical-based cleaners. Open up the windows and doors, or get a fan going to keep the air circulating.
Your cleaning efforts are only as good as your prep work. Removing loose debris first stops you from turning dirt into mud, which only makes grout look worse. A thorough sweep or vacuum is a step you can't afford to skip.
Your Complete Grout Cleaning Checklist
With safety sorted, let's assemble the rest of your toolkit. You won't need everything on this list for every single method, but it’s a solid rundown of what the pros use.
- Your Chosen Cleaner: This could be a commercial formula, a steam cleaner, or the ingredients for a homemade paste.
- Grout Brush: Again, this narrow, stiff-bristled brush is non-negotiable for getting the job done right.
- Buckets: Grab at least two—one for your cleaning solution and another filled with clean water for rinsing.
- Sponges or Microfibre Cloths: These are essential for wiping away the dirty cleaner and rinsing the area thoroughly.
- Dry Towels: For drying the floor afterwards. This prevents water spots and stops moisture from seeping back into your freshly cleaned grout.
Tiled floors are incredibly popular here in Australia, which makes this a very common household task. In fact, the Australian ceramic tiles market is valued at a massive USD 1,784 million, with 45% of new homes featuring them. The downside? Grout discolouration impacts a staggering 70% of these installations within just a few years. Having the right toolkit from the start is your best defence. For anyone looking for eco-friendly alternatives, exploring options like natural floor cleaning solutions can provide great results with fewer chemicals.
Proven Techniques for Cleaning Your Grout
Alright, you've got your gear ready and the floor is prepped, so it's time to get down to business. How you tackle the grout really depends on how much grime you're up against and what kind of cleaners you're comfortable using. We'll walk through three solid techniques, each with its own strengths for handling everything from light discolouration to those stubborn, deep-set stains.
This infographic lays out the simple but crucial prep work you need to do before starting.
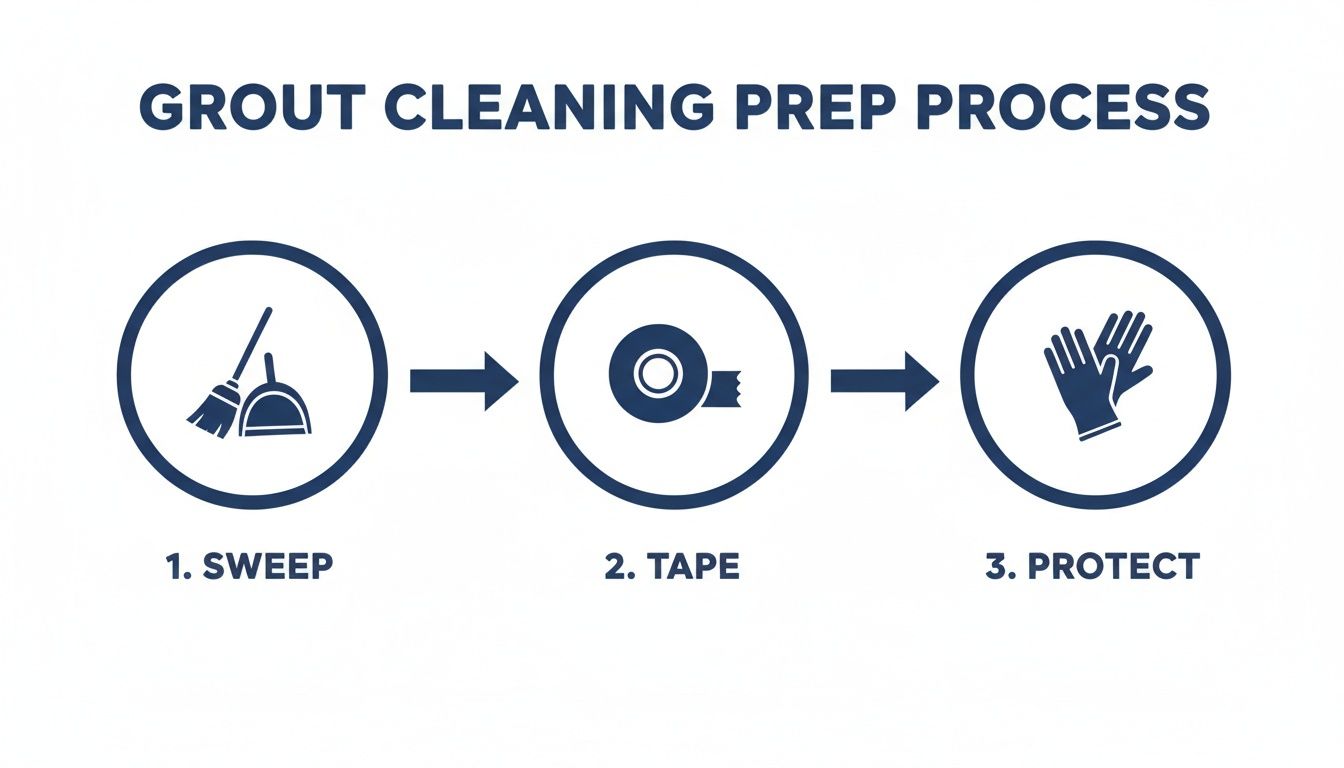
Getting these prep steps right means your cleaner can go to work directly on the grout, without loose dirt getting in the way.
Using a Commercial Alkaline Cleaner
For the really tough, greasy buildup you often see in kitchens or busy hallways, a commercial alkaline floor tile grout cleaner is usually your best bet. These formulas are specifically designed to cut through oils and dissolve the kind of stubborn grime that gentler methods just can't shift.
When you're using an alkaline cleaner, always work in small, manageable sections—about one square metre at a time is perfect. This stops the solution from drying out before you've had a chance to give it a good scrub. Apply the cleaner straight onto the grout lines and let it sit for the manufacturer's recommended dwell time, which is typically 5-10 minutes.
Don't skip the dwell time; it's when the chemical reaction that lifts all that dirt actually happens. Once the time is up, grab your stiff-bristled brush and scrub the lines with firm, back-and-forth motions. You should see the grime start to lift almost instantly.
After you've scrubbed a section, use a sponge and clean water to rinse it thoroughly. This is a vital step to make sure all the chemical residue is gone.
The Natural DIY Approach
If you'd rather go with a gentler, more eco-friendly option, a homemade paste of baking soda and water is a fantastic place to start. It's a mild abrasive that's excellent for routine cleaning and tackling light to moderate stains without any harsh fumes.
You'll want to create a thick paste, something with the consistency of toothpaste. A good ratio is:
- Three parts baking soda
- One part water
Apply the paste directly onto the grout lines using your finger or a small spatula, making sure you cover all the discoloured spots. Let it sit for about 15 minutes so it can get to work.
After it has sat for a bit, spray the paste with a 50/50 solution of white vinegar and water. You'll see it start to fizz, which is the reaction helping to agitate and lift the dirt from the porous grout. Scrub with your grout brush while it's still fizzing, then rinse the whole area completely with clean water.
A Quick Word on Vinegar: While vinegar is a popular DIY cleaner, it is acidic. You should never use it on its own on unsealed or cement-based grout, as it can slowly eat away at the material over time. It's much safer when it's just being used to activate a baking soda paste.
Harnessing the Power of Steam
For a truly deep, sanitising clean without a single chemical, a steam cleaner is an incredibly powerful tool. The high-temperature steam doesn't just blast away grime; it also kills 99.9% of germs and bacteria, including any mould spores hiding deep within the grout’s pores.
To get the best results, make sure your steam cleaner has a small grout nozzle attachment. This concentrates the steam into a powerful jet that can really get into the grout lines effectively.
Move the nozzle slowly along each grout line, holding it just a centimetre or two from the surface. The hot steam will loosen all the embedded dirt. As soon as you've steamed a section, wipe away the loosened grime with a clean microfibre cloth.
It’s best to work in small sections from the back of the room towards the door. This way, you avoid stepping on your freshly cleaned, damp grout. This method is particularly great for homes with pets, kids, or allergy sufferers because it leaves zero chemical residue behind.
How to Tackle Stubborn Grout Stains
You've scrubbed and scrubbed, but some spots just refuse to go away. These aren't your typical dirt marks; they're stubborn, set-in stains from things like mould, rust, or that coffee you spilled last Tuesday. They’ve worked their way deep into the grout, and a general floor tile grout cleaner just isn't going to cut it.
Don't panic—it doesn't mean your floors are ruined. It just means you need to play detective, figure out what kind of stain you're dealing with, and then bring out the right tool for the job. Different stains need different treatments, and using the wrong one is like trying to unlock a door with the wrong key. It's either ineffective or, worse, could make the problem harder to solve.
Dealing with Mould and Mildew
If you’re seeing dark, spotty stains in the bathroom or laundry, you can almost bet it's mould or mildew. These fungi love damp, humid environments, which are practically a given in many Australian homes. Your first thought might be to douse it in chlorine bleach, but there's a much better option: oxygenated bleach powder.
Oxygenated bleach is far less corrosive than its chlorine-based cousin, which makes it safer for your grout and any coloured tiles you might have. It works by releasing tiny oxygen bubbles that get deep into the grout's pores, breaking down the mould spores and lifting the stain without those harsh, eye-watering fumes.
Expert Tip: Mix up a thick paste using an oxygenated bleach powder and a little water. Plaster it directly onto the mouldy grout lines, then give it at least an hour to do its thing. After it's had time to work, give it a gentle scrub and a good rinse.
Removing Rust, Coffee, and Mineral Stains
Discolouration from rust (often left behind by metal furniture feet), coffee, wine, or even mineral deposits from hard water is a completely different beast. These stains are usually acidic or mineral-based, so you need something that can dissolve them properly.
For these kinds of marks, a pH-neutral cleaner made specifically for rust or mineral removal is your safest and most effective bet. If you want to try a DIY approach, a paste made from lemon juice and borax can sometimes work wonders on rust. Just be sure to test it on a hidden spot first—that acidity isn't friendly to all tile types, especially natural stone.
To make things a bit easier, I've put together a quick reference guide for some of the most common grout issues we see.
Common Grout Problems and Solutions
This table will help you quickly identify what you're up against and point you toward the right solution.
| Problem | Appearance | Recommended Solution |
|---|---|---|
| Mould & Mildew | Black, green, or pinkish spots, usually in damp areas. | Oxygenated bleach paste or a specialised mould remover. |
| Rust Stains | Orange or reddish-brown marks. | Commercial rust remover or a lemon juice and borax paste. |
| Coffee or Wine | Brown or reddish-purple discolouration. | An alkaline cleaner or a targeted stain remover for organic spills. |
| Mineral Deposits | White, chalky buildup (also known as efflorescence). | A specialised sulfamic acid cleaner designed specifically for tiles. |
Think of this as your cheat sheet for tackling those frustrating spots that a normal clean leaves behind.
When Cleaning Is Not the Answer
It’s also crucial to know when a "stain" isn't a stain at all. If you notice your grout is crumbling, cracked, or has entire chunks missing, no amount of scrubbing is going to fix that. This is a sign of physical damage, and the only real solution is to bite the bullet, remove the old grout, and re-grout the area. Trying to clean crumbling grout is a losing battle—at that point, it’s a repair job, not a cleaning one.
Sealing and Maintaining Your Clean Grout
You’ve put in the hard work with a floor tile grout cleaner, and your grout lines are finally looking pristine again. So, what’s next? The last thing you want is for all that effort to go to waste as dirt and grime creep back in. This is where sealing comes in—it’s the crucial final step that acts as an invisible shield for your grout.
Think of unsealed grout as a tiny sponge. Its porous nature means it’s ready to soak up any spills, dirt, or moisture it comes into contact with. Sealing closes up these microscopic pores, creating a barrier that stops grime from penetrating deep into the grout. Not only does this prevent stains from setting in, but it also makes future cleaning a whole lot easier.
Choosing the Right Grout Sealer
Not all grout sealers are made equal, and the best choice really depends on where your tiles are located. You'll generally come across two main types on the shelf.
- Penetrating Sealers: These are my go-to for most situations. They soak right into the grout to form a protective barrier from within. This is perfect for high-moisture zones like bathrooms and laundries because they offer fantastic protection against water and stains without changing how your grout looks.
- Membrane-Forming Sealers: These work by creating a protective film on top of the grout. While they're effective, they can sometimes wear away in high-traffic areas. I'm also not a huge fan of them for shower floors, as there's a risk of water getting trapped underneath the film.
For a bathroom or laundry, a top-quality penetrating sealer is your best bet, no question. In a kitchen, where you're more likely to deal with oil-based spills, look for a penetrating sealer specifically designed for extra stain resistance.
The most common mistake homeowners make is skipping the sealing process. After spending hours cleaning, sealing is the single most effective way to protect your investment of time and effort and keep your grout looking new for much longer.
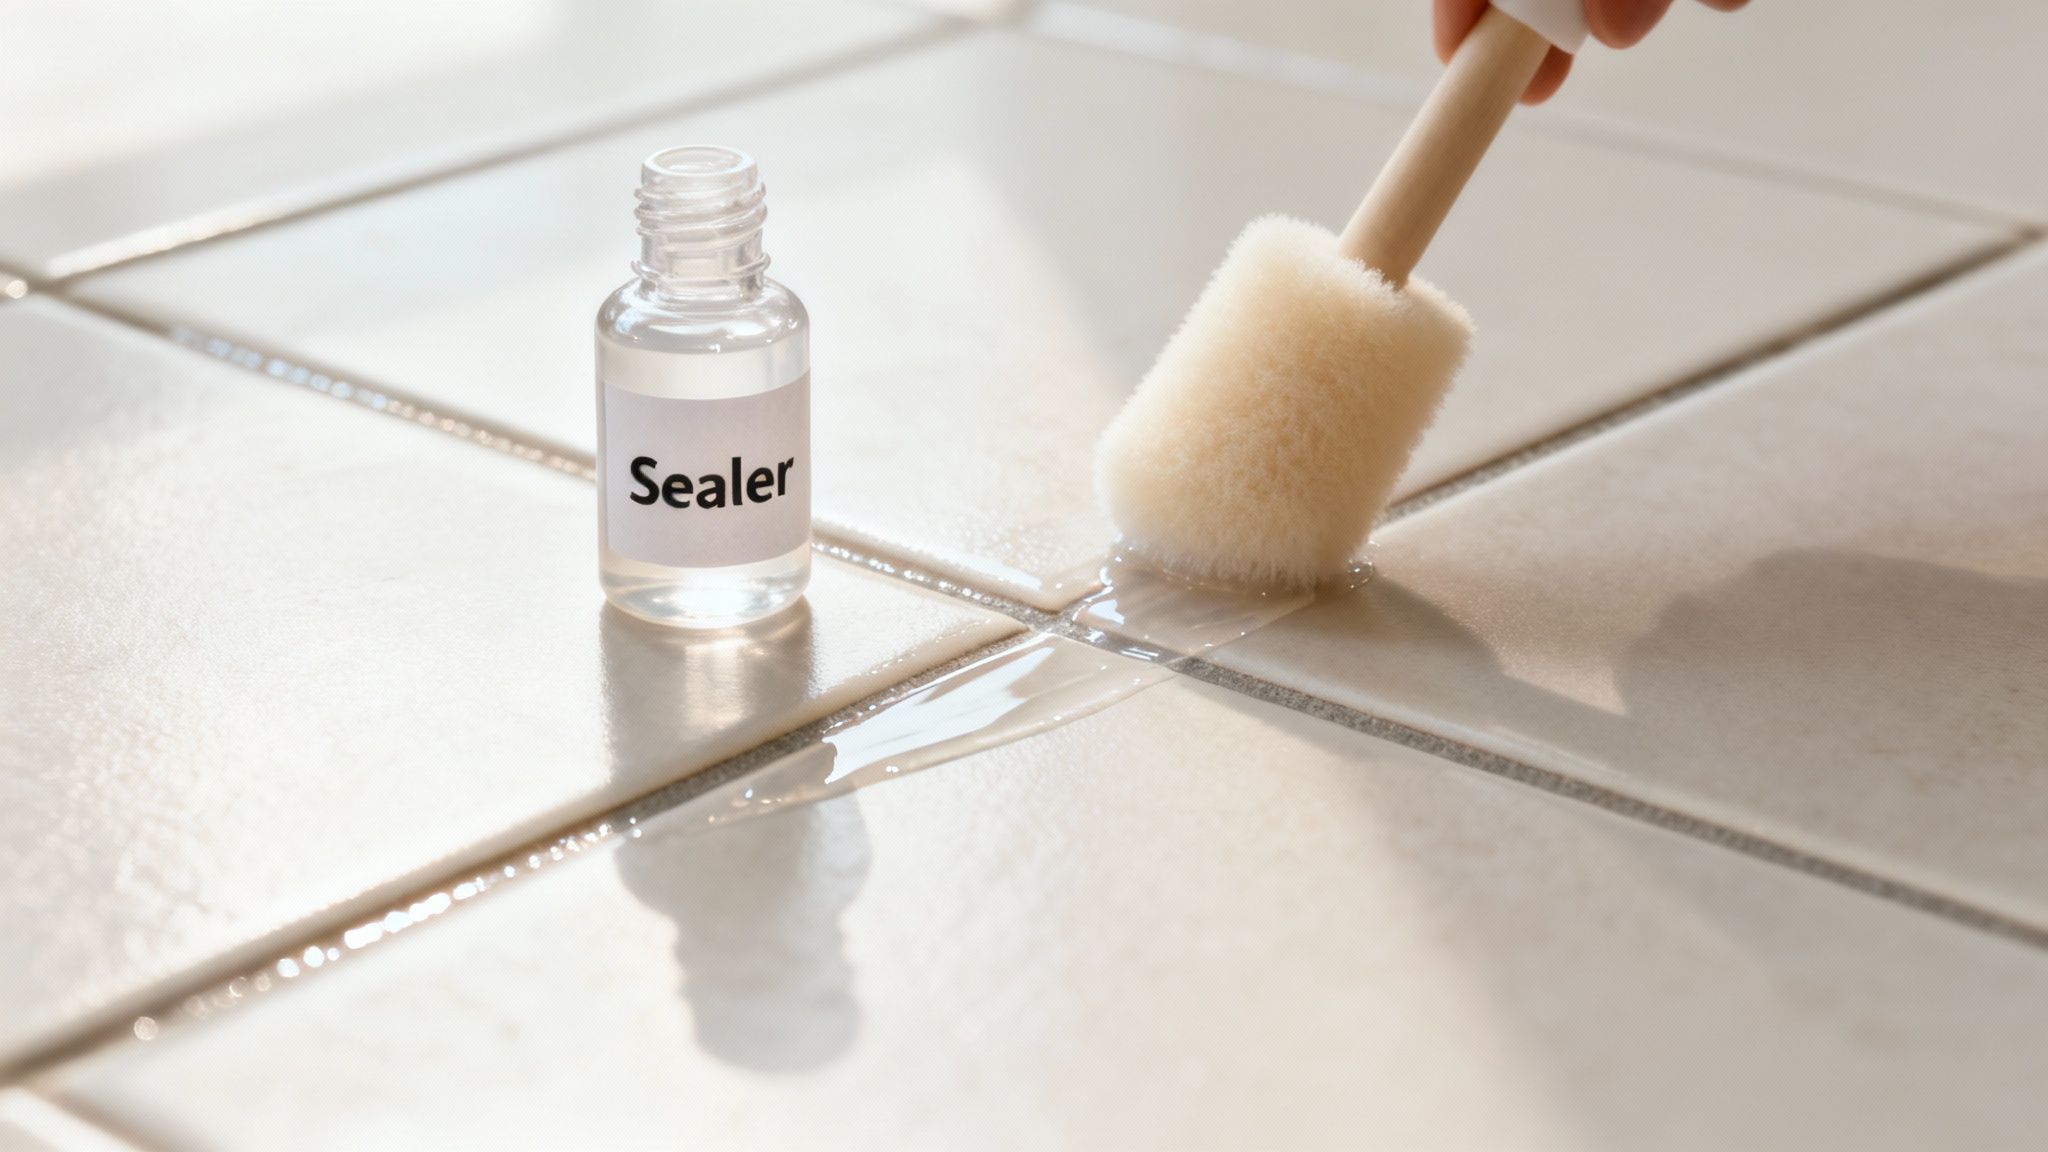
Applying Sealer for Maximum Protection
Before you even think about opening that sealer, make sure your grout is completely clean and bone dry. I always recommend waiting at least 24 hours after cleaning to give all the moisture plenty of time to evaporate.
Most sealers come with a small brush or a roller applicator. Your goal is to apply a thin, even coat directly onto the grout lines. Be careful to wipe any excess sealer off the tiles immediately with a damp cloth before it has a chance to dry. It's best to work in small, manageable sections and always follow the manufacturer’s instructions for drying times. After a deep clean, sealing is a critical step for both grout and stone tiles to guard against future grime. For a full picture of floor protection, it's worth learning how to effectively seal natural stone.
A Simple Maintenance Routine
Once your grout is sealed, keeping it looking great is surprisingly straightforward.
- Weekly: Give your floors a mop with a pH-neutral cleaner. Stay away from traditional soap-based cleaners—they tend to leave behind a sticky residue that actually attracts more dirt.
- Monthly: Pay a little extra attention to the high-traffic spots. A quick spot clean using a paste of baking soda and water can tackle any minor discolouration before it turns into a bigger headache.
This simple routine helps prevent the kind of heavy, stubborn buildup that requires hours of intense scrubbing, ensuring your floors stay looking their best with minimal fuss.
When You Should Call a Professional Cleaner
DIY methods and a good floor tile grout cleaner are brilliant for general upkeep, but let's be honest—sometimes a job is just too big or too stubborn for what you’ve got under the sink. Knowing when to throw in the towel and call in the experts can save you hours of back-breaking work and deliver a result that lasts.
If you find yourself on your hands and knees, scrubbing the same discoloured patch for the third weekend in a row with zero progress, that’s a pretty clear sign you need more firepower. The same goes for large tiled areas. Cleaning hundreds of square metres of grout by hand isn't just a chore; it's an exhausting project that professionals are equipped to handle in a fraction of the time.
The Power of Truck-Mounted Steam Cleaning
The real game-changer between a DIY clean and a professional service comes down to the machinery. A professional truck-mounted steam cleaning system is a world away from a handheld steamer. It operates at incredibly high temperatures and pressures that consumer-grade units simply can't match.
This industrial-strength steam doesn't just clean; it blasts away years of built-up grime, grease, and bacteria from deep inside the grout's porous surface. This process achieves a level of sanitation you just can't get with store-bought products. It doesn't just skim the surface—it properly restores the health and hygiene of your floors by eradicating trapped allergens and mould spores.
At Right Price Carpet Cleaning, our specialised tile and grout service is designed for exactly these situations. We’ve seen it time and time again: homeowners frustrated with grimy grout that won't brighten up, only to be amazed at what we can achieve in a single visit.
Our Proven Restoration Process
When you call Right Price Carpet Cleaning, our trained technicians don’t just turn up and start spraying. We follow a careful, detailed process to make sure your floors are restored safely and effectively.
Our service always includes:
- Pre-Inspection: We start by identifying your specific tile and grout type. This is crucial for choosing the safest and most effective cleaning solution for your floors.
- Specialised Pre-Treatment: We apply a powerful, eco-friendly solution that gets to work breaking down tough soils, oils, and deep-set grime.
- High-Pressure Steam Extraction: Our truck-mounted machine uses hot, softened water to thoroughly rinse and extract every last bit of dirt and cleaning agent, leaving absolutely no sticky residue behind.
- Optional Sealing: To finish the job, we can apply a professional-grade sealer. This is a great investment, as it protects your grout from future stains and makes your own maintenance efforts much, much easier.
If your floors are looking tired and your best efforts just aren't cutting it anymore, it might be time to let a professional bring them back to life.
Common Questions We Get About Grout Cleaning
Even with the best guide, there are always a few specific questions that come up. Let's tackle some of the most common ones we hear from homeowners trying to get their floors looking brand new again.
How Often Should I Be Deep Cleaning My Grout?
For the average home, giving your grout a really good, deep clean every 6 to 12 months is plenty. But that’s not a hard-and-fast rule.
If you’re talking about the grout in your kitchen, the entryway, or the main bathroom—places that see a lot of foot traffic and moisture—you’ll want to tackle it more often. A deep scrub every 3 to 4 months in those areas will stop stubborn grime and mould from getting a foothold.
Is It Okay to Use Bleach on Grout?
It’s tempting, I know. Bleach seems like the ultimate cleaner, but it’s actually not a great choice for grout. It's a very harsh chemical that can eat away at the grout's structure over time, making it brittle. Even worse, it can permanently strip the colour out of coloured grout, leaving you with patchy, faded lines.
A much better and safer option is an oxygenated bleach powder mixed with water. It does a fantastic job of whitening stains and killing mould spores without being corrosive, which is exactly what you want for the long-term health of your floors.
Why Did My Grout Turn Yellow After I Cleaned It?
This is a really frustrating one, and it usually comes down to one of three things. The yellowing could be a chemical reaction between the cleaner you used and an old sealer that was on the grout. It might also just be leftover cleaning solution that wasn't rinsed away properly.
Another common cause is something called "wicking," where dirt from the subfloor gets pulled up through the porous grout as it dries. To avoid this, always give the area a thorough rinse with plain, clean water after you’ve finished scrubbing.
If your grout is looking a bit beyond a weekend DIY project, the team at Right Price Carpet Cleaning can bring it back to life. Our professional truck-mounted steam cleaning is powerful enough to restore even the most neglected floors. Get your free instant quote online today!
Recent Comments