


Before you can win the war on shower grime, you need to assemble the right kit. Having the best tools, cleaners, and safety gear ready to go is what separates a frustrating afternoon of scrubbing from a quick, satisfying clean. It turns a dreaded chore into a planned-out project with a guaranteed payoff.
Your Grout Cleaning Toolkit and Safety Essentials
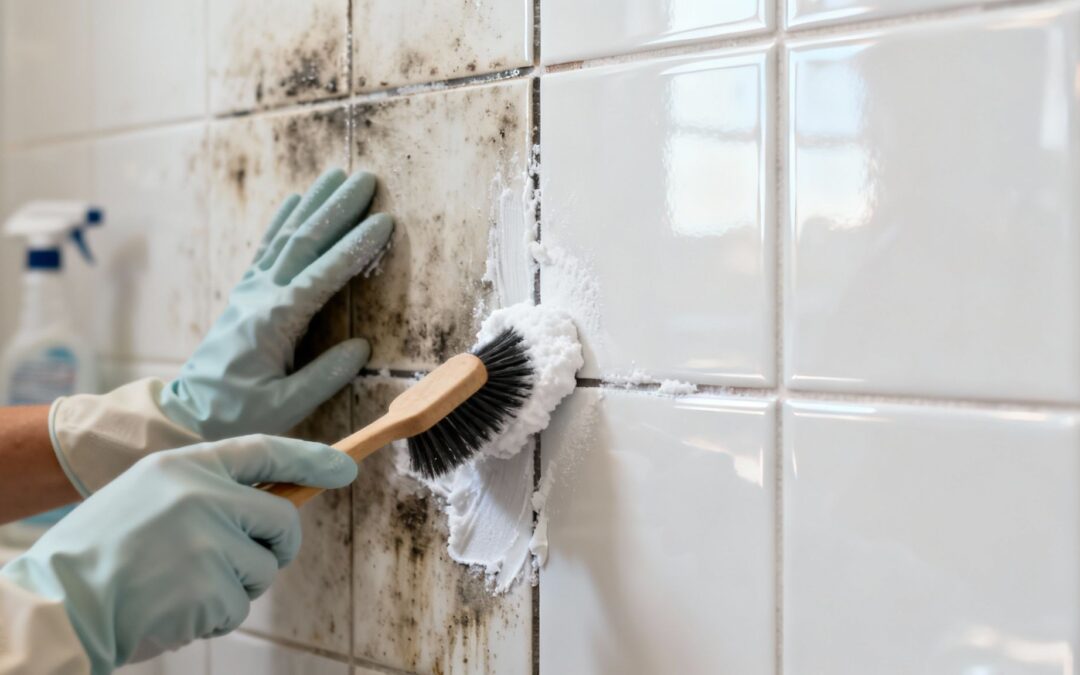
Knowing how to clean shower grout properly starts well before you even touch a brush to the tile. Just like a chef preps their ingredients, getting your supplies in order first makes the whole process smoother, safer, and far more effective.
Trying to fight stubborn stains with an old toothbrush and whatever spray you have under the sink usually just leads to sore muscles and disappointment. A little prep work makes all the difference.
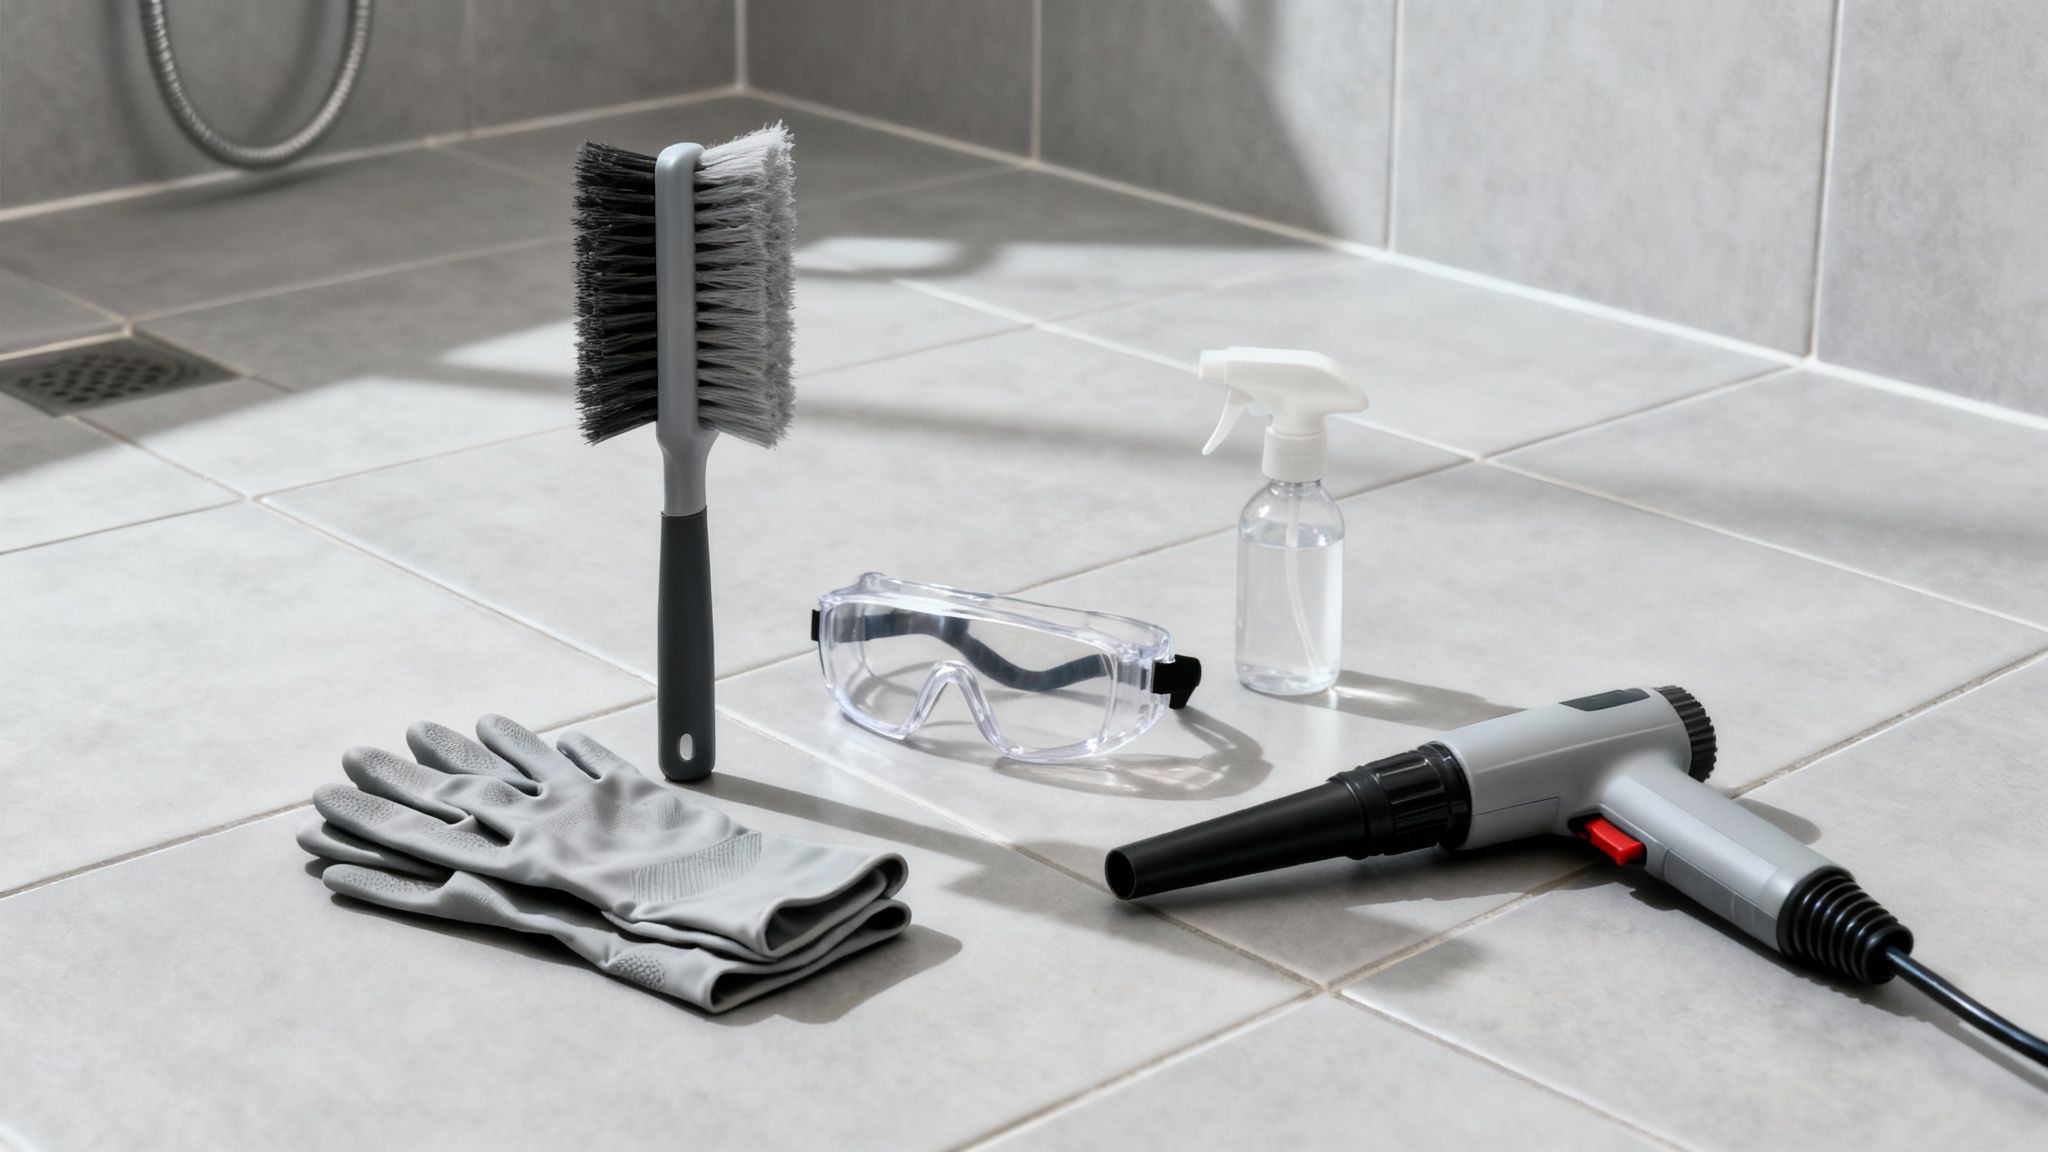
The cornerstone of any good grout cleaning kit is a proper grout brush. Unlike a regular toothbrush, these are specifically designed with stiff, angled bristles that get right into the grout lines. They give you maximum scrubbing power without you having to put in all the effort. For bigger shower floors, a long-handled brush will be a lifesaver for your back and knees.
To help you put together the perfect kit for your shower, here’s a quick rundown of the common tools and cleaners, what they’re good for, and their pros and cons.
Choosing Your Grout Cleaning Arsenal
| Item | Best For | Pros | Cons |
|---|---|---|---|
| Grout Brush | All grout cleaning tasks, big or small. | Stiff bristles get deep into grout lines; ergonomic handles reduce fatigue. | Can be too abrasive for very delicate or old grout. |
| Baking Soda & Water | Everyday soap scum and light water marks. | Natural, cheap, non-toxic, and surprisingly effective for minor grime. | Lacks the power for deep-set stains, mould, or mildew. |
| Oxygen Bleach | Stubborn discolouration and early signs of mildew. | Stronger than baking soda but less harsh than chlorine bleach; great for whitening. | Can be irritating to skin; requires good ventilation. |
| Steam Cleaner | Deep cleaning, killing mould spores, and sanitising. | Uses high-heat steam, no chemicals needed; dissolves grime effortlessly. | An expensive investment; can be bulky to store and use. |
| Waterproof Gloves | All cleaning tasks, especially with chemical solutions. | Protects skin from dryness, irritation, and chemical burns. | Can feel clumsy if they don't fit well. |
| Safety Goggles | When using any spray or chemical cleaner. | Prevents accidental splashes from getting in your eyes, which can be dangerous. | Can fog up in a steamy bathroom. |
This table should give you a solid starting point. You don’t need everything on the list, but having the right brush, a suitable cleaner, and your safety gear is non-negotiable.
Choosing Your Cleaning Solution
The cleaner you pick really comes down to what kind of stain you're up against. For the usual soap scum and light water marks, a simple homemade paste of baking soda and water often does the trick.
When you're dealing with tougher discolouration or the first hint of mildew, a specialised oxygen bleach cleaner gives you more grunt without the harsh fumes of chlorine bleach.
Beyond these specific grout cleaners, knowing a bit about choosing the right multi-purpose cleaner can give you more options for general upkeep around the bathroom.
This decision tree gives you a quick visual guide for which cleaner to grab depending on whether you're tackling light, daily grime or more serious mould.
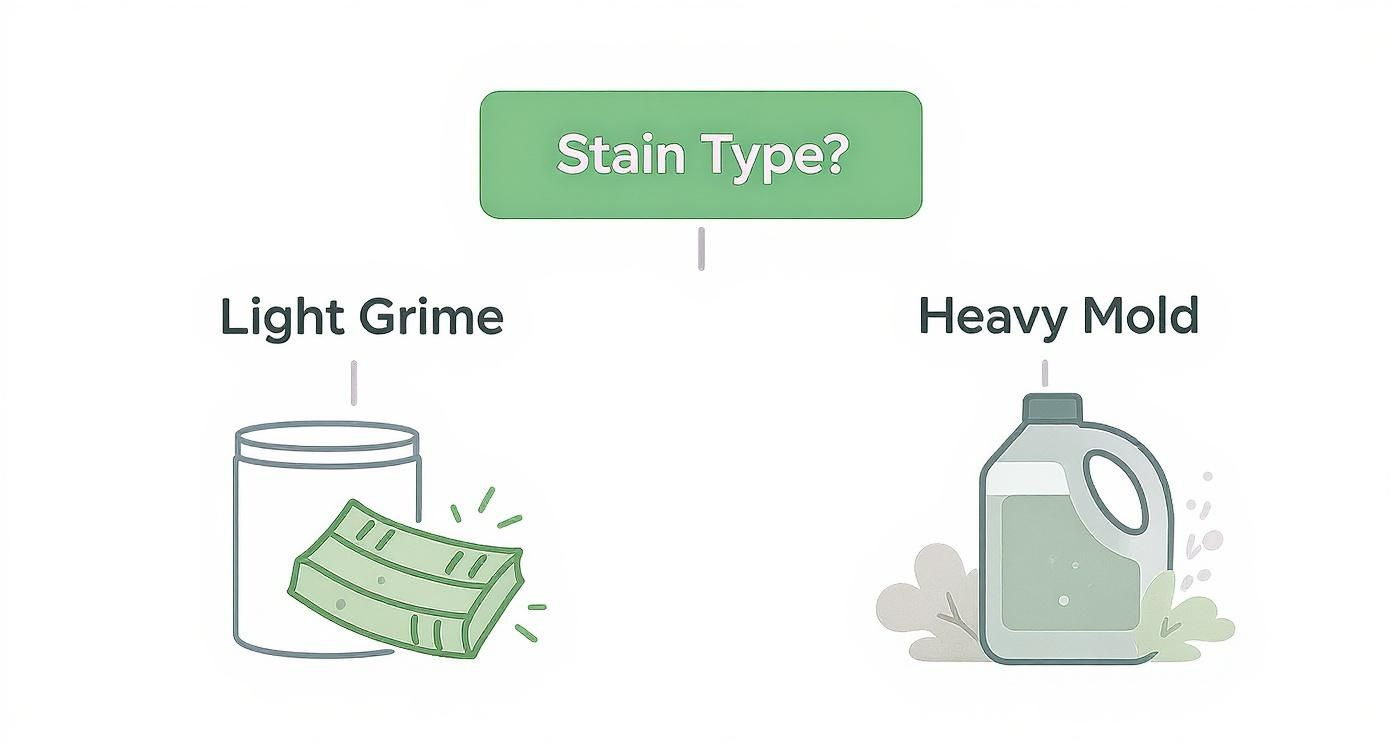
As you can see, the idea is to match the strength of your cleaner to the problem. Always start with the gentlest option and only move up to the stronger stuff if you need to.
Non-Negotiable Safety Measures
Safety has to be your number one priority, especially when you're working in a small, enclosed space like a shower. Heaps of cleaning products, both store-bought and natural, can release fumes that are irritating or even harmful if you breathe them in.
Always get the air flowing before you start. Crack open a window, switch on the bathroom exhaust fan, and maybe even stick a small portable fan in the doorway. It’s a simple step, but it’s absolutely critical for protecting your lungs.
Protecting your skin and eyes is just as important.
- Waterproof Gloves: These stop your hands from drying out and prevent nasty skin reactions from direct contact with cleaning solutions.
- Safety Goggles: Splashes happen when you're scrubbing. Goggles are your best defence against getting acidic or alkaline cleaners in your eyes, which can cause serious damage.
Finally, keep a few old towels or microfibre cloths handy for wiping surfaces and rinsing everything down. And if you're facing a particularly epic battle with grime, a steam cleaner can be your secret weapon. It uses high-temperature steam to blast away dirt and kill mould spores with very few, if any, chemicals.
Natural Cleaning Methods for Everyday Grime
Before you reach for the heavy-duty chemicals, it's worth remembering that most of the gunk in your shower doesn't need an aggressive approach. That everyday buildup of soap scum and water spots can often be tackled with a few simple ingredients you already have in the pantry.
Going the natural route is not only gentler on your grout and tiles but also much better for your home's air quality. A little regular maintenance with these methods will stop that stubborn, grimy buildup in its tracks, saving you from a major scrubbing session down the line. It's all about working smarter, not harder.
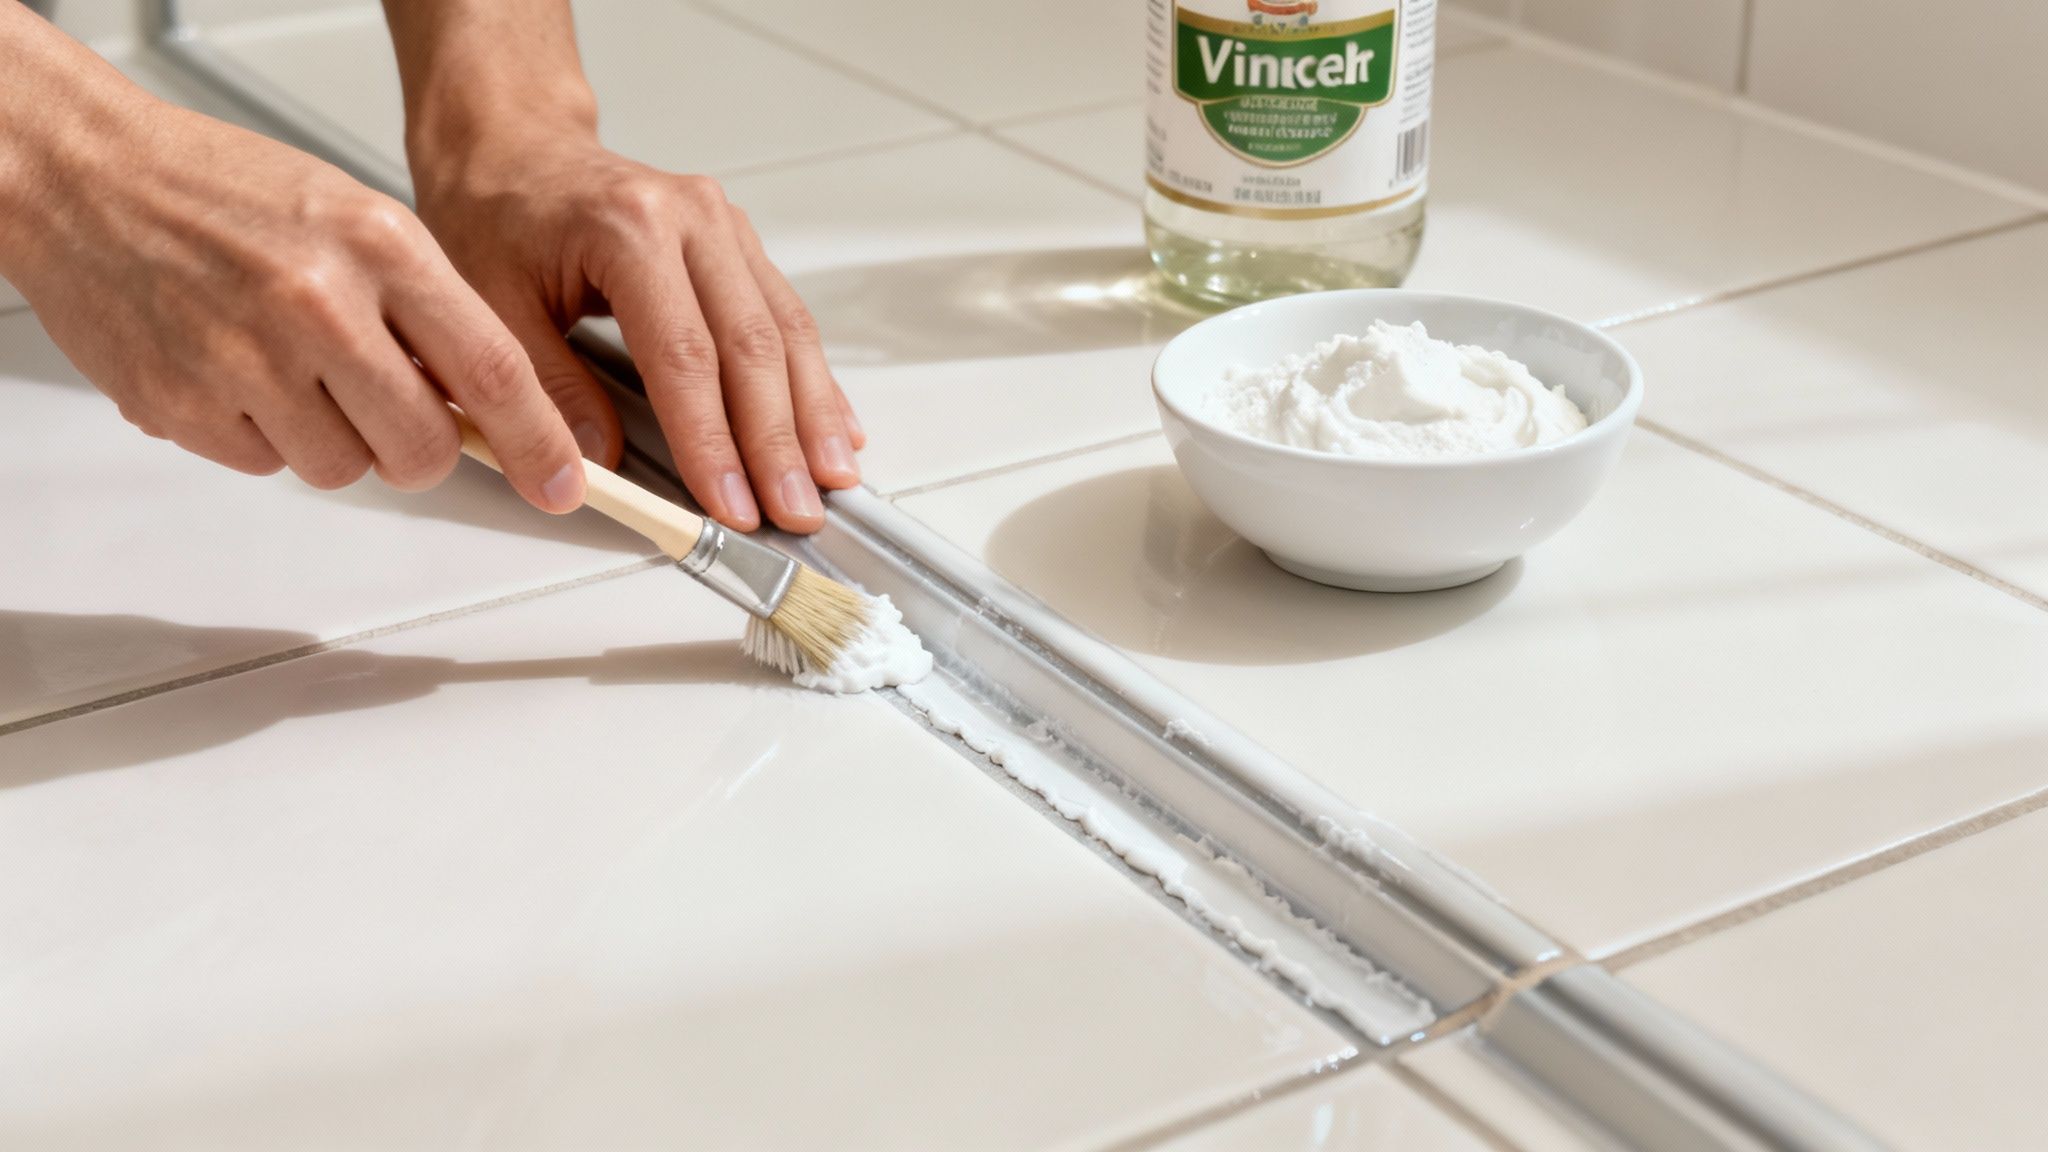
The Classic Bicarb Soda and Vinegar Paste
One of the most tried-and-true methods for learning how to clean shower grout comes down to two household staples: bicarb soda and white vinegar. This combination creates a fantastic foaming action that literally lifts the grime out of porous grout lines.
Bicarb soda acts as a mild alkali, dissolving dirt and grease, while its fine grit gives you a bit of scrubbing power without scratching your tiles. When you add the acidic vinegar, it reacts to release carbon dioxide gas. That fizzing and bubbling is what physically pushes the gunk out of the grout's tiny crevices, making it a breeze to scrub away.
Here’s how to mix up your own cleaning paste:
- Start with about half a cup of bicarb soda in a small bowl.
- Slowly mix in just enough water to form a thick paste—think the consistency of toothpaste. You want it thick enough to stick to the grout lines without sliding down the wall.
- Using a grout brush or an old toothbrush, work the paste directly into the grout, making sure you cover all the discoloured spots.
Let the paste sit for about 10–15 minutes. This gives the bicarb a chance to start breaking down the grime. Next, grab a spray bottle filled with white vinegar and spritz it directly over the paste. You’ll see it start to fizz immediately, and that’s your cue to get scrubbing.
Perfecting Your Natural Cleaning Technique
Once the foaming action dies down, use your grout brush to scrub the lines in a small circular motion. This really helps to dislodge any stubborn bits from all angles. For a real-world example, think about the shower floor where shampoo and soap residue really builds up—this paste-and-spray method is perfect for cutting right through that film.
After a good scrub, rinse the whole area with warm water from your showerhead. The final, and most important, step is to wipe everything dry with a clean microfibre cloth. This prevents new water spots from forming and gives you a streak-free finish.
Other Gentle Yet Effective Alternatives
While bicarb soda and vinegar are a powerhouse duo, they're not your only options. It's always good to have a few other tricks up your sleeve for different situations.
-
Hydrogen Peroxide: Got some light mildew stains or grout that’s looking a bit dull? A 3% hydrogen peroxide solution is an excellent choice. It works as a natural brightener without the harsh fumes of chlorine bleach. Just spray it directly on the grout, let it sit for 10 minutes, then scrub and rinse. For an extra kick, you can even make your bicarb paste with peroxide instead of water.
-
Dish Soap and Warm Water: Never underestimate the power of good old soapy water. For your weekly clean, a few drops of quality dish soap in a spray bottle of warm water works wonders on fresh soap scum before it hardens. It’s the perfect gentle solution for your tiles and glass screen, too.
Expert Tip: With natural cleaners, consistency is everything. A quick spray and wipe-down after every few showers will dramatically cut down on how often you need to do a deep scrub. Prevention is always easier than the cure.
By working these simple, non-toxic methods into your regular cleaning routine, you’ll keep your shower grout looking fresh without the cumulative damage or health risks that come with harsh chemicals. This is your playbook for maintaining a pristine shower without the heavy lifting.
Tackling Stubborn Mould and Mildew Head-On
When the everyday natural cleaners just don't cut it and those stubborn black or pink spots refuse to budge, it’s time to bring out the heavy hitters. Stubborn mould and mildew demand a more targeted approach that goes way beyond a simple surface clean.
You need a strategy that gets to the source of the problem, killing the spores to stop them from coming right back. This is where stronger solutions like oxygen bleach or specialised mould removers come into play. These products are designed to break down the very structure of mould for a deeper, more lasting clean. But with greater power comes a greater need for caution.
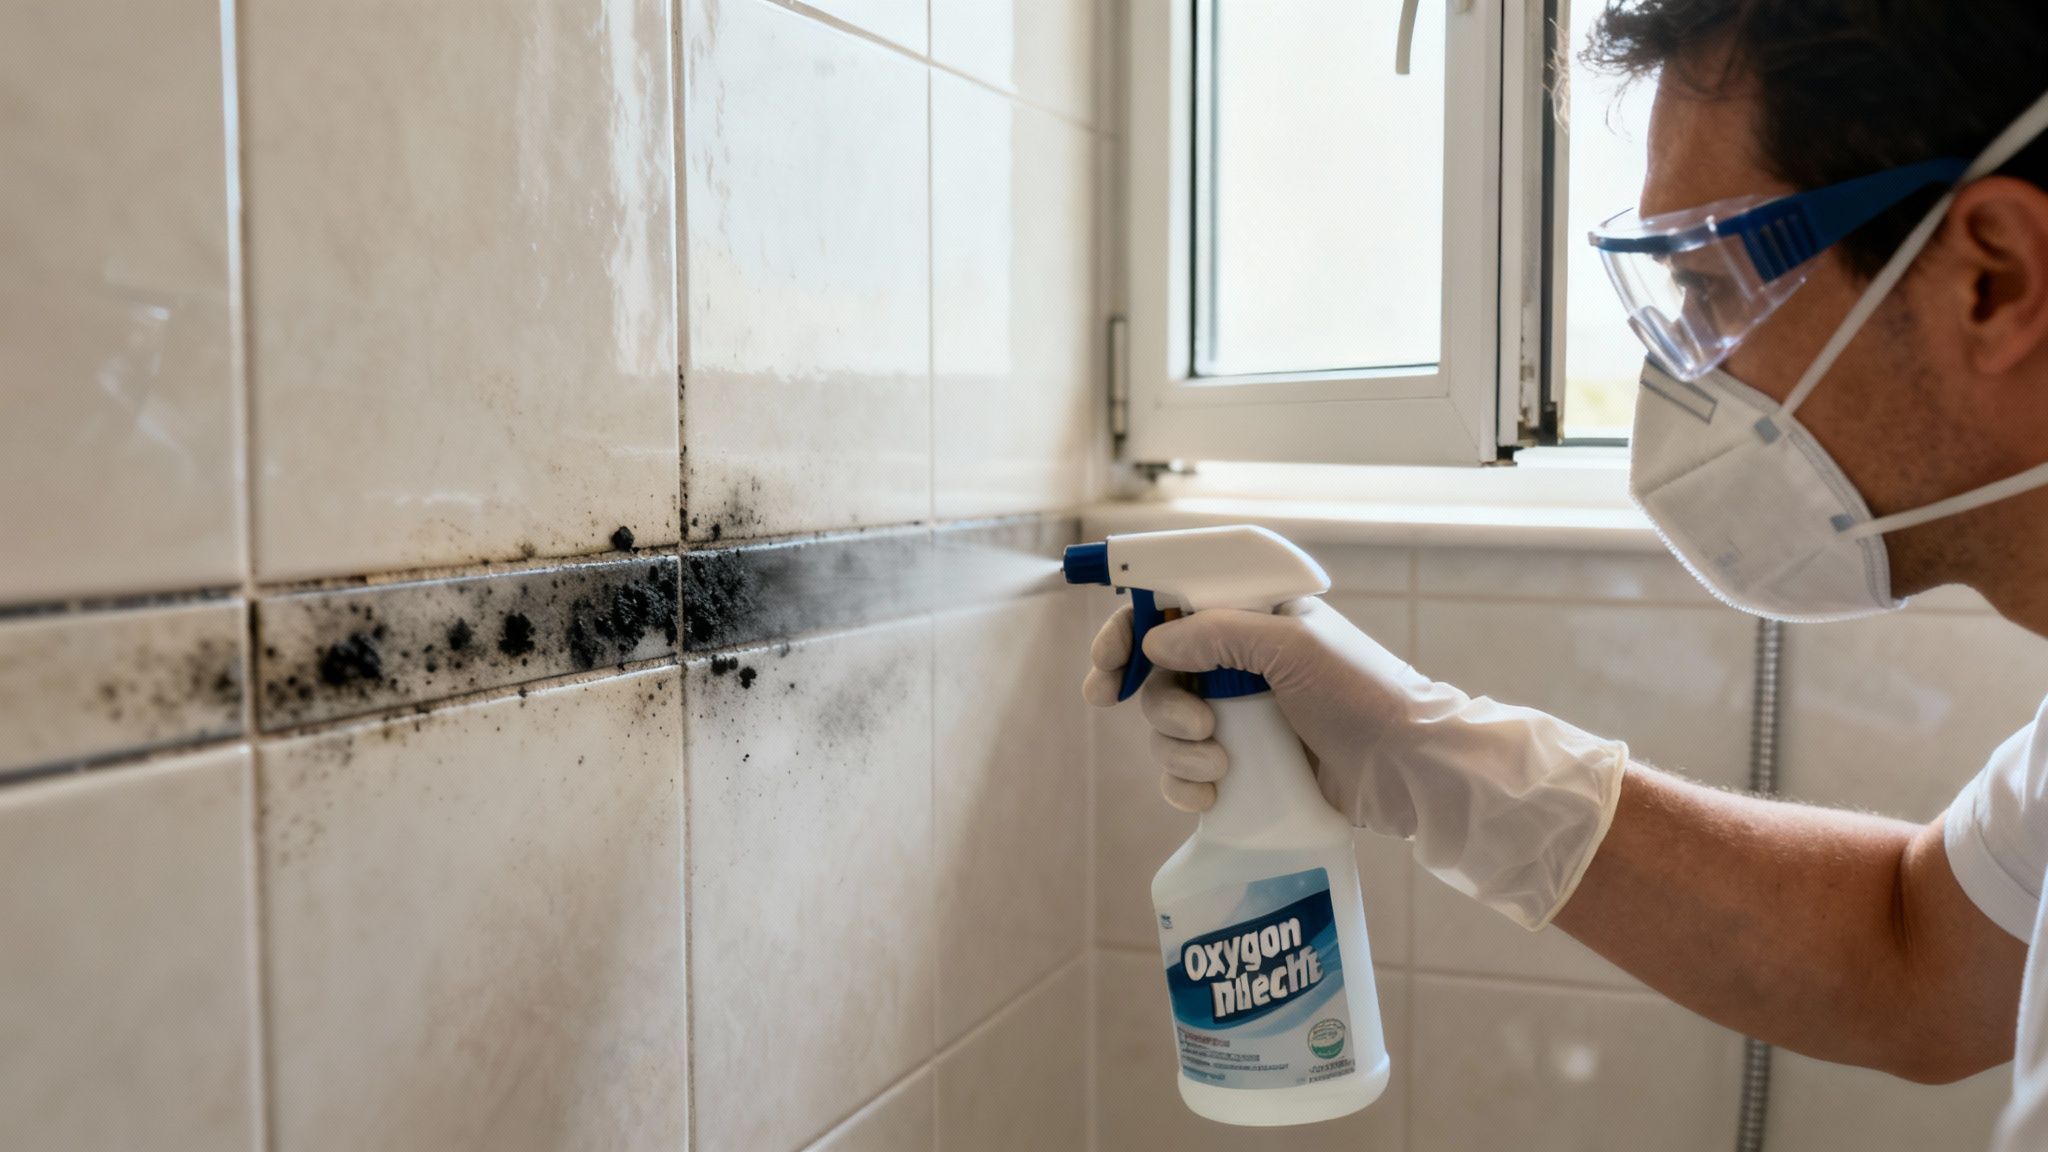
The Power of Oxygen Bleach
Think of oxygen bleach as the perfect step up from your bicarb soda and vinegar mix. It’s a non-chlorine bleach that works by releasing oxygen when mixed with water. This chemical reaction is incredibly effective at lifting stains and killing mould without the harsh, corrosive fumes of traditional chlorine bleach.
Here’s how to use it to make a real impact:
- Make a Paste: In a small bowl, mix a few tablespoons of powdered oxygen bleach with just enough hot water to form a thick, spreadable paste. You want it to cling to the grout lines, not run down the tiles.
- Apply Directly: Using an old toothbrush or a stiff grout brush, work the paste directly onto the mouldy grout. Be generous and make sure every affected area is completely covered.
- Let it Sit: This is the most important part. You have to give the paste time to work its magic. Let it sit for at least 30 to 60 minutes. This dwell time is what allows the oxygen to penetrate the porous grout and kill the mould at its roots.
- Scrub and Rinse: After the time is up, give the grout lines a light scrub with your brush to loosen any remaining grime. Then, just rinse the whole area thoroughly with warm water.
This method is brilliant for whitening grout that’s become discoloured over time, as it tackles both the stain and the fungal growth causing it.
Remember, the goal is to kill the mould, not just bleach the stain it leaves behind. Allowing the cleaning solution adequate time to work is the key to a successful deep clean and is a critical step in learning how to clean shower grout effectively.
Dealing with Deep-Set Mould
Sometimes, especially in bathrooms that struggle with ventilation, mould can become deeply embedded in the grout. In these tougher cases, you might need to reach for a commercial mould and mildew remover. These products often contain powerful fungicides designed specifically to destroy stubborn growth.
Exploring safer alternatives to bleach is always a good idea, as many can deliver great results without the harshness of traditional chemicals. But if you do choose a commercial product, always follow the manufacturer's instructions to the letter.
This is a familiar battle in many households. Mould growth in Australian showers is incredibly common, thanks to our warm, humid climate that creates the perfect breeding ground. Grout is porous and rough, unlike waterproof tiles, so it easily traps dust and soap scum, which in turn feeds mould. While natural methods are fantastic, sometimes you just need a stronger approach for a fast, thorough clean.
Critical Safety and Ventilation
Working with any strong cleaning agent requires you to take safety seriously. A small, enclosed shower can concentrate fumes quickly, making proper ventilation an absolute non-negotiable.
Your Safety Checklist:
- Get the Air Moving: Before you even open the bottle, open the bathroom window and switch on the exhaust fan. If you don't have either, place a fan in the doorway facing out to pull fumes from the room.
- Gear Up: Always wear waterproof gloves to protect your skin from irritation or chemical burns. Safety goggles are also a must to guard against accidental splashes.
- Never Mix Chemicals: This is the golden rule of cleaning. Never mix bleach-based products with any other cleaner, especially anything containing ammonia or acids (like vinegar). Doing so can create highly toxic chlorine gas, which is extremely dangerous.
If you start to feel dizzy, lightheaded, or have trouble breathing, leave the area immediately and get some fresh air. Your health always comes first.
Protecting Your Grout for Long-Lasting Results
Getting your grout back to that fresh, bright state feels like a huge win. But all that scrubbing will be for nothing if you don't take a few steps to protect it.
Honestly, the real secret to knowing how to clean shower grout is learning how to keep it clean in the first place. This is where we shift from reactive cleaning to proactive prevention—a move that will save you hours of work down the line.
The single most important thing you can do after a deep clean is to seal your grout. Grout is naturally porous, acting like a tiny sponge that soaks up water, soap scum, body oils, and mould spores. A quality grout sealer creates an invisible, waterproof barrier, stopping grime from sinking in and making future cleaning so much easier.
Choosing and Applying a Grout Sealer
Not all grout sealers are created equal. You’ll generally find two main types on the shelf at your local hardware store, and picking the right one comes down to your needs and grout type.
-
Penetrating Sealers: These soak right into the grout and bond with it chemically, creating a stain-resistant barrier from the inside out. They're a brilliant choice for most showers because they don’t change the look or feel of the grout.
-
Topical or Membrane-Forming Sealers: These create a protective film over the top of the grout, almost like a coat of paint. While they work, they can sometimes look a bit glossy and might peel or flake in a high-moisture shower if not applied perfectly.
For most bathroom situations, a penetrating sealer is the way to go because of its durability and natural finish.
Applying the sealer is pretty straightforward, but it does require some patience. Make sure your grout is completely clean and, most importantly, bone dry. This usually means waiting at least 24 to 48 hours after your last deep clean.
Most sealers come with a small brush or applicator tip. Carefully run the sealer along the grout lines only, wiping any excess off the tiles straight away with a damp cloth before it has a chance to dry.
You'll need to let the sealer cure fully according to the manufacturer's instructions, which usually means keeping the shower dry for another 24 to 72 hours. I know it's an inconvenience, but this curing time is crucial for creating a durable, long-lasting barrier.
Building Proactive Daily Habits
While sealing is a powerful job you might do once a year, what you do every day has an even bigger impact on preventing build-up. A few simple habits can dramatically cut down how often you need to do a deep, heavy-duty clean. These small actions disrupt the warm, damp environment that mould and mildew love.
The goal is simple: minimise moisture and soap residue.
- Use a Squeegee: Keep a small squeegee in your shower. After every use, take 30 seconds to wipe down the tiles and glass. This simple act removes most of the water and soap scum before it can dry and stain.
- Improve Ventilation: This one is non-negotiable. Run your bathroom's exhaust fan for at least 20-30 minutes after every shower to pull all that humid air out of the room. No fan? Crack a window open to get the air moving.
- Dry Off Surfaces: Got any shelves or niches where water tends to pool? Give them a quick wipe with a microfibre cloth.
Adopting these routines turns grout protection from a major annual chore into a minor part of your daily life. It’s the difference between constantly battling grime and maintaining a shower that looks fresh and clean with very little effort.
Look, even the most committed DIY-er eventually meets their match. There comes a point where bicarb soda and a whole lot of elbow grease just won't cut it anymore for your shower grout. While your regular cleaning routine can handle the everyday stuff, there are some definite red flags that signal it’s time to hang up the scrubbing brush and call in a professional.
Recognising these signs isn't admitting defeat—it's the smart move. It can save you a ton of time, prevent some seriously expensive damage down the track, and get your shower looking genuinely new again. Sometimes, what looks like a simple stain is actually a symptom of a much deeper issue that your household cleaners just can't touch.
Telltale Signs You Need an Expert
Are you stuck in a frustrating loop, scrubbing the same stubborn stains week after week with zero progress? That’s a classic sign the grime has worked its way deep into the porous grout, far beyond the reach of surface cleaners. Professionals come armed with high-pressure steam and commercial-grade solutions that can lift years of filth in a matter of minutes.
Here’s when you should seriously consider picking up the phone:
- Crumbling or Cracked Grout: If you see grout that’s breaking apart, chipping away, or showing obvious cracks, stop scrubbing immediately. You’ll only make it worse. This kind of damage is a direct invitation for water to seep behind your tiles, which can lead to widespread water damage and even structural problems.
- Widespread or Recurring Mould: Little patches of mould that reappear almost as soon as you’ve cleaned them often point to a bigger problem. It could be poor ventilation, or worse, a sign that moisture is trapped behind the walls, creating a permanent breeding ground for nasty mould spores.
- Stains That Defy All Efforts: Have you thrown everything at it? Bicarb soda, vinegar, oxygen bleach, and even the strongest grout cleaners from the hardware shop, but that orange or black stain just laughs back at you? Deep-set mineral deposits or oil-based grime can chemically bond with the grout, and that requires professional extraction methods to break down.
When you're dealing with crumbling grout, the problem is no longer about cleaning—it's about structural integrity. A professional can properly assess the damage, remove the compromised sections, and re-grout to ensure a waterproof seal, protecting your home from costly water damage.
What to Expect from a Professional Service
Let’s be clear: a professional tile and grout cleaning service is a world away from a weekend DIY session. These technicians show up with powerful, often truck-mounted equipment that you simply can’t rent from the local shops. They follow a very methodical process to deliver a deep, lasting clean that you can see and feel.
Typically, the process starts with a pre-treatment spray designed to break down dirt and oils. This is followed by a high-pressure, high-temperature steam clean that blasts grime out of the grout’s pores while also sanitising the surface. Afterwards, a good service will recommend (or apply) a professional-grade sealant to protect the grout lines, making your future cleaning efforts a whole lot easier.
Budgeting for Professional Grout Cleaning
Knowing the potential cost helps you make an informed decision without any surprises. Here in Australia, you can expect the price for professional tile and grout cleaning in a standard shower to range from $25 to $40 per square metre. Most bathroom jobs end up costing somewhere between $100 and $200.
If you want that long-term protection, adding a grout sealing service will tack on an extra $25 to $35 per square metre. For more severe damage requiring restoration or recolouring, the cost shifts to an hourly rate, usually between $45 and $150. In a worst-case scenario where the tiles and grout are beyond saving, you might be looking at retiling, which averages around $60 per square metre. For a better idea of what goes into the final price, you can find more detail on the elements that influence tile and grout cleaning costs.
Bringing in a professional isn’t giving up; it’s a strategic investment in the health, value, and longevity of your bathroom.
Got Grout Questions? We've Got Answers
Even when you're armed with the best cleaning methods, a few tricky situations always seem to pop up. Getting the right answers can be the difference between a frustrating Saturday chore and a sparkling, refreshed shower. Let's tackle some of the most common questions we hear from homeowners.
Getting these details right helps you work smarter, protect your grout for the long haul, and solve those annoying little problems that can leave you scratching your head.
How Often Should I Deep Clean My Shower Grout?
For an average household, a deep clean every three to six months is a pretty good benchmark. But honestly, it really depends on how often the shower gets used, how good your bathroom's ventilation is, and whether you live in a humid climate.
The most practical answer? Act as soon as you notice any discolouration or the first hint of mildew.
Your daily habits are far more important than a big cleaning session every few months. Using a squeegee after showering and running the exhaust fan for 20 minutes will do more to prevent buildup than anything else.
This proactive approach means less scrubbing for you and better-looking grout over time.
Can I Just Use Straight Bleach on My Grout?
Using undiluted chlorine bleach is a classic mistake, and it can cause more harm than good. It's an aggressive chemical that's way too harsh for grout. Over time, it will slowly eat away at the grout, fade its colour, and can even damage the finish on certain types of tiles.
There are much safer—and still very effective—ways to get the job done.
- Diluted Bleach Solution: A better option is to mix one part chlorine bleach with three parts water.
- Oxygen Bleach: This is a fantastic alternative. Powdered oxygen bleach products whiten beautifully without the intense fumes or corrosive effects.
Whichever you choose, always make sure your bathroom is well-ventilated. Open a window, get the exhaust fan running, and—this is critical—never mix bleach with other cleaners, especially anything containing ammonia or acids.
Why Did My Grout Turn Yellow or Orange?
That unsightly discolouration is usually caused by one of two things. It could be stubborn mineral deposits from hard water (iron is a common culprit, leaving that rusty tint), or it's a thick buildup of soap scum that's mixed with body oils.
If you've tried a standard baking soda paste and the stain isn't budging, that's a strong clue you're dealing with a mineral issue.
In this case, you'll probably need a cleaner specifically designed to tackle hard water stains and limescale. Just remember to test any new, powerful product on a small, hidden spot first. This quick patch test will make sure it won't cause any unexpected discolouration or damage to your grout or tiles.
What Should I Do if My Grout Is Cracking?
Stop cleaning immediately. If you notice your grout is crumbling, cracking, or chipping away, grabbing a scrub brush is the worst thing you can do. Aggressive scrubbing will only make the damage worse and can create little pathways for water to seep behind your tiles. That can lead to major structural problems and widespread mould growth you can't even see.
At this point, your priority has to shift from cleaning to repair. You'll need to carefully remove the damaged sections and replace them with new grout. Once the new grout has fully cured—which usually takes about 48-72 hours—you can apply a quality sealer to protect it and get back to a gentle cleaning routine. Ignoring cracking grout is a risk you just don't want to take.
At Right Price Carpet Cleaning, our professional technicians use powerful, truck-mounted steam cleaning equipment to restore your tile and grout to its former glory. If DIY methods aren't cutting it, get an instant quote online and let us handle the tough work for you.
Recent Comments