


That awful, sinking feeling you get when a candle drips all over your beautiful carpet doesn't have to be a permanent disaster. The absolute key to fixing it is simpler than you think: let the wax harden completely before you even think about touching it.
Jumping in too soon and trying to wipe it up will only smear the hot wax deeper into the carpet fibres, turning a small, manageable spot into a widespread, greasy mess.
Your First Move After a Carpet Wax Spill
When you see a fresh wax spill, every instinct will tell you to grab a cloth and start scrubbing. You have to fight that urge. Wiping hot, liquid wax will just embed it further into the pile, making your job ten times harder.
So, what's the best first step? Do nothing. Seriously. Just give the wax time to cool down and solidify on its own.
Once it's hard to the touch, you can properly see what you're dealing with. Is it a thick, raised blob sitting mostly on top of the fibres? Or is it a flatter stain that has soaked right in? This difference is crucial because it tells you exactly which method to use next.
Choosing Your Removal Strategy
There are two main, highly effective DIY methods for getting wax out of a carpet. Each one is designed for a different type of spill.
-
The Freezing Method: This is your go-to for thick, chunky spills. By making the wax cold and brittle, you can easily break it up and lift away the bulk of it without much fuss.
-
The Heat Method: This technique is perfect for wax that has already melted deep into the carpet fibres, leaving more of a stain than a lump. Gentle heat re-melts the wax, allowing an absorbent cloth to pull it straight out.
Carpets are a huge part of Australian homes—in fact, the local market is expected to hit AU$1.29 billion in 2025, which shows just how much we love them. And when it comes to care, industry advice consistently points to either controlled heat or freezing as the most reliable ways to handle these kinds of spills. You can find plenty of great carpet care methods online that back this up.
To make it even easier, here's a quick way to choose the right approach.
Quick Guide to Choosing Your Wax Removal Method
Use this table to quickly identify the best approach for your wax spill.
| Method | Best For | Essential Tools |
|---|---|---|
| Freezing Method | Thick, raised blobs of wax that are sitting on top of the carpet. | Ice cubes, dull knife or spoon, vacuum cleaner. |
| Heat Method | Flatter stains where wax has soaked into the carpet fibres. | Iron, brown paper bags or clean cloths, carpet spot cleaner. |
Making the right choice from the start saves you a lot of time and potential frustration.
This decision tree helps you visualise which path to take.

As the infographic shows, thick spills respond best to cold, while stains that have soaked in need heat. By correctly identifying your spill type right at the beginning, you set yourself up for a successful, stress-free cleanup.
Using Heat to Lift Wax From Carpet Fibres
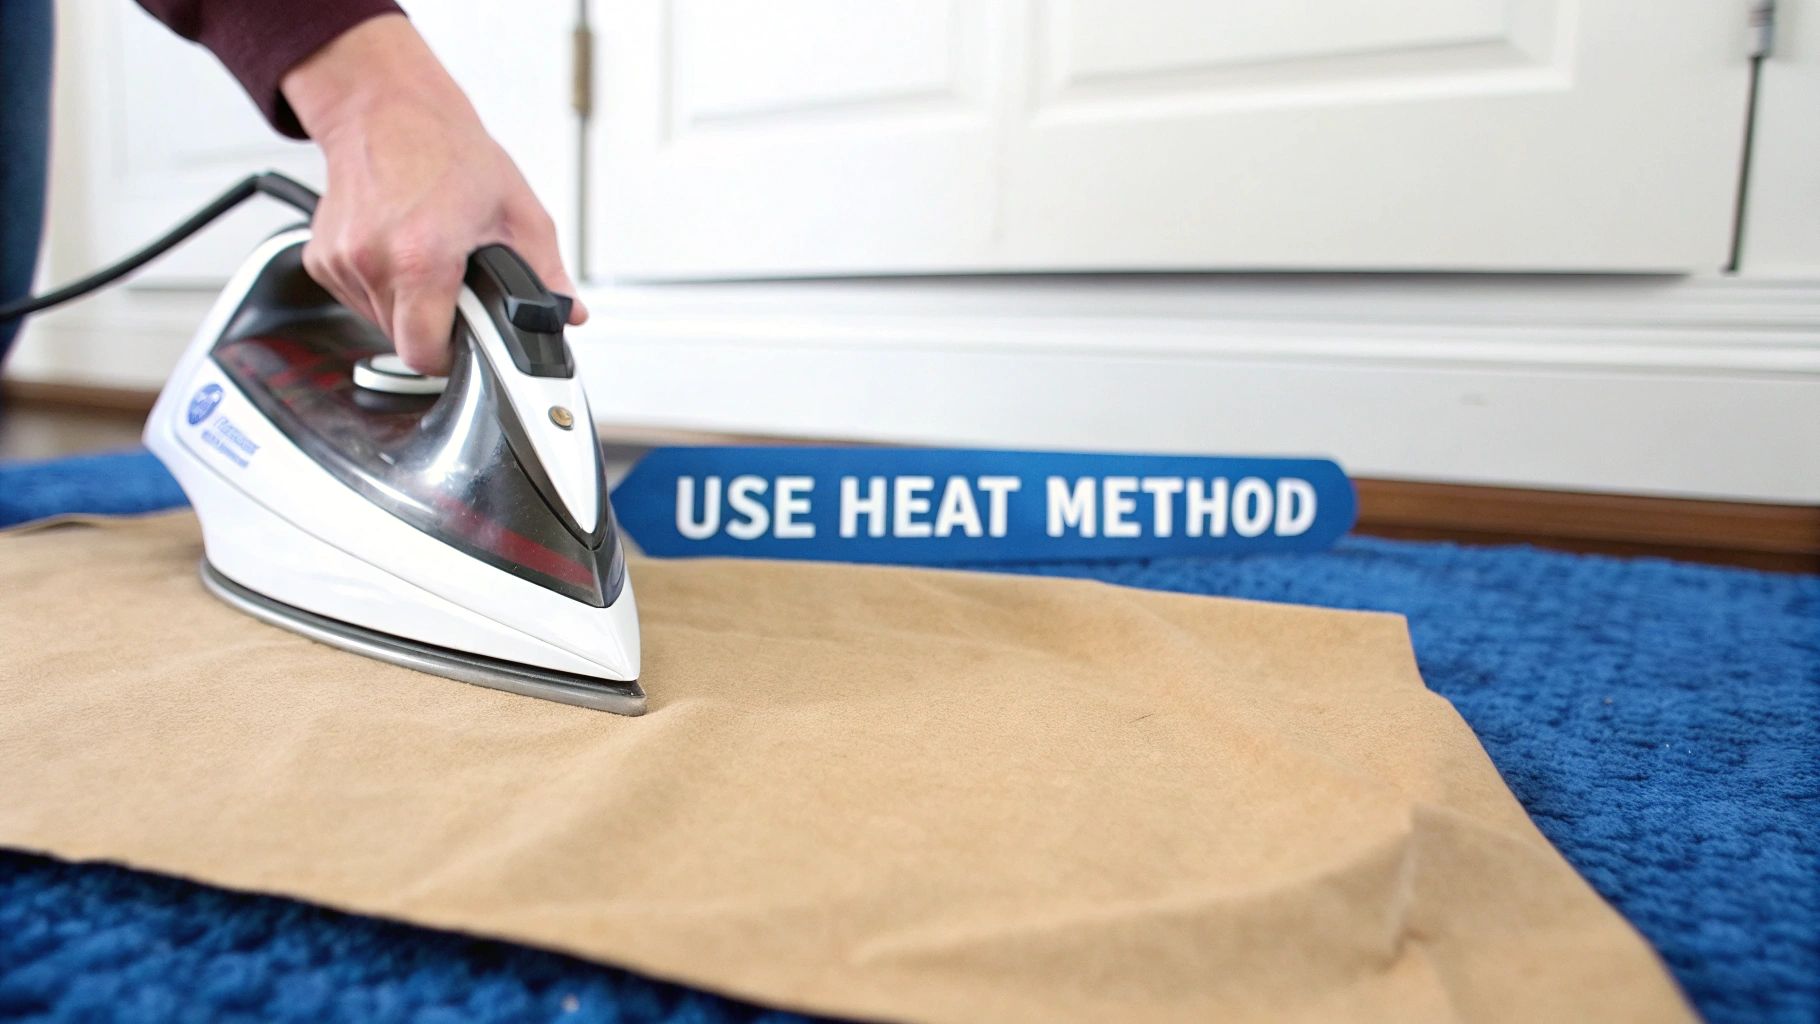
When wax melts deep into your carpet, it leaves a stubborn, greasy stain that scraping alone just won't fix. This is where the classic heat transfer method comes in handy. It’s a surprisingly effective technique that uses gentle warmth to re-melt the wax, letting an absorbent material pull it straight out of the fibres.
Think of it like blotting up a liquid spill, but you’re working in reverse. You're turning a solid back into a liquid just long enough to capture it. For this process to work, all you need are a couple of common household items and a little bit of patience.
The goal is to apply just enough heat to liquefy the wax without scorching or melting the actual carpet fibres, which is a real risk with synthetics.
Preparing for Heat Application
Before you even think about plugging in the iron, getting your prep right is the key to a successful outcome. First, make sure you've already scraped away any large, solid chunks of wax from the surface. This method is designed for the residue that's already worked its way into the pile.
Next, gather your absorbent materials. You have a few great options here, and you probably already have them at home.
-
Brown Paper Bags: The plain, ink-free kind you get from a bakery or fruit shop is perfect. Their porous nature makes them excellent for soaking up oils and wax.
-
Clean White Cotton Cloths: An old t-shirt or tea towel will do the trick. Just make sure it's completely clean and white to avoid any colour bleeding onto your carpet when you apply heat.
-
Paper Towels: A few layers of plain white paper towel can also work in a pinch, though you might find you go through them a lot more quickly.
Lay your chosen material flat over the entire wax stain, making sure it’s completely covered. Now, you’re ready for the most important tool: the iron.
Applying Heat the Right Way
Set your iron to its lowest possible heat setting. This is crucial. And just as important, make sure the steam function is turned off. Steam introduces moisture, which can permanently set the stain or even damage your carpet's backing.
Safety First: Always perform a spot test before you start on the main stain. Find a hidden area of your carpet, like inside a wardrobe or under the sofa, and press the warm iron over a cloth for a few seconds. If there's no discolouration or fibre damage, you're good to go.
Once your safety check is done, gently place the warm iron on top of the paper bag or cloth covering the stain. The key here is constant, slow movement. Never let the iron sit still in one spot—that focused heat is what causes those dreaded scorch marks.
Glide the iron over the area for just a few seconds at a time. You’ll start to see the paper or cloth darken as it soaks up the melting wax. This is the magic happening; the heat is liquefying the wax, and the absorbent material is wicking it away from your carpet fibres.
Lift the iron and the cloth every 10-15 seconds to check your progress. As one section of the cloth becomes saturated with wax, you’ll need to shift to a clean spot or grab a fresh piece entirely. If you keep using a waxy cloth, you’ll just end up putting the wax right back where it came from. Keep repeating this process—heat, lift, check, and reposition—until no more wax is being absorbed.
Applying the Freezing Method for Thick Spills
While the iron method is fantastic for wax that’s soaked into the fibres, it can turn a big, solid blob of wax into a giant, greasy nightmare. When you’re dealing with a thick, raised spill, you need to flip the strategy completely. Instead of melting it, you’re going to freeze it.
The science here is simple but incredibly effective. By dropping the temperature, the wax changes from a pliable solid into a fragile, glass-like substance. This makes it a breeze to break apart and lift away from the carpet fibres without yanking or snagging them. It’s the perfect trick for those candle accidents that leave a chunky mound behind.
Chilling the Wax Spill
First things first, you need to get that wax frozen solid. You don’t need any fancy gear for this—a quick trip to the freezer is all it takes. Your goal is to apply direct, intense cold for at least 10-15 minutes.
A few common household items work perfectly for this job:
-
An Ice Pack: A standard gel-filled ice pack is brilliant because it stays cold and can mould to the shape of the spill.
-
A Bag of Ice Cubes: Just pop some ice cubes into a zip-lock bag. This stops water from melting all over your carpet and making a bigger mess.
-
Frozen Vegetables: Seriously! A bag of frozen peas or corn is surprisingly effective, as the small pieces form perfectly around the wax lump.
Place your chosen freezing agent right on top of the wax and give it time. You’ll know it’s ready when the wax is rock-hard to the touch.
Carefully Scraping the Frozen Wax
Once the wax is properly frozen, it’s time to gently shatter it. The key here is using a tool that’s firm but not sharp enough to slice or damage your carpet fibres. Getting too aggressive will only leave you with frayed loops and a damaged pile.
A dull butter knife is usually the best tool for the job, but the edge of a spoon or a plastic scraper works well too. Place your tool at the base of the frozen wax and apply a little pressure to start chipping it away. You should hear it crackle and shatter—that’s exactly what you want.
The goal is to fracture the wax into small, easy-to-manage pieces. Work from the outside edges inward, lifting the fragments as they break off. Whatever you do, don't try to pry the whole chunk off at once. You’ll just pull out carpet fibres along with it.
The Final Clean-Up
After you’ve chipped away all the big pieces, you'll be left with smaller flakes and waxy dust. This is where your vacuum cleaner comes in. Grab an attachment with good suction and go over the area thoroughly, pulling every last particle from deep within the carpet pile.
This freezing method is exceptionally good at removing the bulk of the wax—often 90% or more of the spill. It might, however, leave a faint oily or coloured residue behind. That’s perfectly normal. The area is now prepped and ready for a final spot-cleaning treatment to finish the job.
You've managed to lift the solid wax off your carpet—fantastic! That’s the hardest part over. But don't put the cleaning supplies away just yet. You'll often be left with a tell-tale oily patch or a colourful dye stain from the candle.
This final clean-up is what really makes the difference, taking your carpet from "fixed" to looking like nothing ever happened. The good news is, you probably don’t need to rush out and buy harsh chemicals. The best tools for the job are likely already in your kitchen pantry.
Here in Australia, we're big fans of using everyday household items for cleaning. It's practical, cheap, and it just works. It's no surprise the Aussie household cleaners market is set to be worth a massive AU$425.83 million in 2025. That figure covers everything from specialised sprays to trusty staples like vinegar and bicarb soda, which are perfect for this last step. You can discover more about the household cleaners market and see how much we rely on these products.
Tackling Oily Patches with Bicarb Soda
Even plain, unscented wax can leave behind a greasy-looking mark. This is where bicarb soda (or baking soda) comes in. It’s brilliant at absorbing oil and drawing it right out of the carpet fibres.
Go ahead and sprinkle a generous amount of bicarb soda over the oily patch. Don't be shy with it—you want to cover the entire area. Let it sit for at least an hour, or even longer if the spot is particularly stubborn. The powder will slowly do its thing, soaking up the oil. Once it's had time to work, just vacuum the area thoroughly until all the powder is gone.
Creating a Vinegar Solution for General Stains
If you're left with a bit of discolouration or just want to freshen up the spot, a simple white vinegar solution is incredibly effective. Vinegar is a mild acid, so it’s great for breaking down stains without being harsh on most carpets.
-
Mix your solution: Just combine equal parts white vinegar and warm water in a spray bottle.
-
Spray lightly: Give the stained patch a light misting. The key is to dampen it, not soak it.
-
Blot, don’t rub: Grab a clean, white cloth and gently blot the area. Always start from the outside of the stain and work your way in. This stops it from spreading.
Crucial Technique: If you remember one thing, make it this: always blot gently. Rubbing or scrubbing a stain is the worst thing you can do. It grinds the pigment deeper into the carpet pile, making it almost impossible to get out later.
Dealing with Stubborn Coloured Dye Stains
Those beautiful, brightly coloured candles can leave behind some seriously stubborn dye stains that vinegar and water just won't touch. For these tougher jobs, isopropyl alcohol (rubbing alcohol) is your secret weapon.
But first, always do a spot test. Find a hidden area of your carpet—inside a cupboard or under a sofa—and dab a tiny amount of alcohol on it with a cotton bud. Let it dry completely and check for any colour bleeding or damage to the fibres. If everything looks good, you're clear to proceed.
Next, apply a small amount of the isopropyl alcohol to a clean, white cloth. Never pour it directly onto the carpet, as that gives you less control. Gently dab at the dye stain. You should start to see the colour transferring from the carpet to your cloth. Keep dabbing with a clean section of the cloth until the stain lifts completely. It’s this careful, patient approach that is key to getting wax out of a carpet for good, leaving absolutely no trace behind.
Of course! Here is the rewritten section, crafted to sound like an experienced human expert, following all the specified requirements.
Knowing When to Call a Professional Carpet Cleaner
While DIY methods are fantastic for tackling most accidental candle drips, there are definitely times when stepping back is the smartest move. Knowing how to get wax out of carpet yourself is a great skill, but sometimes the risk of causing permanent damage outweighs the satisfaction of a DIY win. This is especially true when you’re dealing with delicate materials or an overwhelming mess.
Not all carpets are created equal. Synthetic fibres like nylon and polyester are generally quite resilient, but natural fibres are a different story entirely. If the wax has spilled on a carpet made from wool, silk, or jute, it’s time to pause. These materials are highly sensitive to both heat and cleaning solutions. Using an iron, even on a low setting, can scorch wool fibres, while the wrong cleaning agent can cause irreversible colour bleeding or weaken the fabric's structure.
Protecting your investment is the top priority. For delicate, high-value, or antique rugs, the risk of a DIY mistake is simply too high. A professional cleaner has the right tools and specialised knowledge to treat these materials safely.
Situations That Demand an Expert
Beyond the type of carpet, the nature of the spill itself is a major factor. You should strongly consider calling in a professional like Right Price Carpet Cleaning if you're facing any of these scenarios:
-
Massive Spills: If an entire large candle has tipped over, the sheer volume of wax can be too much for household methods to handle effectively. You'll likely just end up chasing it around.
-
Deeply Ingrained Wax: For wax that has been stepped on and ground deep into the carpet pile over time, surface treatments simply won't be enough to lift it all.
-
Valuable or Antique Rugs: As I mentioned, the risk of damaging an expensive or irreplaceable rug just isn't worth the potential savings of a DIY approach. Don't take the chance.
-
Stubborn Dye Stains: If a brightly coloured wax has left a significant dye stain that household cleaners can't lift, a professional will have access to stronger, specialised solvents that are much safer for your carpet.
The Professional Advantage
So, what exactly does a professional bring to the table? Their primary advantage is their equipment. They use powerful, truck-mounted hot water extraction machines that can flush out deep-seated wax and residue far more effectively than any home remedy could ever hope to.
Additionally, they have access to commercial-grade solvents designed for specific stain types. While the Australian carpet cleaning industry has seen a market decline, with a -7.5% CAGR between 2019 and 2024, the demand for effective, specialised cleaning remains strong. Professionals often rely on powerful products formulated to dissolve grease and wax without harming upholstery. You can learn more about professional-grade wax removers to get a sense of the difference.
Ultimately, hiring a pro is about guaranteeing a safe, thorough result and protecting the longevity of your carpet.
Got Questions About Getting Wax Out of Your Carpet?
Even with the best instructions, you’re bound to run into a few tricky situations. What if the candle was soy? Or what if you just discovered a waxy spot that’s been hiding under a rug for months? Let’s tackle some of the most common questions that come up during the cleanup.
Think of this as the troubleshooting part of the guide. Getting these details right will help you adapt the methods we've already covered to your specific waxy mess.
Does This Work for Soy or Beeswax Candles?
Yes, absolutely. Both the iron and the ice methods work wonders on natural waxes like soy and beeswax, but there's a small catch. These types of waxes have a much lower melting point than your standard paraffin wax.
This means you need to be extra careful when using the iron. Start on the absolute lowest heat setting you can. The wax will liquefy much quicker, so you won't need as much heat. The freezing method is also particularly good for softer waxes like soy, as it helps them firm up enough to be scraped away cleanly.
Can I Use These Methods on Upholstery?
You can, but you have to be incredibly careful. The basic ideas of heating and freezing still apply, but upholstery fabrics are often far more delicate than carpet fibres.
-
Heat Method: This is a bit risky for many lounge suites and chairs, especially if they're made from velvet, silk, or synthetics that can easily melt. If you're going to try it, you must test it on a hidden area first, like underneath a cushion.
-
Freezing Method: This is generally the safer bet for upholstery. Pop an ice pack on the wax to harden it up, then gently flake it off with something that won't snag the fabric, like the edge of a credit card or a plastic spoon. Steer clear of a metal knife—it’s too easy to tear the material.
After you've removed the solid wax, you can usually blot any leftover oily residue with a mild mix of dish soap and water. But again, always do a spot test first.
Before you do anything with heat or liquid, hunt for the manufacturer's cleaning tag on your furniture. This little tag is your best friend—it will tell you if the fabric can be cleaned with water (W), solvents (S), or if it needs a professional's touch (X).
What About Old, Set-in Wax Stains?
Finding an old wax stain that’s been sitting there for who-knows-how-long can feel like a lost cause, but it usually isn't. The process is pretty much the same, it just requires a lot more patience and a bit of repetition.
An old stain has had plenty of time for its oils to soak deep into the carpet fibres. You'll almost certainly need to use the heat and transfer method. Be prepared to go through the cycle of heating the spot and blotting it with a fresh paper towel or cloth many more times than you would for a new spill.
Once the solid wax is gone, the oily stain left behind will likely be more stubborn. This is where bicarb soda becomes essential. Sprinkle a generous amount over the spot and let it sit for a few hours. It works to draw out those deep-set oils before you move on to the final spot-cleaning.
For those really big, old, or stubborn wax spills—especially on delicate carpets—the safest and most reliable solution is to call in the experts. The team at Right Price Carpet Cleaning has the professional-grade gear and know-how to tackle deep-set wax and restore your carpet without any risk. You can book your professional carpet cleaning online and get the peace of mind that comes with a job done right.
Recent Comments