


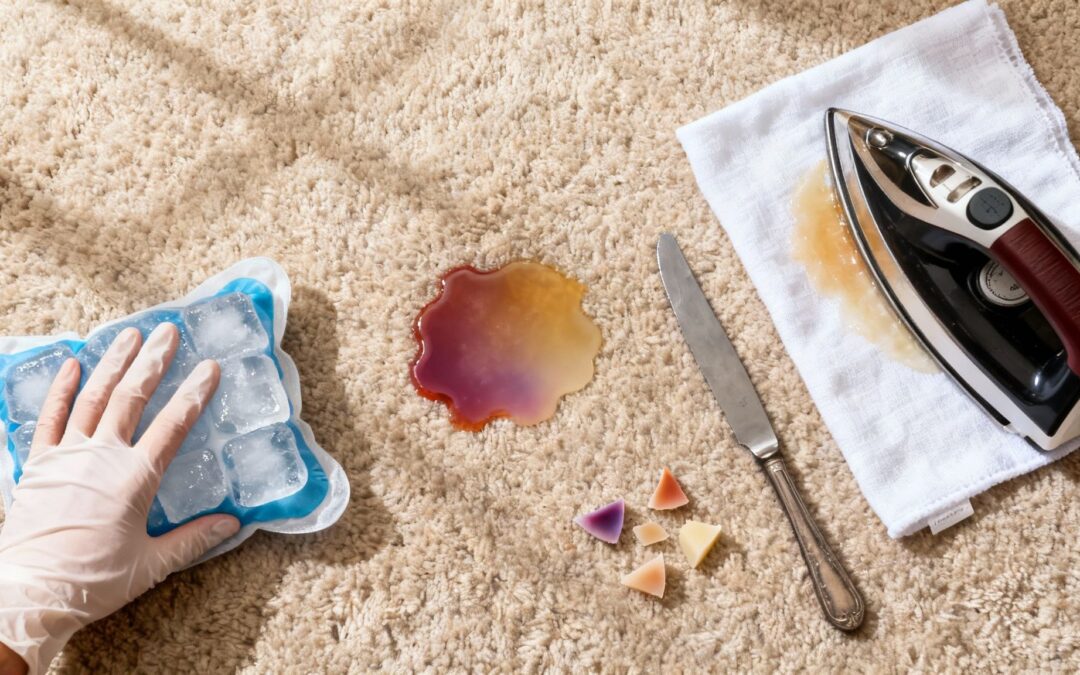
It’s a familiar scene: a relaxing evening with a scented candle ends with a jolt of panic as hot wax pools on your beautiful carpet. Before you grab the first scrubber you can find, just take a breath. The immediate, panicked reaction is often what causes the real damage, pushing the liquid wax deeper into the fibres and making it a nightmare to remove.
Getting spilt wax out of carpet is a two-part process. First, you need to harden the wax with ice so you can scrape away the bulk of it. Then, using a warm iron and an absorbent cloth, you gently melt and lift the leftover residue clean out of the fibres. This approach stops you from accidentally pushing the wax deeper into the carpet's pile.
This guide cuts through the bad advice, showing you two primary, field-tested DIY strategies—one using cold, the other using heat. We’ll explain the simple science behind why chilling and melting work, so you can tackle the problem with confidence instead of making it worse.
Understanding the Process
The goal isn't just to clean the surface; it's to extract the wax entirely. These methods are designed to work with the properties of wax, not against them. You either make it solid and brittle for easy removal or liquid and transferable for complete absorption. You'll learn the exact steps to lift the wax out, not grind it in, restoring your carpet without the stress.
The flowchart below shows the typical (and wrong) reaction to a wax spill versus the correct, calm approach.
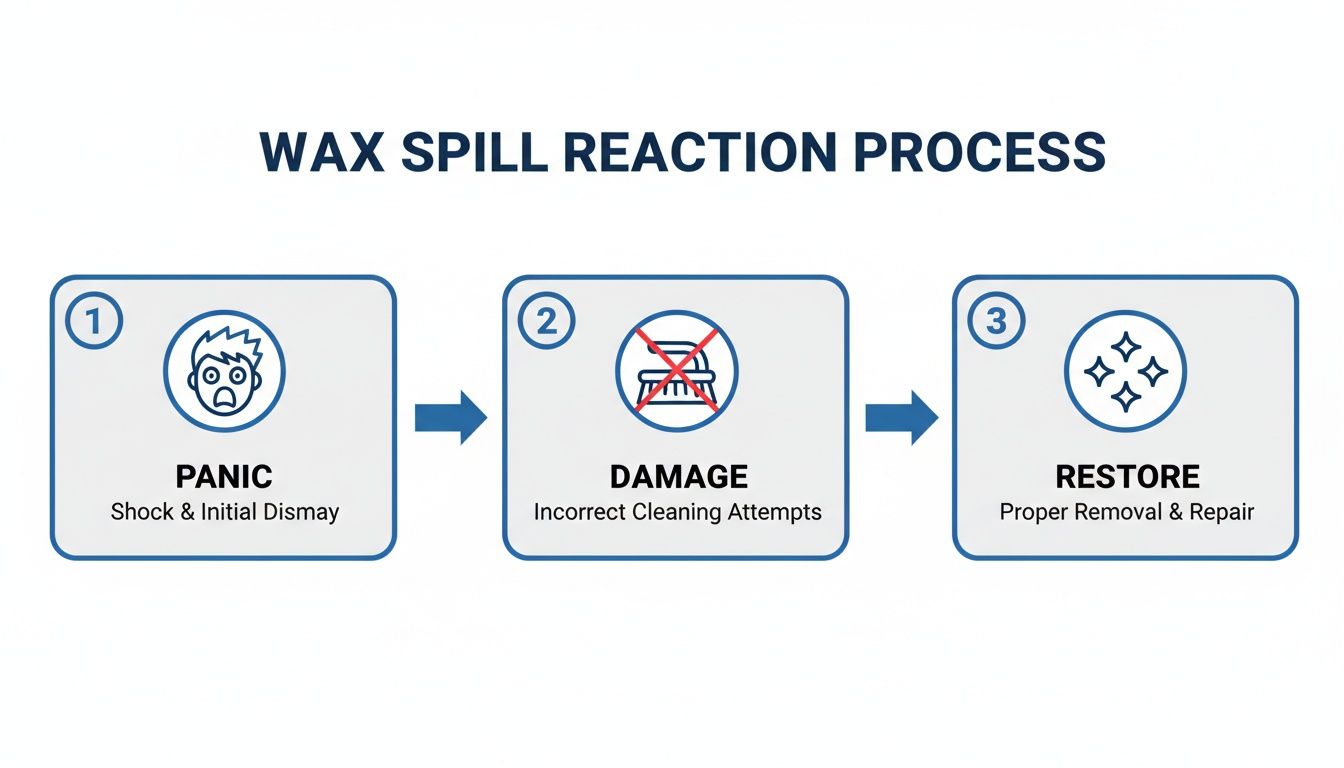
As you can see, a panicked response like scrubbing almost always leads to more damage. A calm, methodical approach is what leads to a full restoration.
Key Takeaway: Patience is your most important tool. Rushing the process with aggressive scrubbing or too much heat is the number one cause of permanent carpet damage, like frayed fibres or burn marks. A slow, steady hand always gets the best results when you're learning how to get wax off carpet.
Assembling Your Wax Removal Toolkit
Before you even think about tackling that wax spill, the secret to a clean, stress-free removal is having the right tools ready to go. Think of this as your professional setup—it ensures you can work efficiently without any mid-cleanup scrambles for supplies. A well-organised toolkit makes the whole process far less daunting.
Instead of just rushing to the kitchen and grabbing the first thing you see, take a moment to gather the correct items. Honestly, this preparation is often the difference between success and accidentally causing more damage.
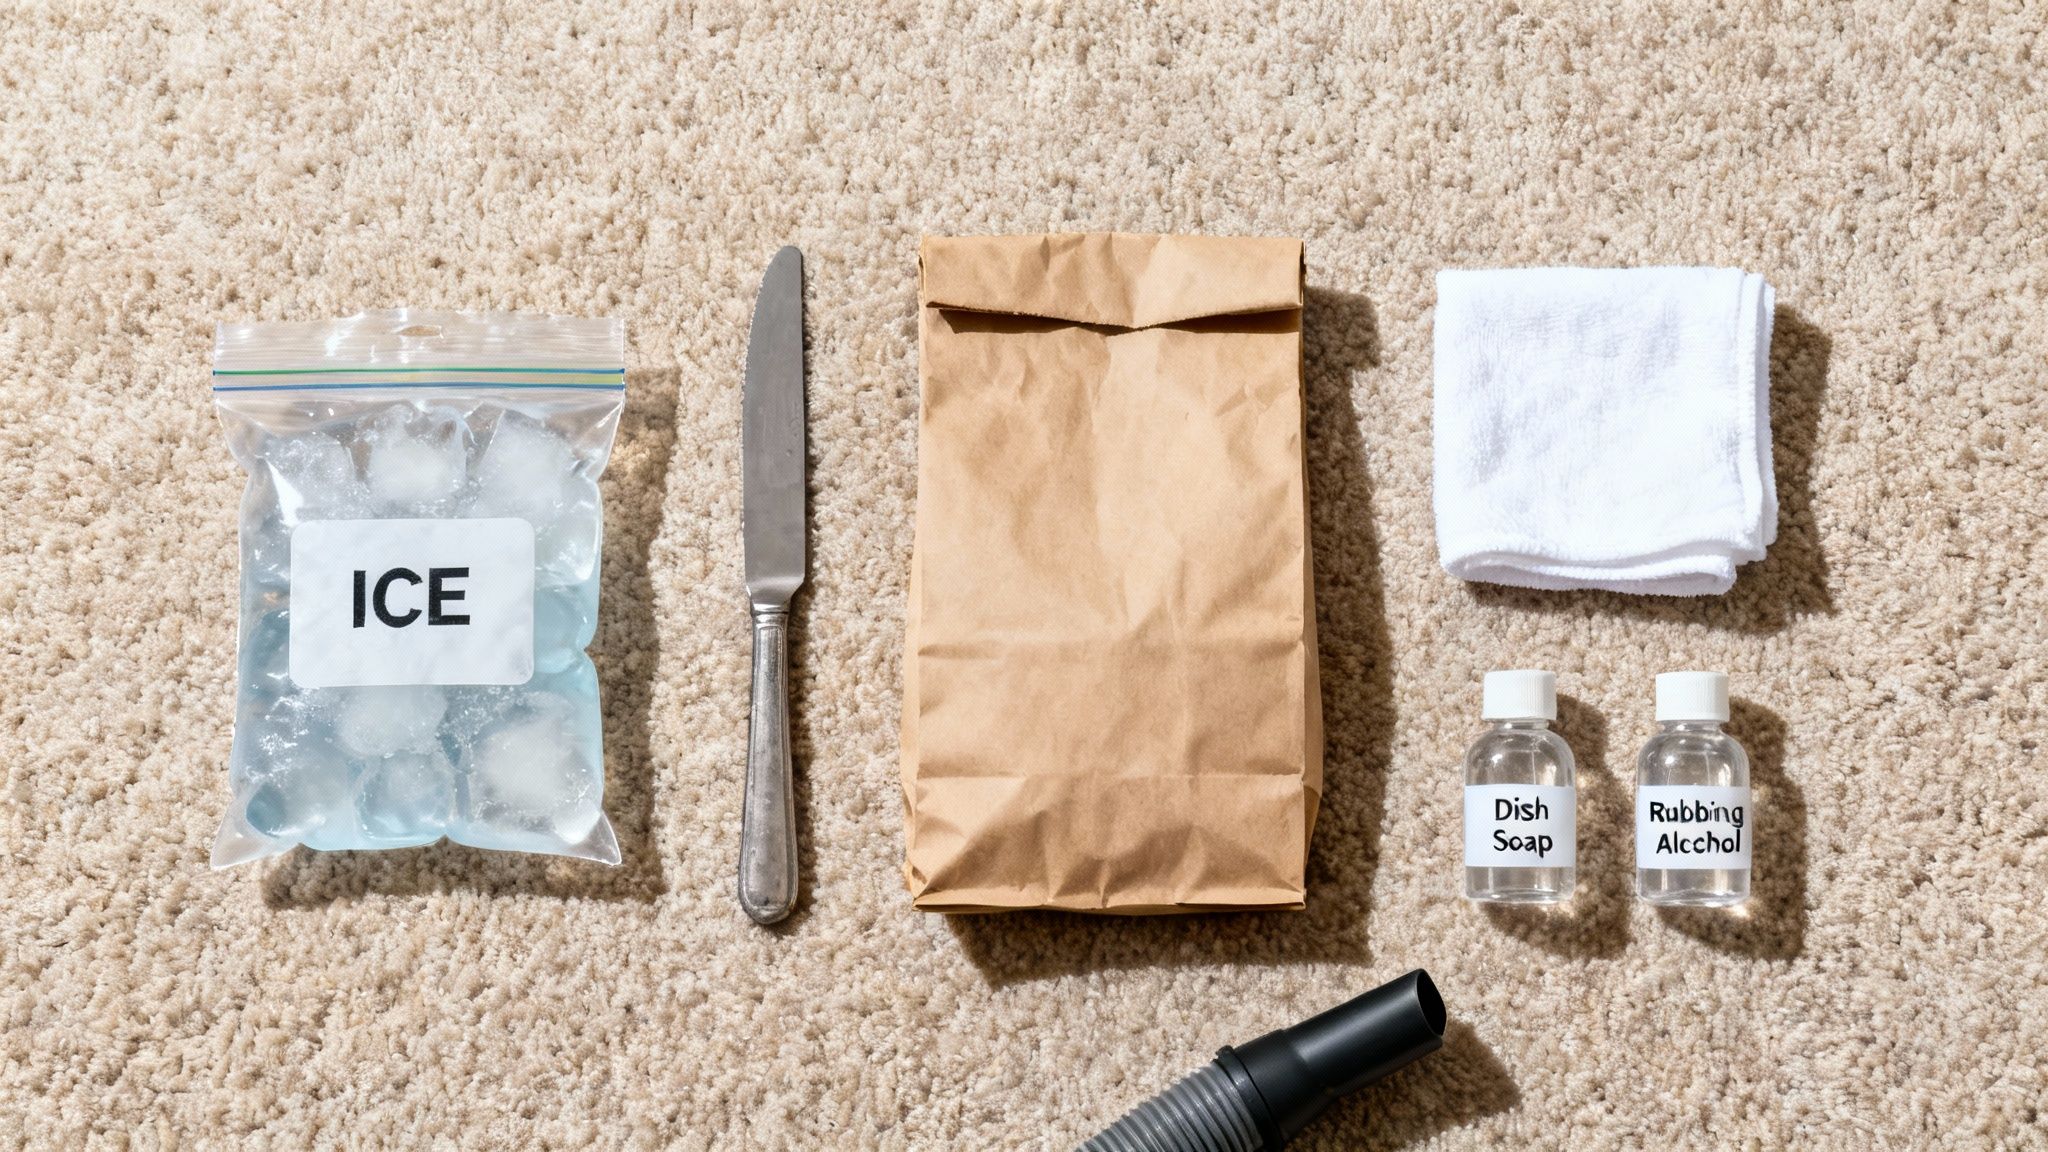
To make things simple, here's a quick checklist of everything you'll need for both the freezing and heating methods.
Your Wax Removal Toolkit Checklist
| Item | Purpose in Wax Removal | Method |
|---|---|---|
| Bag of Ice or Gel Pack | To freeze and harden the wax, making it brittle and easy to break apart. | Freezing |
| Dull Butter Knife or Credit Card | For gently scraping and prying away the hardened wax pieces without snagging carpet fibres. | Freezing |
| Vacuum Cleaner | To clean up all the small, flaky wax fragments after scraping. | Freezing |
| Clothes Iron | Provides controlled heat to melt the remaining wax residue so it can be absorbed. | Heating |
| Brown Paper Bags or White Cloths | To place over the wax stain and absorb it as it melts under the iron's heat. | Heating |
Having these items on hand means you’re prepared for every stage of the removal process.
For the Freezing and Scraping Stage
This first phase is all about making the wax brittle enough to lift away from the carpet fibres. You'll need items that can chill the wax without soaking the carpet and a scraper that’s firm but won’t cause damage.
- A Bag of Ice or a Frozen Gel Pack: Pop this inside a sealed plastic bag. This is a crucial little step to prevent moisture from seeping into your carpet as the ice melts.
- A Dull Butter Knife or an Old Credit Card: You want to avoid sharp blades at all costs. The goal is to gently pry and fracture the frozen wax, not to cut or snag your delicate carpet loops.
- A Vacuum Cleaner: This is essential for the final cleanup of this stage, clearing away all the small, flaky wax fragments after you’ve scraped up the bulk of the spill.
For the Heating and Absorbing Stage
After you've removed all the solid pieces, this part of the process tackles the waxy residue that has soaked into the fibres. The key here is using controlled heat alongside a clean, absorbent material.
Pro Tip: When choosing something to absorb the wax, always opt for plain, undyed options. A brown paper bag (like a grocery bag) or a clean, white cotton cloth is perfect. Using printed paper towels or coloured fabrics is a recipe for disaster, as the heat can cause dye transfer, creating a new, more difficult stain to deal with.
Your heat-transfer toolkit should include:
- A Clothes Iron: A basic model without steam vents is ideal, but any will do. Just make sure you start on the lowest heat setting to avoid scorching your carpet. You can always turn it up if needed.
- Plain Brown Paper Bags or Clean White Cotton Cloths: You will need several fresh pieces. As you blot up the melted wax, you'll need to keep switching to a clean section of the bag or cloth to absorb it all effectively.
Using the Freezing Method to Remove Bulk Wax
When you're staring down a thick, lumpy wax spill, your best first move is to freeze it solid. The idea is to make the semi-soft wax brittle enough to break away from the carpet fibres, rather than smearing it deeper into the pile.
This approach is all about changing the wax's physical state. Instead of tackling a soft, sticky mess, you’re turning it into a solid that you can fracture and lift out in chunks. For any significant spill, this is the absolute best place to start.
Freezing the wax is incredibly effective for getting the bulk of it out. A decent-sized spill can be hardened with ice in about five minutes, which should let you scrape off up to 90% of the wax before you even think about dealing with the oily residue left behind. Getting this big stuff out first is critical, as it removes most of the problem without heat or moisture, which can make things worse, especially with colourful waxes. You can even explore more data on Australian cleaning service efficiency to see why the pros always tackle the bulk of a spill first.
Applying the Cold
First things first, grab a bag of ice or a frozen gel pack. The trick is to pop it inside a sealed zip-top bag before you place it on the wax. It’s a simple step but a crucial one—it stops melting ice from soaking your carpet, which can lead to water stains or even damage the backing.
Place your sealed ice pack directly over the entire wax spill and leave it there for at least five to ten minutes. You want the wax frozen right through, so don't rush this part. You’ll know it’s ready when the wax feels rock-hard to the touch.
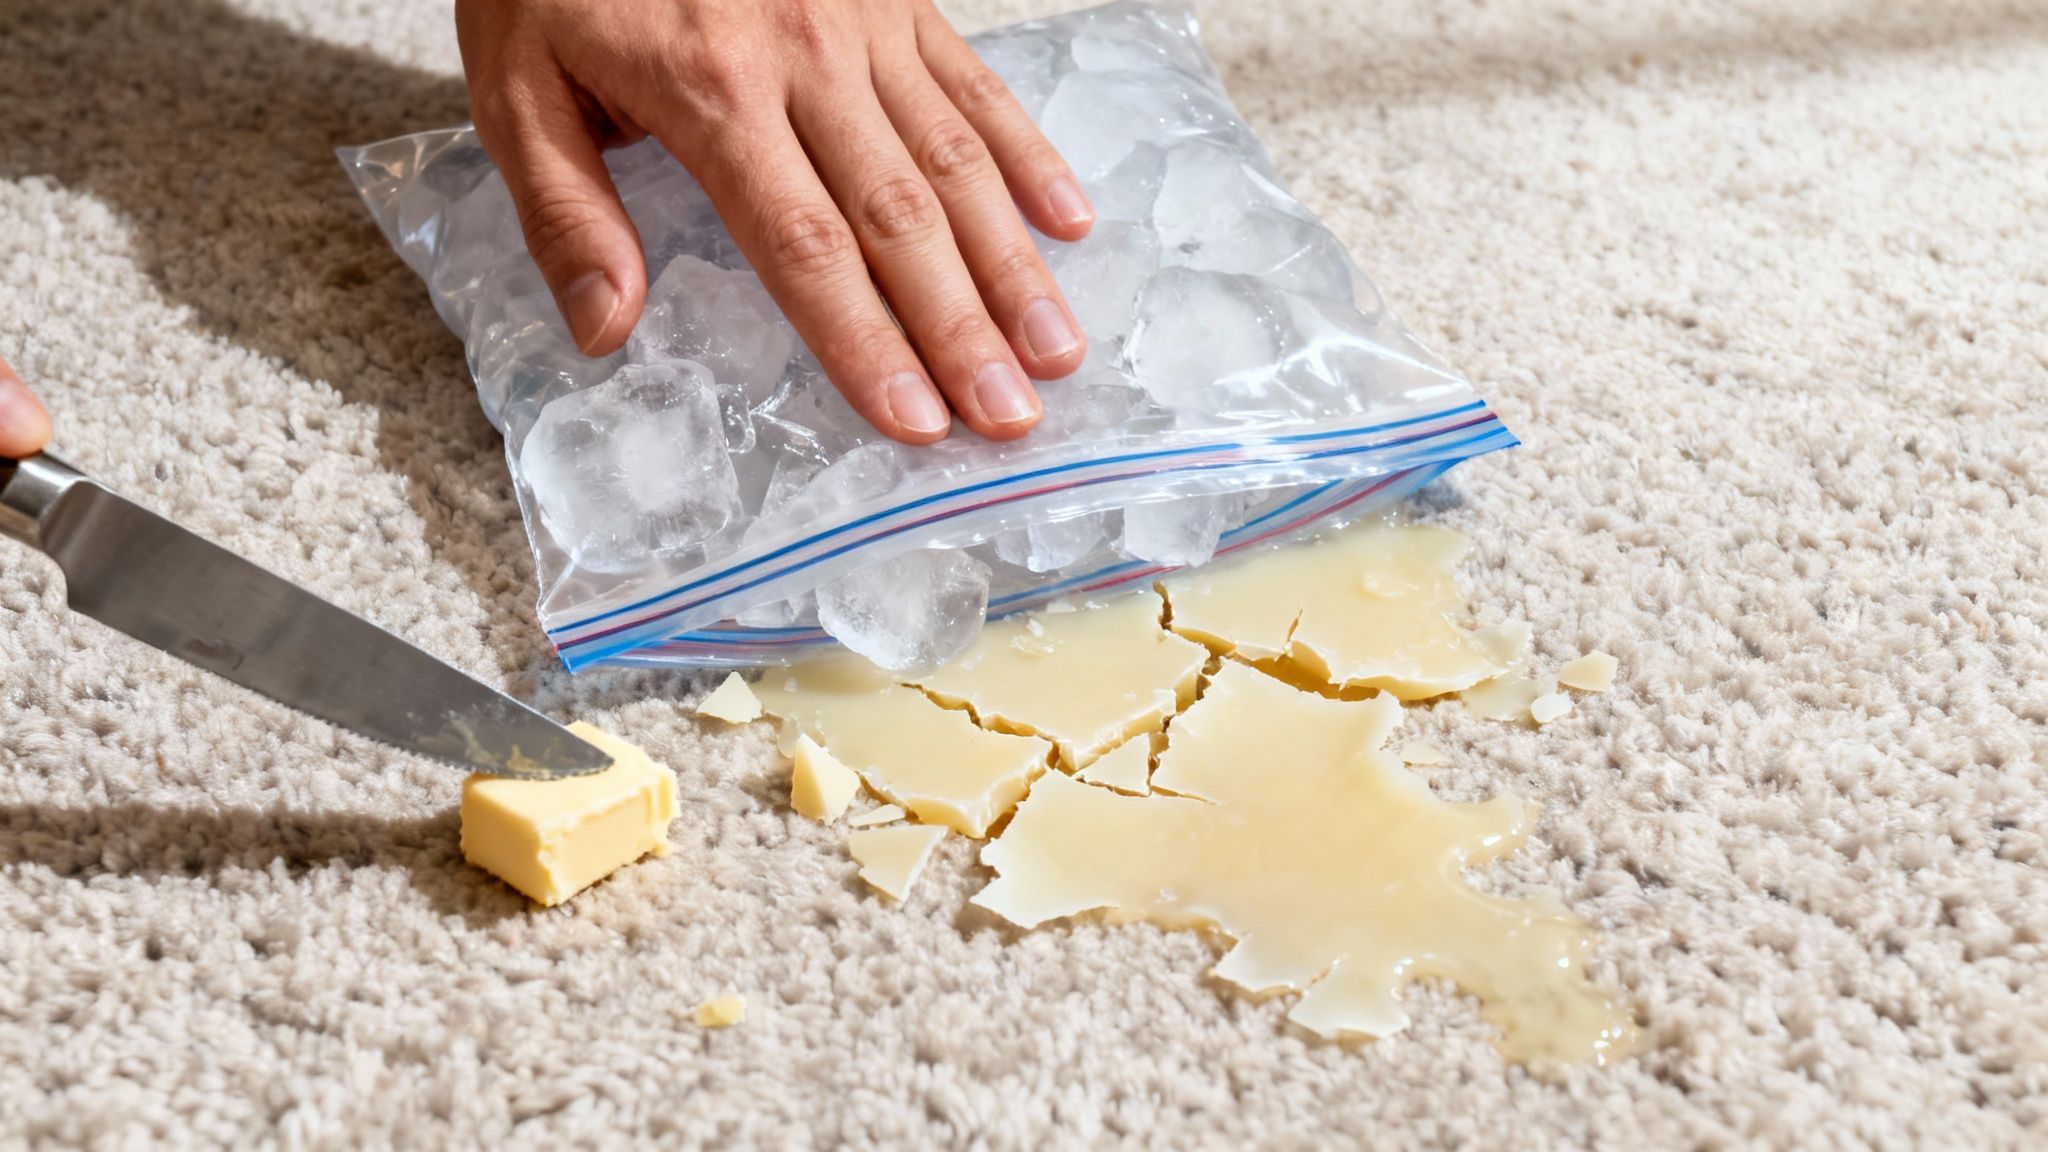
The Gentle Scraping Technique
Once the wax is completely frozen, it’s time to get it out. Grab a dull butter knife or an old credit card and start gently prying at the edges of the hardened wax. The key here is gentle pressure. You’re not trying to dig into your carpet; you’re trying to crack the brittle wax.
Think of it like breaking a thin sheet of ice on a puddle. Use the edge of your scraper to apply firm but careful pressure, which should make the wax fracture into smaller, easy-to-handle pieces. As they come loose, just lift them out by hand.
Important Reminder: Whatever you do, don't use a sharp knife or a blade. It's way too easy to snag a carpet loop, which can cause a permanent pull or fray. A dull edge is your best friend for this job.
Keep going until you’ve removed all the larger chunks of wax. You’ll probably have smaller flakes and fragments scattered around when you're done, but that's perfectly normal.
Final Cleanup of Wax Debris
After scraping away as much solid wax as you can, the last part of this stage is a quick cleanup. Grab your vacuum cleaner—a hose attachment is ideal if you have one.
Vacuum the area thoroughly, making sure to get right down to the base of the carpet fibres where tiny wax particles love to hide. This clears away all the loose debris and sets you up perfectly for the next step, which involves using heat to tackle any leftover waxy residue that's soaked into the pile. A clean slate makes that next method far more effective.
Using Heat to Lift Out Stubborn Wax Residue
Okay, so you've scraped away the solid, frozen wax. What you’re left with is the oily residue that has worked its way deep into the carpet fibres. This is where a bit of gentle heat comes into play, a clever method designed to melt the wax just enough for it to be soaked up and pulled out of the pile.
It’s a surprisingly effective technique for getting that final, thorough clean. The idea is simple: a warm iron melts the wax, and something absorbent placed over it wicks the liquid away like a sponge. It’s a delicate dance, but when you get it right, it can bring your carpet’s texture and appearance right back to normal.
Preparing for the Heat Method
Before you even think about plugging in the iron, let's talk safety. Bringing a hot iron near your carpet can go wrong quickly. One wrong move and you’ve got a scorch mark, which is a much bigger headache than the original wax stain.
Here’s what you’ll need to have ready:
- A clothes iron with an adjustable temperature setting. Crucially, make sure the steam function is turned OFF.
- Plain brown paper bags or clean, white cotton cloths. Don't use anything with ink, logos, or dyes on it—the heat can easily transfer those prints straight onto your carpet.
Set your iron to its lowest heat setting, usually the one for silk or synthetics. You can always nudge the temperature up a tiny bit if needed, but starting low is the only safe way to go. You want to melt the wax, not your carpet.
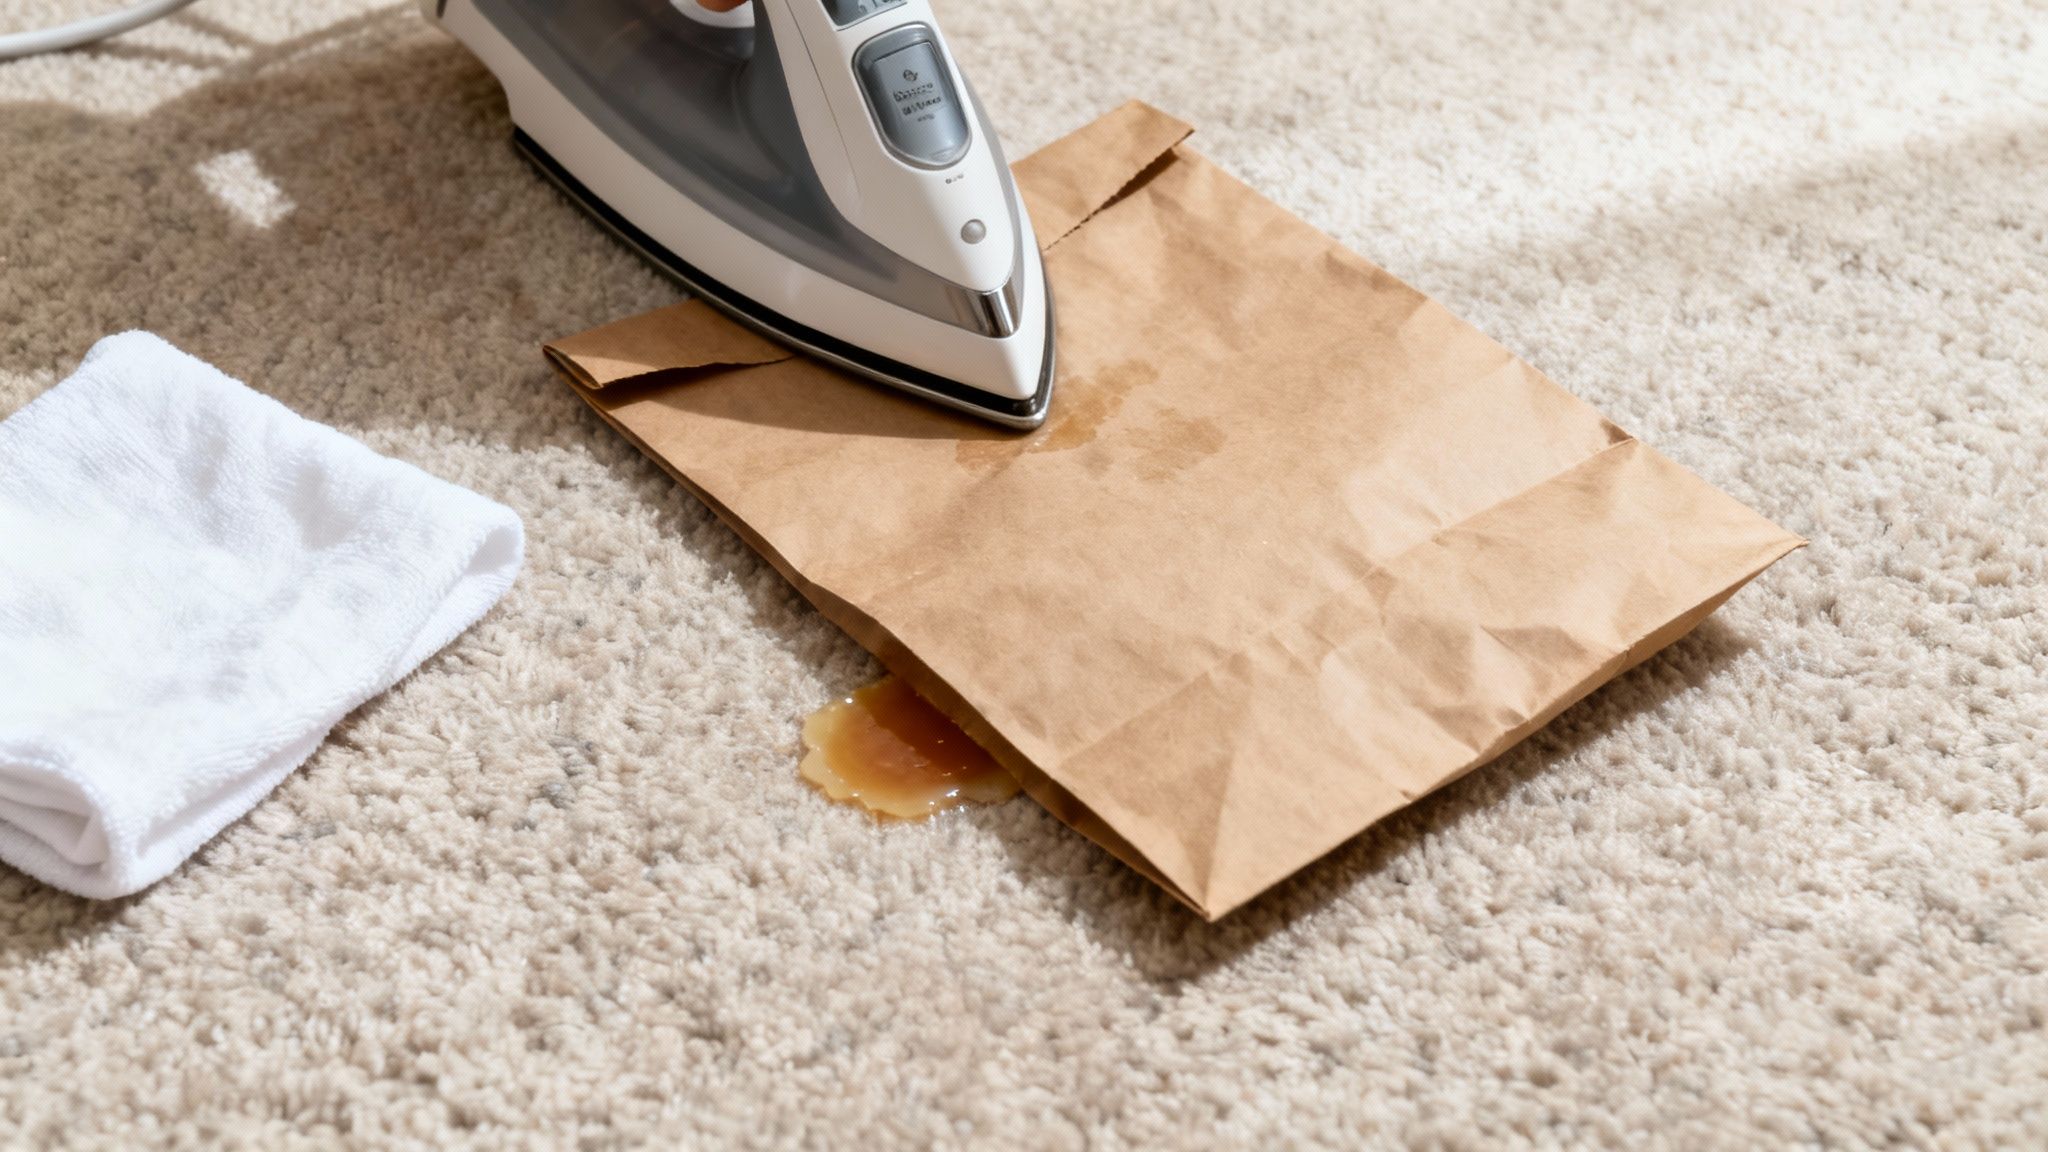
Executing the Wax Transfer
With your iron warmed and ready, lay a piece of the brown paper bag or white cloth directly over the waxy spot. Now, gently place the warm iron on top of the paper for just a few seconds at a time. Whatever you do, don't let the iron sit still.
Keep the iron moving in a slow, circular motion. You should start to see the paper or cloth absorb the melted wax, creating a greasy-looking mark. That's a good sign—it means it's working. Lift the iron and the cloth every five to ten seconds to see how you're doing.
Key Takeaway: Patience is your best friend here. It’s so tempting to crank up the heat to speed things up, but that’s how accidents happen. A low, steady temperature and constant movement are what will get you a successful, damage-free result.
As one section of the paper gets saturated with wax, shift to a clean part or just grab a fresh piece. This is a repetitive process, so get comfortable. Keep heating and blotting until the paper stops picking up any more wax.
It's worth knowing that this DIY approach takes a bit of persistence. For example, we've seen that common amateur ironing techniques in Melbourne might only transfer 60-70% of the wax on the first pass. It often takes three to five rounds with fresh towels to get it all. This really highlights the patience required, especially when you compare it to a professional steam clean that lifts nearly all the residue in one go. You can discover more insights on DIY versus professional wax removal methods.
What to Do About Leftover Colour Stains
So, you’ve successfully removed the wax, but a colourful ghost of the spill remains. It’s a common problem—those vibrant candles get their hue from dyes that can easily bleed into carpet fibres, leaving a stubborn stain that freezing or heating just won’t shift.
Tackling this dye stain is a separate battle. The key is to lift the pigment out of the fibres without accidentally bleaching your carpet in the process. Whatever you do, don't reach for a harsh chemical cleaner in a panic. That's a surefire way to either set the stain permanently or fade the carpet's original colour. A gentle, methodical approach always wins the day.
Start with the Gentlest Solution
Before you bring out the big guns, always start with the mildest option. You'd be surprised how often a simple mix of dish soap and water can knock out light-coloured dye stains.
Here’s the game plan:
- Mix a few drops of a clear, mild dish soap into a cup of warm water.
- Grab a clean, white cloth and dip it into your soapy solution.
- Gently blot the stain. Always work from the outside edge in to stop the colour from spreading.
- You'll see the dye transferring to your cloth. As it does, keep switching to a fresh part of the cloth so you aren't just putting the stain back onto the carpet.
Seriously, never rub or scrub. That kind of aggressive action just frays the carpet fibres and shoves the dye deeper into the pile, making your job ten times harder. Keep blotting until you don’t see any more colour lifting onto your cloth.
Bringing in Rubbing Alcohol for Tougher Stains
If the dish soap trick didn't quite get you over the finish line, it’s time to step it up a notch with a solvent like isopropyl alcohol (rubbing alcohol). Alcohol is fantastic at breaking down many types of dye, but you have to use it carefully.
Crucial First Step: Always do a spot test. Dab a small amount of rubbing alcohol on a hidden bit of carpet—think inside a wardrobe or under the sofa. Let it dry completely to make sure it doesn’t mess with your carpet’s colour or texture.
Once you’ve confirmed it’s safe, put a little rubbing alcohol on a fresh white cloth and start blotting the stain gently. You should see the colour begin to lift from the carpet and onto the cloth.
While DIY methods have their place, they also have their limits. For comparison, professional cleaners use specialised pretreatments that can lift up to 95% of dye-transfer stains without risking any fading. The success rate for rubbing alcohol is closer to 70%, and that comes with risks if you use too much or on the wrong type of carpet. For more information, you can check out some of the professional cleaning benchmarks and success rates.
After you're done treating the stain, gently blot the area with a water-dampened cloth to rinse out any leftover solution. Finish by pressing a dry towel firmly over the spot to soak up as much moisture as possible.
Knowing When to Call a Carpet Cleaning Professional
While DIY methods are fantastic for most minor wax spills, there are times when calling in the experts isn't just a good idea—it's essential for protecting your carpet. Let's be honest, trying to tackle a massive, deeply set wax stain or working on delicate fibres can quickly turn a manageable problem into permanent damage.
Recognising the limits of home remedies is key. If you're dealing with a spill that covers a significant area or has soaked deep into the carpet's backing, your iron and paper towel might not be enough to get it all out.
Signs It Is Time for an Expert
Sometimes, pushing ahead on your own leads to costly mistakes that are far more expensive than a professional clean. You should strongly consider getting professional help if you run into any of these situations.
- Delicate Carpet Fibres: Materials like wool, silk, or jute are extremely sensitive and unforgiving. Wool can shrink or scorch under an iron, while silk can be permanently damaged by the wrong cleaning solution or even just a little too much heat.
- The Spill is Huge: A small candle drip is one thing; an entire jar of melted wax is a whole different beast. Large spills saturate the fibres and the backing, making complete removal with home tools next to impossible.
- A Stubborn Coloured Stain Remains: If you've tried gentle cleaning and a colourful dye stain simply won't budge, a professional has access to specialised solvents. These are designed to lift pigment without bleaching your carpet.
- You're Not Confident: If you feel unsure at any stage of the process, it’s always safer to stop and call for backup. A botched removal attempt can make the problem much harder—and more expensive—for a professional to fix later.
For particularly stubborn wax spills or if you're looking for a comprehensive solution, professional deep cleaning services can effectively remove the residue. They use specialised equipment to ensure a thorough clean without risking damage.
Professionals bring out the heavy-duty gear for a reason. They use powerful, truck-mounted steam cleaning machines that inject hot water and cleaning agents deep into the carpet pile. Then, with incredible force, they extract the melted wax, dirt, and any lingering residue.
This process doesn’t just remove the wax you can see; it also lifts those tricky oily spots left behind, ensuring a uniform and truly clean finish. It’s the smartest choice to protect your investment in the long run.
Common Questions About Removing Wax From Carpet
Even with the best instructions, you might still have a few lingering questions before you get started. It's completely normal. Let's run through some of the most common ones I hear from clients to make sure you're feeling confident.
Can I Use a Hairdryer Instead of an Iron?
Absolutely, and in many cases, a hairdryer is actually the safer option, especially if you're working with synthetic carpet fibres. It gives you a lower, much more controllable level of heat, which dramatically reduces the risk of accidentally scorching or melting the carpet pile.
Just hold the dryer a few centimetres away from an absorbent cloth placed over the wax and keep it moving. As the wax begins to melt, press down firmly on the cloth to soak it up. You might need to do this a few more times than you would with an iron, but the extra peace of mind is well worth it.
Will These Methods Work on My Wool or Silk Rug?
This is where you need to be extremely careful. Natural fibres like wool and silk are very sensitive to both high heat and harsh cleaning chemicals. The freezing method is generally the safest first step, but you must avoid any aggressive scraping that could damage the delicate fibres. Using an iron is a definite no-go—it can easily scorch or shrink wool, causing permanent damage.
For any high-value, antique, or delicate rug, my honest advice is to call a professional. It’s simply not worth the risk of ruining a piece you love.
What if an Oily Stain Remains After Removing the Wax?
It's pretty common for a faint, greasy spot to be left behind since most candle wax is oil-based. You can tackle this with a good quality, carpet-safe stain remover or by dabbing a small amount of rubbing alcohol onto a clean white cloth.
Always, always spot-test on a hidden area first, like inside a closet. Gently blot the oily stain—never rub, as that will just spread it—then use a different damp cloth to rinse the spot. If that greasy mark just won't budge, a professional steam clean is the most reliable way to lift out that oily residue for good.
While this guide has focused on carpets, wax spills can happen anywhere. For a great resource covering how to remove candle wax from any surface, there are some excellent guides available that break it down.
Recent Comments