
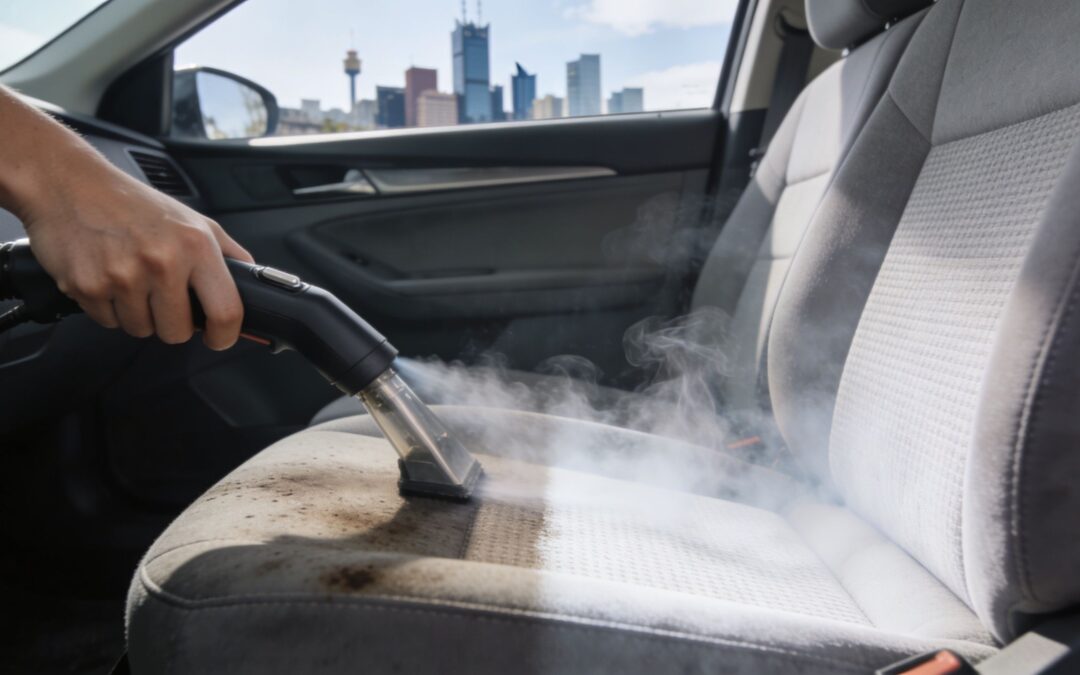
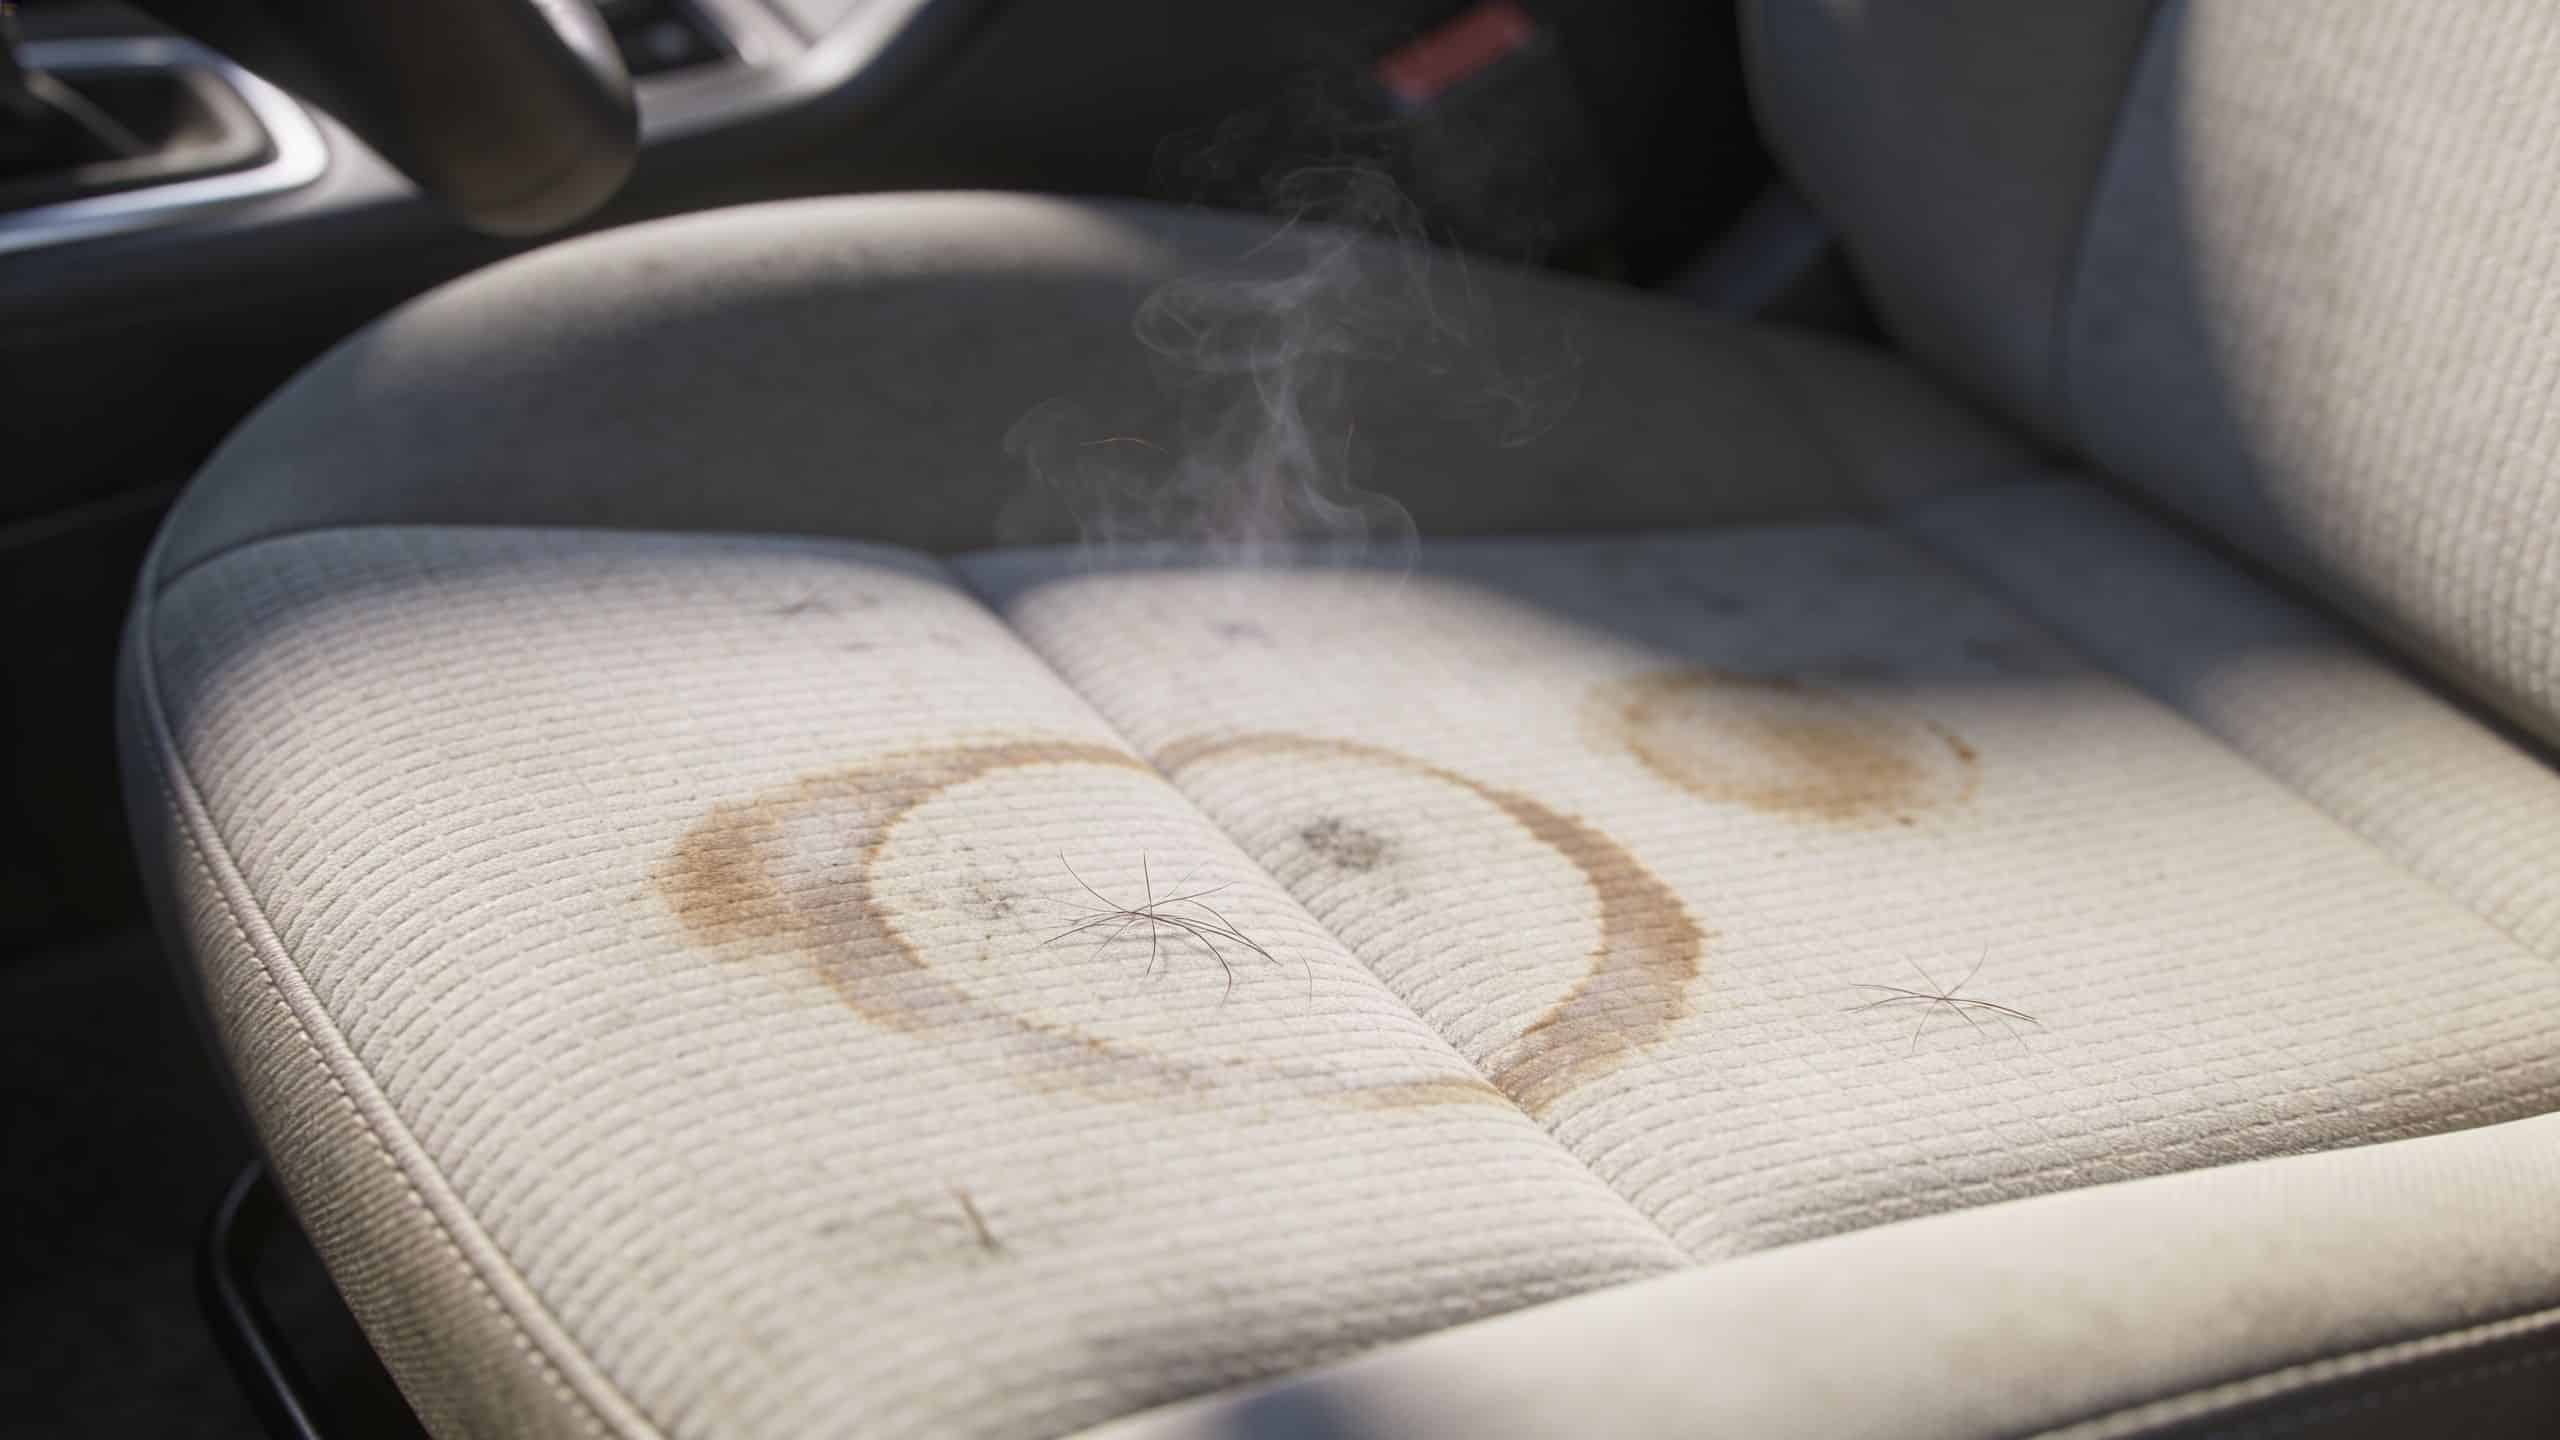
You’re probably looking at the seat right now. There’s a coffee ring near the centre seam, a dull patch where hands and jackets rub every day, and a smell that isn’t strong enough to be obvious until the cabin heats up in the afternoon sun.
That’s the moment most Melbourne drivers start searching how to steam clean auto seats. Fair enough. A vacuum helps with crumbs and loose grit, but it won’t fix embedded grime, old spills, body oils, pet mess, or the musty smell that sits deeper in the foam and fabric.
Steam cleaning can. But only if it’s done properly. The method matters, the seat material matters, and drying matters more than generally acknowledged. A careful DIY job can freshen seats well. A poor one can leave water trapped in the padding, push stains wider, or mark delicate trim. And when the mess is heavy, a home unit lacks the heat, pressure, or extraction to match a proper truck-mounted service.
Why Your Car Seats Are Dirtier Than You Think
Most car seats don’t look filthy. That’s why people leave them alone for too long. The problem sits below the surface, in the seams, the foam, and the fibres that collect skin oils, food residue, moisture, and everything dragged in from school runs, job sites, shopping trips, and wet Melbourne weather.
In Australia, vehicle interiors can carry between 300 and 650 germs per swab on driver’s seats, with similar contamination on other high-touch surfaces. High-temperature steam is effective because it can kill up to 99% of bacteria, viruses, and mould spores at temperatures above 120°C without chemicals, which matters even more when 1 in 5 residents is affected by asthma according to AIHW 2024, as noted in this overview of steam cleaning for car seats.
What hides in the upholstery
Visible marks are only part of the story. The bigger issue is what settles into places you can’t properly reach with a standard vacuum head.
- Seams and stitch lines collect crumbs, grit, skin flakes, and sticky residue.
- Bolsters and backrests absorb body oils and sweat over time.
- Seat bases trap moisture from wet clothes, umbrellas, swimmers, and spills.
- Child and pet zones tend to hold the worst mix of food, dander, odour, and mystery stains.
If you’ve only ever used wipes on the surface, you’ve cleaned appearance more than substance. Wipes have a place on hard trim, but fabric and leather need a different approach. If you want a useful comparison for touchpoint hygiene, this a guide to effective germ control explains where wipes help and where they fall short.
Practical rule: If a seat smells stronger when the cabin warms up, the contamination usually sits deeper than the surface fabric.
Why steam works better than a quick spray-and-scrub
Steam loosens soil without flooding the seat. That’s the key difference. You’re using heat to break grime loose and lift it out, not soaking the upholstery and hoping it dries before mildew starts.
That makes steam especially useful for family cars, rideshares, and commuter vehicles that get used hard and rarely sit idle long enough for old-school shampooing to dry safely. Done well, the seat feels cleaner, smells fresher, and doesn’t stay damp for ages.
Your Pre-Cleaning Checklist for Flawless Results
Most bad DIY results come from poor prep, not bad intentions. People go straight in with steam, turn loose dust into muddy streaks, and then wonder why the seat looks worse around the edges.
Prep is what separates a tidy result from a patchy one.
Clear the cabin first
Take out the easy clutter before you touch a tool. Water bottles, child seats, floor mats, charging cables, jackets, dog leads, and anything under the seats all get in the way and slow you down.
If a child seat is fitted, remove it if you can do so safely and reinstall it correctly later. The area underneath is often one of the dirtiest parts of the car.
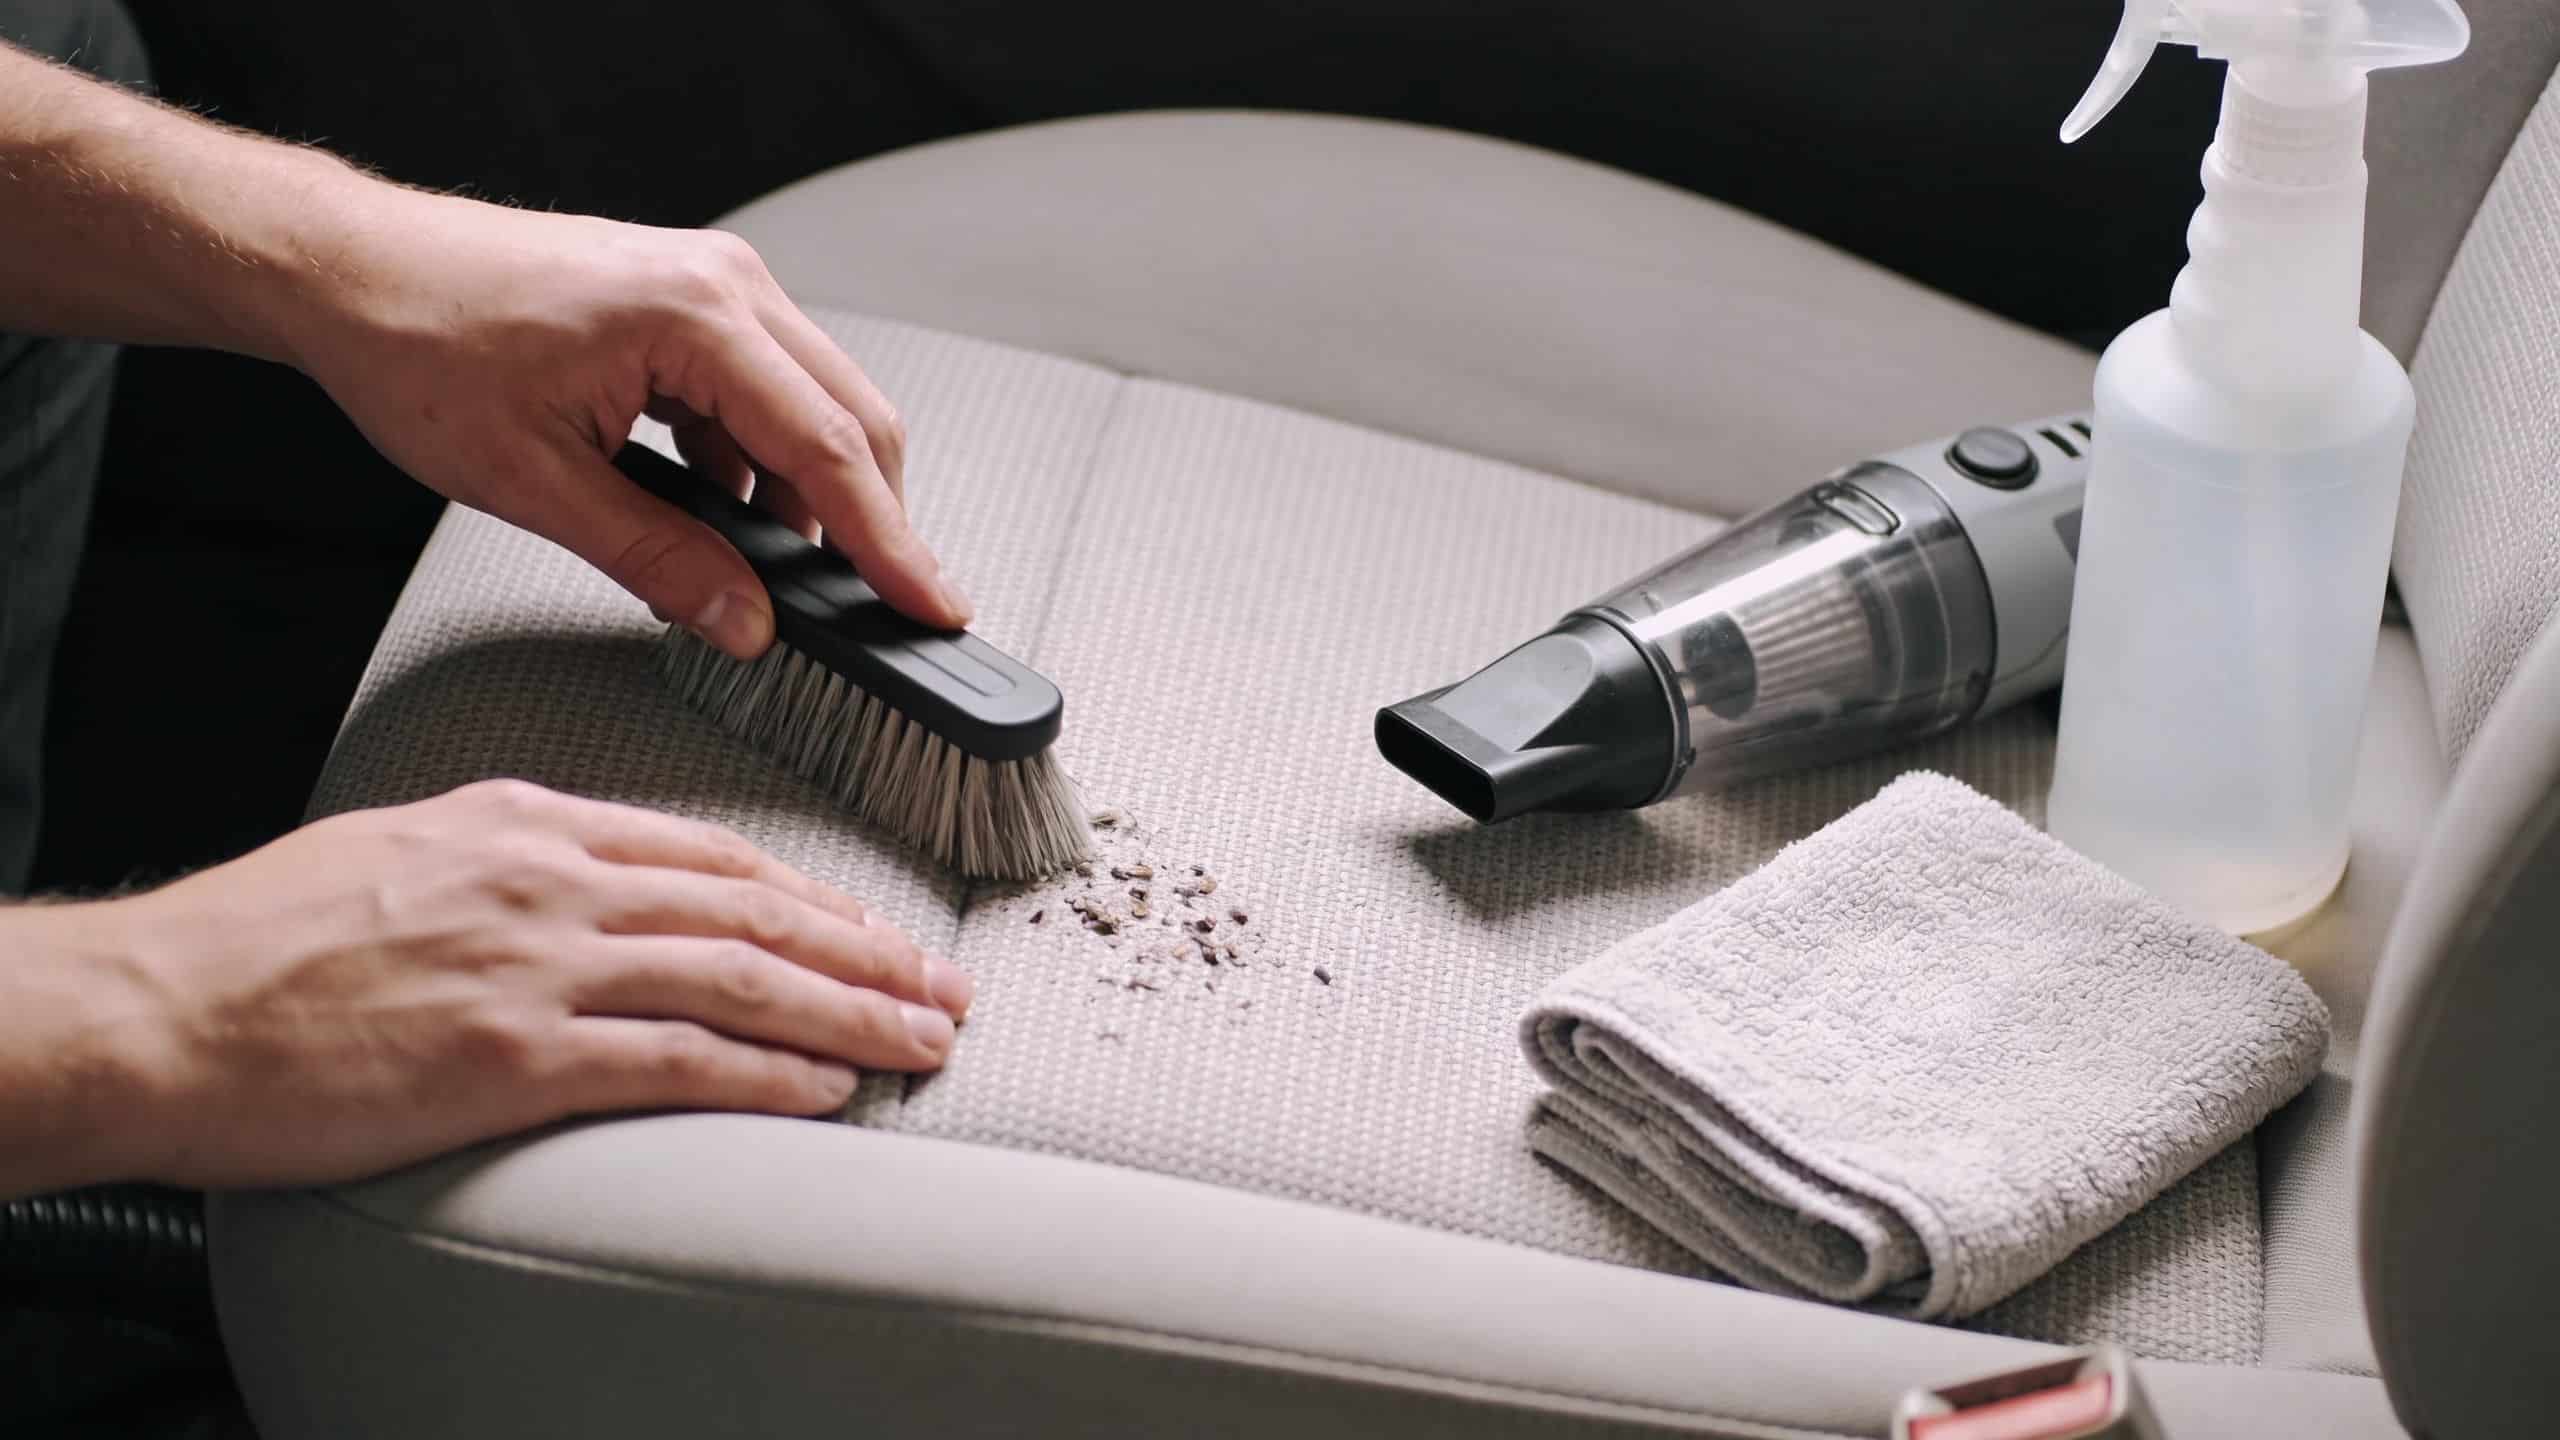
Vacuum like it matters
This isn’t the quick once-over you do at the car wash. Use a proper vacuum with a crevice tool and upholstery head. Work the seams, piping, buckle surrounds, between the seat base and backrest, and the rails at the sides.
Use this order:
- Start high and vacuum the headrest and upper backrest.
- Drop to the centre panels where dust and fibres sit in the weave.
- Finish with seams and edges using the narrow tool slowly, not in fast passes.
- Brush pet hair loose before vacuuming if it’s woven into fabric.
A good basic reference for tidy interior prep is this SwiftJet guide for car cabin care. The broad principle is right. Remove loose contamination first so steam can work on what’s embedded.
Check the seat before you steam it
Not every seat should be treated the same way. Before you begin, identify the material properly. Standard woven cloth is forgiving. Leather needs a modified technique. Suede-style trims and Alcantara need much more caution.
Use a small hidden test spot and check for:
- Colour transfer onto a white microfibre cloth
- Darkening that doesn’t lift quickly
- Raised texture or fuzzing
- Adhesive weakness near trims or seat inserts
If the seat already smells damp before cleaning, steaming isn’t your first job. Drying and diagnosis come first.
Pre-treat the problem areas only
Don’t spray the whole seat with stain remover. Target the worst areas. Food spills, coffee marks, body oil on the headrest, and old drink splashes usually respond better if you loosen them before steam touches the fabric.
Use a light hand. Agitate gently with a soft brush if the fabric allows it. Let the pre-treatment sit briefly, then wipe excess product off the surface. Too much chemical leaves residue, and residue attracts fresh soil.
Set up your drying plan before you start
Open the car in a secure, ventilated space. Get your dry microfibre towels ready. If you have a fan, set it up now. If you’re relying on weather alone, you’re gambling with drying time.
That’s the sort of detail professionals think about before the first pass. It saves trouble later.
A Practical Guide to Steaming Fabric Seats
Fabric seats are the most forgiving to work on, but they still punish rushed technique. The biggest DIY mistake is treating steam like a pressure washer. It isn’t. You’re applying controlled heat and light moisture, then lifting contamination away in stages.
For routine care in Australia, steam cleaning auto seats every 3 to 6 months is the usual recommendation, moving to 1 to 3 months for high-use vehicles. Steam also uses up to 70% less water than traditional shampooing, which matters when damp-related issues affect 30% of vehicles in humid conditions, according to this Australian car steam cleaning guide.
The right way to move the tool
A consumer unit can do decent maintenance work if you keep your expectations realistic. Fit an upholstery or triangular attachment if your machine has one. Keep the nozzle moving. Work in small sections rather than trying to steam the whole seat in one sweep.
Use this method:
- Begin on the backrest, not the base. It’s usually less soiled and lets you gauge how the fabric responds.
- Hold the tool slightly off the surface, not jammed into it.
- Use short passes with overlap so you don’t leave clean stripes beside dirty ones.
- Wipe after each small section with a clean microfibre cloth to lift loosened residue.
- Change cloth faces often so you’re not rubbing grime back in.
Where DIY works well
A home steamer is fine for lighter jobs:
- Fresh food or drink marks that haven’t set hard
- General commuter grime on otherwise well-kept seats
- Routine freshening between deeper cleans
- Pet hair follow-up after thorough vacuuming
If the seat just looks tired and smells closed-up, controlled steam often brings it back nicely.
Where DIY struggles
Some stains don’t respond to heat alone. Grease, ink, old protein spills, and heavy body oil usually need the right pre-treatment and stronger extraction than a handheld machine can deliver.
Here’s the practical test. If you steam a small area correctly and the stain lightens only on the surface while the dark centre remains, the contamination is sitting deeper. Repeating the same pass over and over won’t fix that. It usually means you’re adding moisture without removing enough soil.
A seat shouldn’t feel wet after a proper maintenance pass. Lightly damp is acceptable. Wet means you’re overdoing it.
A workable routine for Melbourne drivers
Cars used every day in Melbourne pick up grime fast. School drop-offs, gym clothes, takeaway, work gear, and winter moisture all end up in the fabric. That’s why regular light maintenance beats an aggressive annual scrub.
A simple pattern works well:
| Situation | Good approach |
|---|---|
| Light dust and odour | Vacuum well, then one controlled steam pass |
| Recent spill | Blot first, pre-treat the spot, then steam lightly |
| General family-car grime | Clean by section and allow full ventilation after |
| Heavy staining or old odour | Skip repeat DIY passes and book deeper extraction |
If you want a broader look at professional upholstery methods beyond vehicle interiors, this upholstery steam cleaning service guide shows how deeper fibre cleaning differs from surface freshening.
What not to do on fabric seats
Don’t scrub hard with a stiff brush. Don’t keep blasting one patch because you’re chasing an old mark. Don’t soak seams. And don’t put the car back into closed-up use while the padding is still damp.
Most DIY problems come from impatience. Slow passes, limited moisture, and good towelling off beat brute force every time.
Special Considerations for Leather Upholstery
A lot of people assume steam and leather never mix. That’s not quite right. Direct, aggressive steam on leather is a bad idea. Controlled steam used carefully can be very effective for lifting grime from the grain and stitching, especially on seats that look shiny from body oils rather than naturally glossy.
The trick is moderation.
How to steam leather safely
Use lower output than you’d use on cloth. Wrap the nozzle in a clean microfibre cloth so the steam is diffused before it reaches the leather. Work a small area, wipe immediately, then move on.
That does two things. It reduces the risk of overheating the finish, and it stops loosened grime from settling back into the pores.
A practical sequence looks like this:
- Test a hidden section first and check for finish sensitivity.
- Steam through a cloth, never straight onto the leather face.
- Work quickly in small zones such as one bolster or one seat panel at a time.
- Wipe dry immediately with a second cloth.
- Condition the leather after cleaning once the surface is properly dry.
The mistake that ruins leather
The cleaning step isn’t usually what causes trouble. Skipping the conditioning step is. Heat and cleaning remove grime, but they also leave the surface needing moisture balance restored. If you steam leather and walk away, you increase the chance of dryness, stiffness, and premature wear.
That’s why the aftercare matters as much as the cleaning.
Leather doesn’t need a wet clean. It needs a controlled clean followed by proper replenishment.
Seats that need extra caution
Not all “leather” interiors are the same. Some are coated heavily and cope better. Others have delicate finishes, perforations, or mixed-material inserts. Suede-style panels and Alcantara trims are where people get into trouble by using too much moisture.
For a useful non-salesy overview of seat-safe methods, this APEX NANO car seat cleaning advice is a reasonable starting point. The broad lesson is sound. Match the method to the material, not the other way around.
If your interior is genuine leather and you want a better understanding of ongoing care, this leather cleaning guide is worth reading before you attempt anything more than a light refresh.
Ensuring a Dry and Mould-Free Finish
Cleaning is only half the job. Drying decides whether the car ends up fresh or musty.
Melbourne conditions can turn a decent steam clean into a lingering odour problem if you leave moisture sitting in the foam. A seat surface can feel almost dry while the padding underneath is still holding dampness. That’s where mildew starts.
What to do straight after cleaning
Blot the seat with dry microfibre towels as soon as you finish each section. Don’t rub hard. Press and lift. You’re pulling moisture away before it settles deeper.
Then improve airflow immediately:
- Open doors or windows in a secure area
- Run fans across the cabin if you have them
- Avoid putting seat covers back on too soon
- Don’t close the car up in a garage while seats are still damp
Check the risky spots
The first places to hold moisture are the seams, the stitched channels, and the lower seat base where foam is thickest. Press those areas with a dry towel. If the towel picks up moisture, the seat needs more drying time.
A damp smell is your warning sign. Don’t mask it with a deodoriser. Fix the moisture.
When to stop and get help
If the seat was already wet from a leak, repeated spill, or mould issue, a normal DIY steam pass can make things worse. In that case, the focus should shift to proper moisture removal and mould treatment, not more heat.
For that scenario, this guide to removing mould from upholstery explains why hidden dampness needs a more deliberate approach.
Airflow isn’t optional. It’s the difference between a clean seat and a problem that returns next week.
DIY Steamers vs Professional Truck-Mounted Cleaning
DIY steamers have a place. They’re handy for maintenance, small spills, and keeping a reasonably clean car under control. But they have clear limits, and those limits show up fast on heavily used seats.
Professional truck-mounted systems work on a different level. The gap isn’t branding or convenience. It’s heat, pressure, penetration, extraction, and drying control.
Professional truck-mounted systems operate at 100 to 150 psi and 160 to 200°C, with 4x deeper penetration than consumer units. Poor drying from weaker DIY methods is linked to 35% of service complaints involving mildew, while professional work achieves 25 to 80% faster drying times, often under an hour, and can extend seat life by up to 50% in high-use scenarios, based on this trade-focused rundown of mobile steam cleaning.
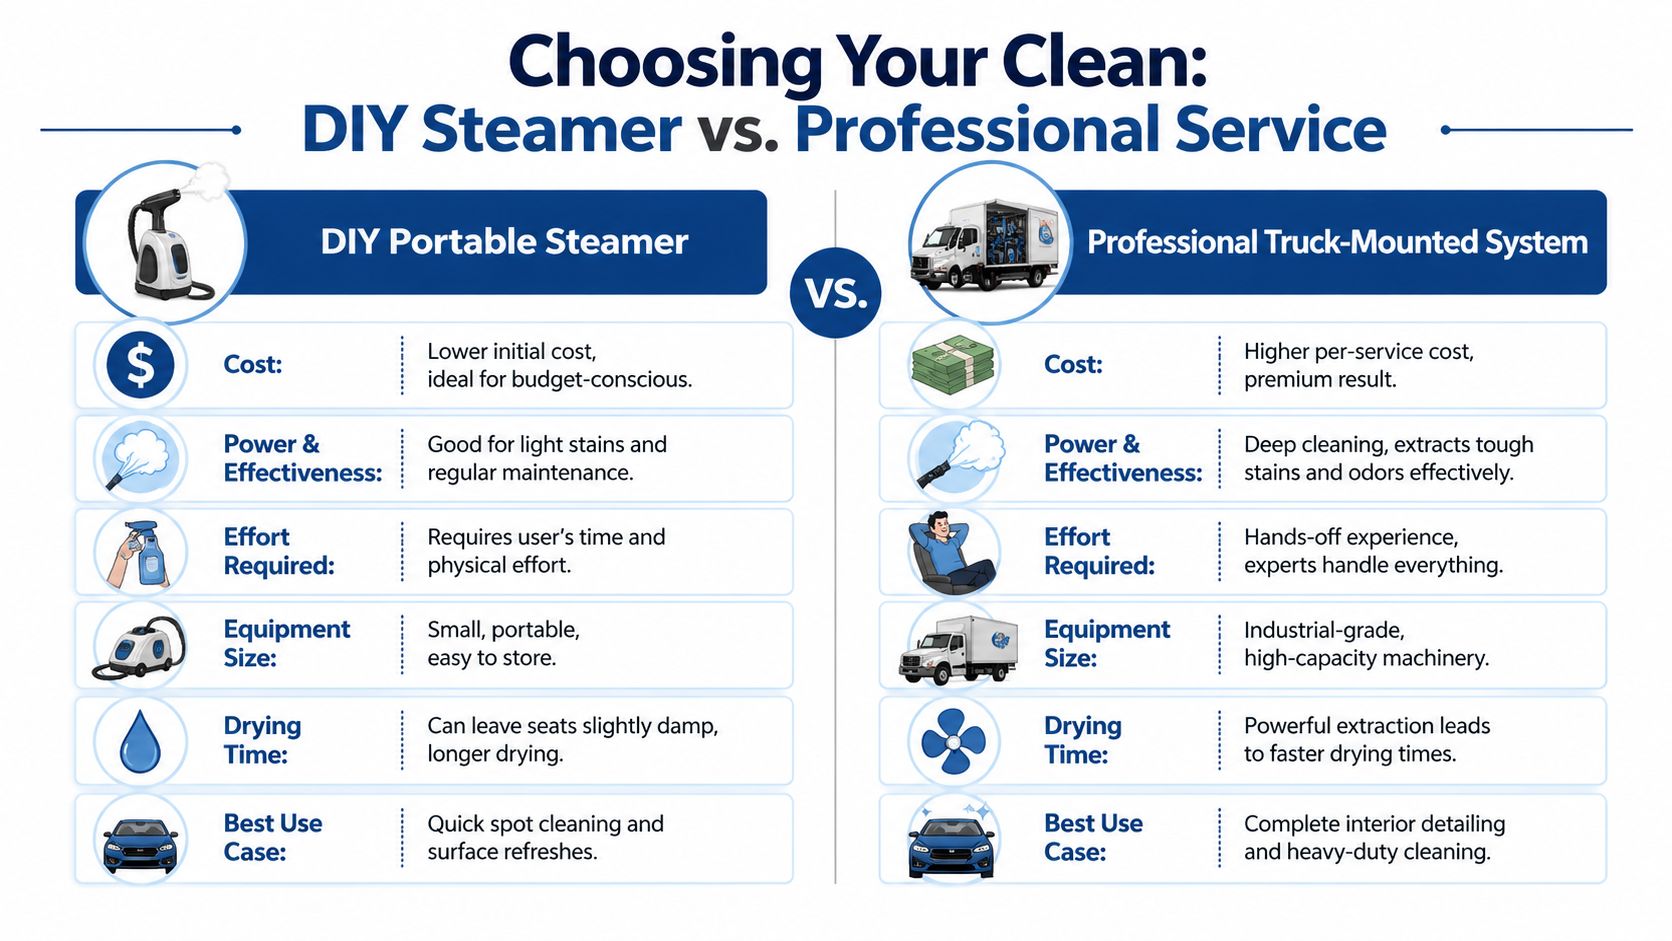
What the DIY machine can and can’t do
A portable unit is useful for surface-level maintenance. It can loosen soil, improve smell, and tidy up common mess. Where it struggles is removal. Loosening grime is one thing. Extracting it from deeper in the upholstery is another.
That’s why some DIY jobs look better for a day or two and then wick stains back to the surface. The contamination was disturbed, not fully removed.
Why truck-mounted systems get a different result
Truck-mounted cleaning combines higher steam performance with stronger recovery. That matters most on:
- Deep food and drink contamination
- Persistent odours
- Seats with heavy commuter use
- Rideshare and fleet vehicles
- Cars used by people with allergies or respiratory sensitivity
- End-of-lease and presentation-critical jobs
A stronger professional setup also means less guesswork with drying. That’s a major advantage in Melbourne, where a cold, damp day can slow a mediocre DIY result badly.
A direct comparison
| Cleaning factor | DIY portable steamer | Professional truck-mounted system |
|---|---|---|
| Best for | Light maintenance and spot work | Deep cleaning and sanitising |
| Heat and pressure | Limited | Much stronger operating range |
| Penetration | Surface to moderate | Deeper into upholstery structure |
| Moisture recovery | Modest | Strong extraction |
| Drying control | More dependent on weather and airflow | Faster, more predictable |
| Risk if overused | Damp foam, wicking, mildew | Lower when operated correctly |
When it’s smarter to call in a pro
If you’ve got one recent coffee spill on a cloth seat, DIY is reasonable. If you’re dealing with old stains, pet odour, wet-weather mildew smell, multiple affected seats, or a vehicle that has to be back in use quickly, a truck-mounted service is the better decision.
That’s also true when the clean has to be reliable rather than “pretty good”. Property managers, frequent drivers, and households with health sensitivities usually need the kind of extraction and drying consistency that portable machines can’t match.
Frequently Asked Questions about Auto Seat Steaming
Can I steam clean Alcantara or suede-style seats
Be very careful. These materials don’t respond like normal woven cloth, and too much moisture or heat can mark the nap or distort the finish. For delicate inserts, the safer approach is very light treatment, minimal moisture, and immediate towelling. If you’re unsure, don’t experiment on the main seating area.
How much does professional car seat steam cleaning cost in Melbourne
Pricing varies by vehicle size, seat material, condition, and whether the job is just the seats or a broader interior clean. A primary difference in value comes from the setup being used, the stain load, and how much extraction and drying control the technician can provide. If you’re comparing quotes, ask what method is included, how drying is handled, and whether stain treatment is part of the service.
How long should I wait before sitting on the seats
Wait until they feel dry, not just cool. A lightly refreshed seat may be usable fairly soon if ventilation is good. A heavier clean takes longer. If the fabric still feels damp at the seams or the base, give it more time and keep air moving through the cabin. Sitting on a damp seat compresses moisture deeper and slows drying.
Is steam enough to remove bad odours
Sometimes yes, sometimes no. If the smell comes from fresh surface contamination, steam often helps a lot. If the odour is from old spills, urine, milk, mould, or moisture trapped in the foam, steam alone may not solve it. Those jobs usually need targeted treatment and strong extraction.
Should I use more steam on a stubborn stain
Usually no. Repeated passes on the same spot often create a larger damp patch without removing the cause. It’s better to reassess the stain, use the right pre-treatment, and avoid over-wetting the seat.
If your car seats need more than a light DIY refresh, Right Price Carpet Cleaning offers professional truck-mounted steam cleaning across Melbourne. Their team handles upholstery with the kind of heat, extraction, and fast-drying setup that’s hard to match with a portable unit, which is especially helpful for family cars, end-of-lease jobs, allergy-sensitive households, and heavily used vehicles that need a deeper clean without the lingering dampness.
Recent Comments