
Finding mould on your carpet can feel a bit alarming. The gut reaction for most people is to grab a brush and start scrubbing, but hold off for a moment. The first, and most important, move is to take a breath and figure out exactly what you're dealing with.
This initial assessment is what separates a quick DIY fix from a much bigger problem. It'll tell you whether you've got a small surface spot you can handle yourself or if it’s time to call in the professionals. Getting this right from the start saves you a world of time and trouble.
Identifying the Problem
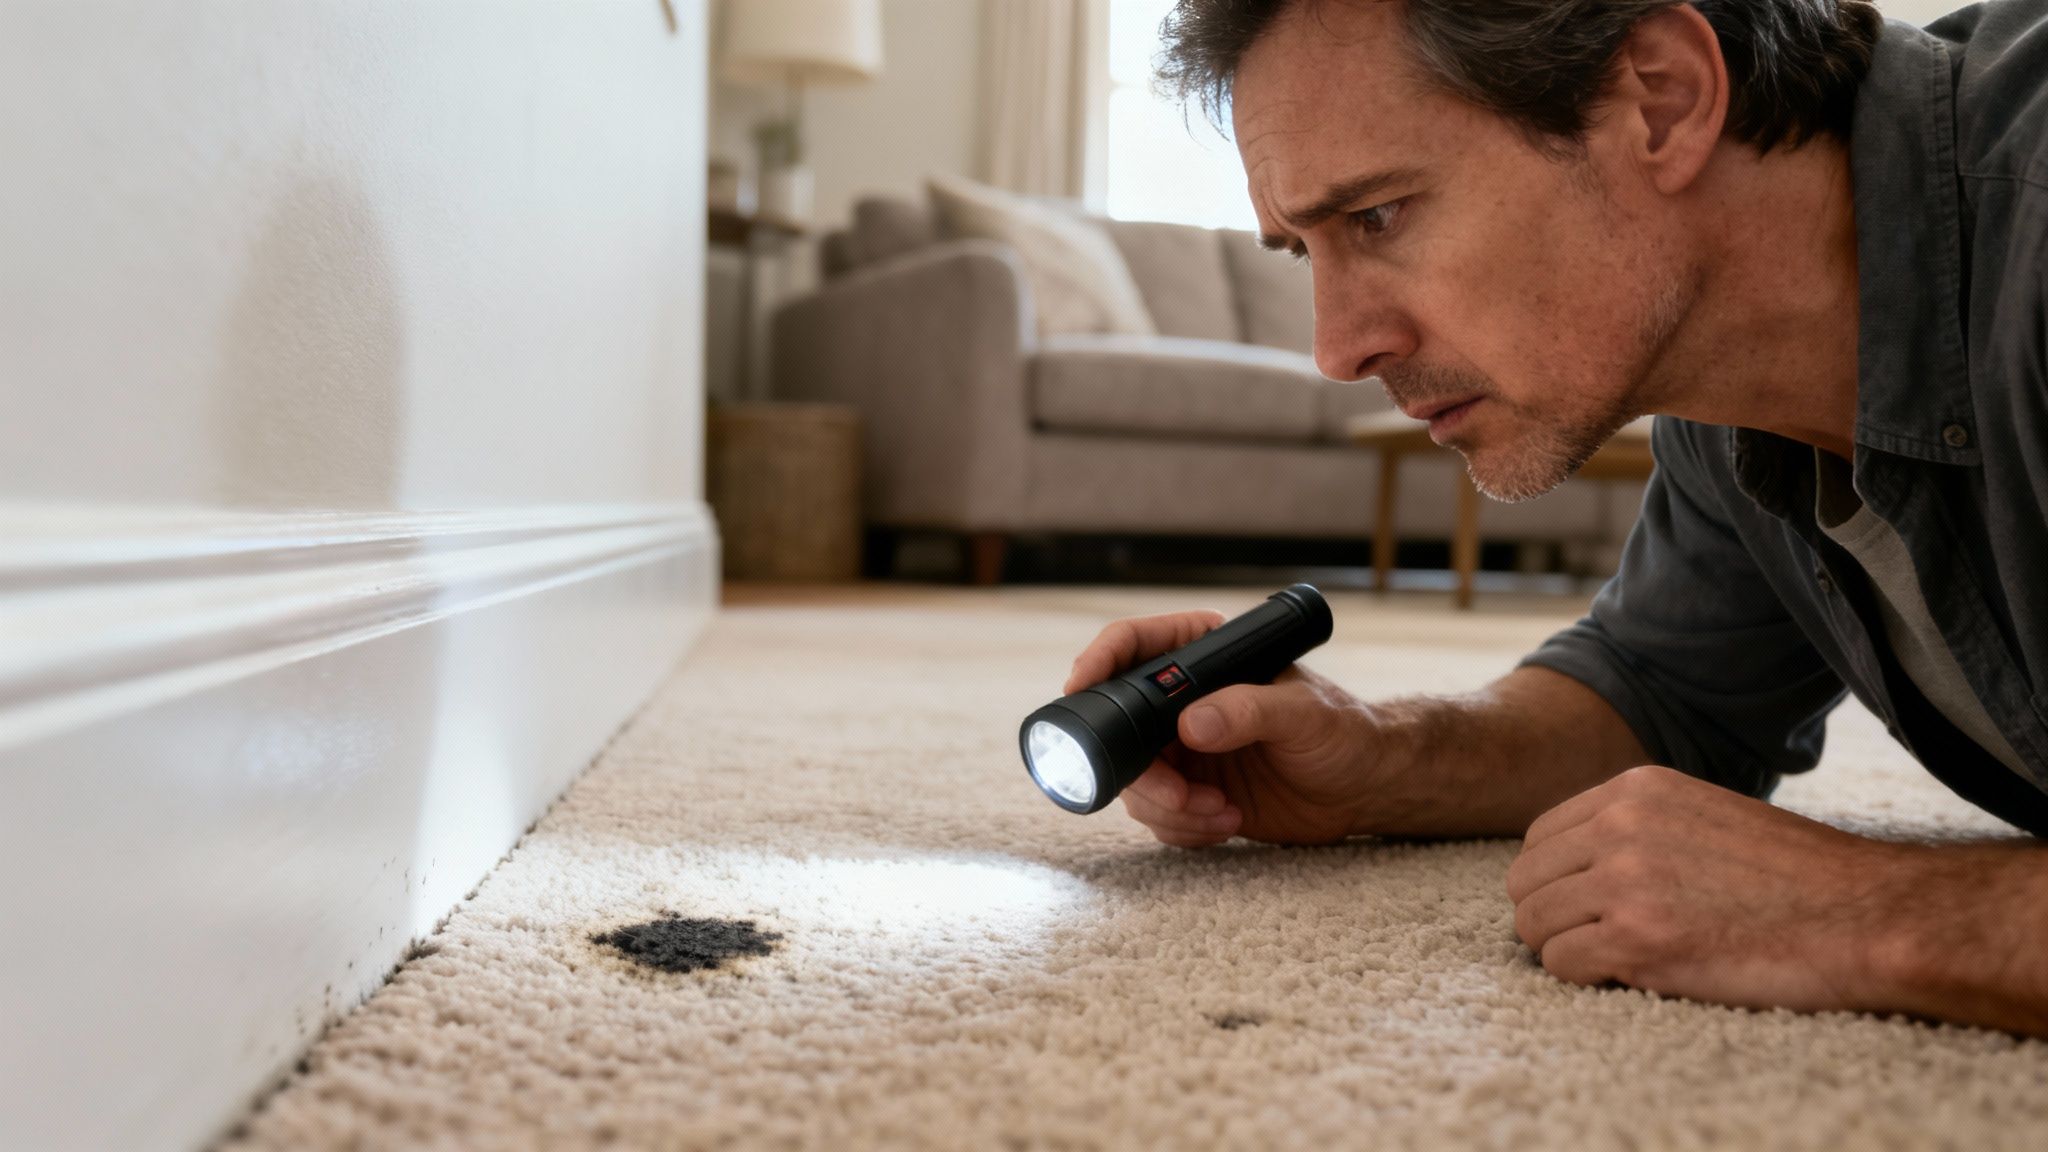
Before you can treat it, you have to find it. Mould is sneaky and doesn't always show up as an obvious black patch. Your best tools for detection are your own senses.
- What you see: Keep an eye out for any discolouration. Mould can be black, green, or even show up as white, fuzzy spots. Sometimes it just looks like a stubborn dirt stain that won't go away, no matter how many times you clean it.
- What you smell: That classic musty, earthy smell is a dead giveaway. If a room has a damp, stale odour even when everything feels dry, you've likely got mould hiding somewhere, possibly under the carpet.
- What you feel: Run your hand over the suspicious area. Does the carpet feel damp or a bit spongy? Any lingering moisture is an open invitation for mould to set up shop.
This quick investigation gives you a clear picture of the challenge ahead. A small, dry spot is one thing; a large, damp area with a strong smell is another beast entirely.
Assessing the Severity
Once you've confirmed it’s mould, the next job is to work out how bad it is. This is the crucial step that helps you decide whether to roll up your sleeves or pick up the phone.
As a rule of thumb in the industry, we use the one-square-metre test. If the mould patch is smaller than this, it's usually something you can manage with a DIY approach. If it's bigger, it's a sign of a more serious issue that really needs a professional eye.
Think about where the moisture came from. Was it a simple spill that someone forgot to dry properly? Or is it from a slow leak or a bigger flood? A spill often means the problem is just on the surface.
But if a leak is the culprit, the water has probably soaked right through the carpet, into the underlay, and maybe even the subfloor. That's a much more complex job. If you even suspect the mould runs deeper than the carpet fibres, it’s always safer to get an expert opinion. Tackling it now stops a small spot from turning into a major headache for your home and health.
Assembling Your Mould-Busting Toolkit
Before you even think about tackling that mouldy patch on your carpet, the smartest thing you can do is step back and gather the right gear. Going in unprepared isn't just a recipe for a poor clean-up—it’s a genuine health risk and can actually make the mould problem worse. This isn't like cleaning a simple spill; you're dealing with a living organism that loves to send its spores airborne.
Think of it like this: you're preparing for a small-scale containment operation. The mission is to eliminate the mould without spreading it through the air or breathing it in. Getting your kit ready beforehand means you can work methodically and, most importantly, safely from start to finish.
Personal Protective Equipment Is Non-Negotiable
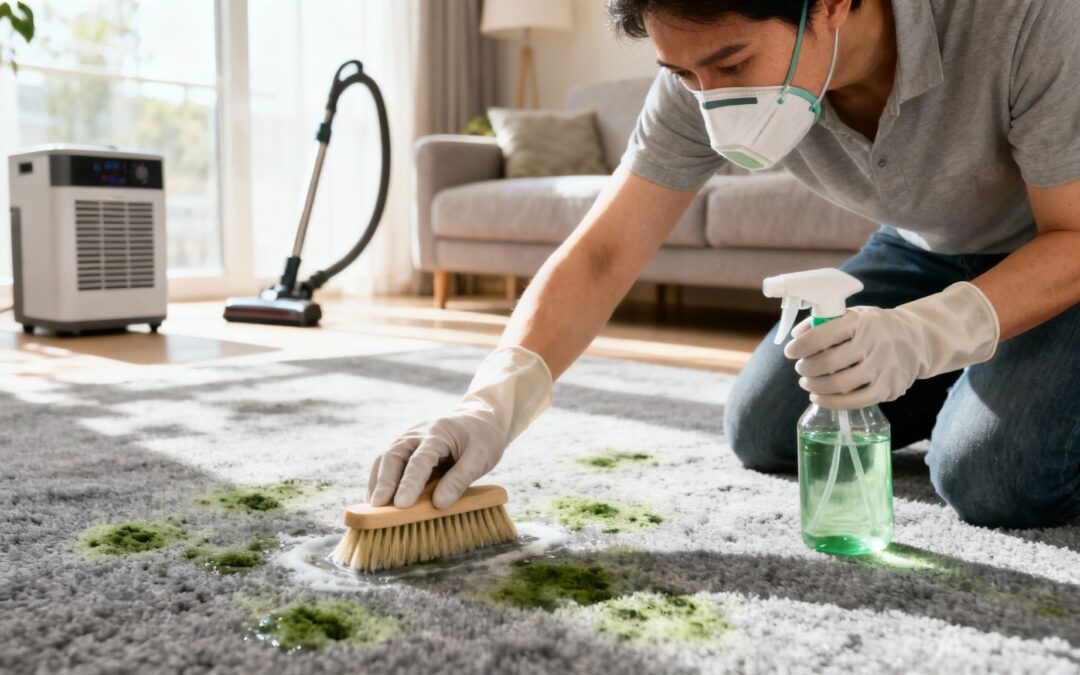
Seriously, your health comes first. Mould spores can kick off allergic reactions, asthma attacks, and a whole host of other respiratory issues. Gearing up with proper Personal Protective Equipment (PPE) is an absolute must. Don't be tempted to skip these, even if you're only dealing with a small spot.
- N95 or P2 Respirator Mask: A simple cloth or paper dust mask just won’t cut it. You need a respirator that’s actually designed to filter out microscopic mould spores.
- Safety Goggles: You need to protect your eyes from both airborne spores and any accidental splashes from your cleaning solution. Your everyday glasses don't provide enough coverage.
- Rubber Gloves: Go for a non-porous pair that extends up past your wrist. This keeps your hands clean and stops any cleaning agents from irritating your skin.
Choosing Your Cleaning Agents
When it comes to the actual cleaning part, you’ve got a few solid options. What you choose will depend on your carpet’s material, how bad the mould is, and what you’re comfortable using. A lot of people reach for bleach on hard surfaces, but it's a terrible choice for carpets. It can wreck the fibres, strip the colour, and often fails to kill the mould's roots hiding deep down.
Instead, have a look at these much safer and more effective alternatives.
Before you pick one, here’s a quick rundown of the most common DIY and commercial solutions. It’s worth knowing the pros and cons of each before you start spraying.
Comparing DIY Carpet Mould Cleaning Solutions
| Cleaning Solution | Effectiveness on Mould | Carpet Safety (Colour-fastness) | Best For |
|---|---|---|---|
| White Vinegar & Water (1:1) | High | Generally safe, but spot test first. | Mild to moderate surface mould on most carpet types. A great natural starting point. |
| Baking Soda & Vinegar Paste | Moderate | Very safe. | Surface mould and excellent for neutralising musty odours after cleaning. |
| Commercial Mould Remover | Very High | Varies. Must check label for carpet type (wool vs. synthetic). | Stubborn or recurring mould. Products with anti-microbial agents prevent regrowth. |
| Tea Tree Oil Solution | Moderate | Spot test needed. Can be strong on some dyes. | A natural fungicide for smaller spots; good for preventative spraying. |
Each of these has its place. For a small, new spot of mould, a simple vinegar solution is often all you need. For something more stubborn, a dedicated commercial product is probably the way to go.
Pro Tip: I can't stress this enough—always do a spot test! Whatever cleaning solution you choose, try it on a hidden bit of carpet first. Inside a wardrobe or under the sofa is perfect. This quick check will tell you if it’s going to mess with your carpet’s colour.
Essential Tools for the Job
Beyond your PPE and cleaners, a few other tools will make the whole process smoother and much more effective.
The single most important piece of equipment you’ll need is a vacuum cleaner fitted with a HEPA filter. A standard vacuum cleaner is your worst enemy here. It will suck up the mould spores from the carpet only to blast them straight back into the air, spreading them all over the room. A HEPA (High-Efficiency Particulate Air) filter is non-negotiable because it’s designed to trap 99.97% of microscopic particles, including mould spores, locking them away for good.
You'll also want to grab a stiff-bristled brush for scrubbing, a stack of clean cloths for blotting, a spray bottle for your chosen solution, and some fans or a dehumidifier. The drying stage is absolutely critical, and these will speed things up significantly. Having everything on hand before you start will make the job less of a headache and give you the best shot at success.
Right, you’ve got your gear sorted and you’re ready to get stuck in. This is where a bit of patience and a methodical approach really pays off. If you rush this part, you might not only damage your carpet but also miss the root of the problem, meaning that musty smell will be back before you know it.
Let's break down the cleaning process into a few manageable chunks. By following these steps, you’re doing more than just wiping the surface – you're getting deep into the fibres to properly kill off the mould spores and give your carpet the best shot at a full recovery.
This is the basic game plan: protect yourself, treat the mould, and then get rid of the mess.
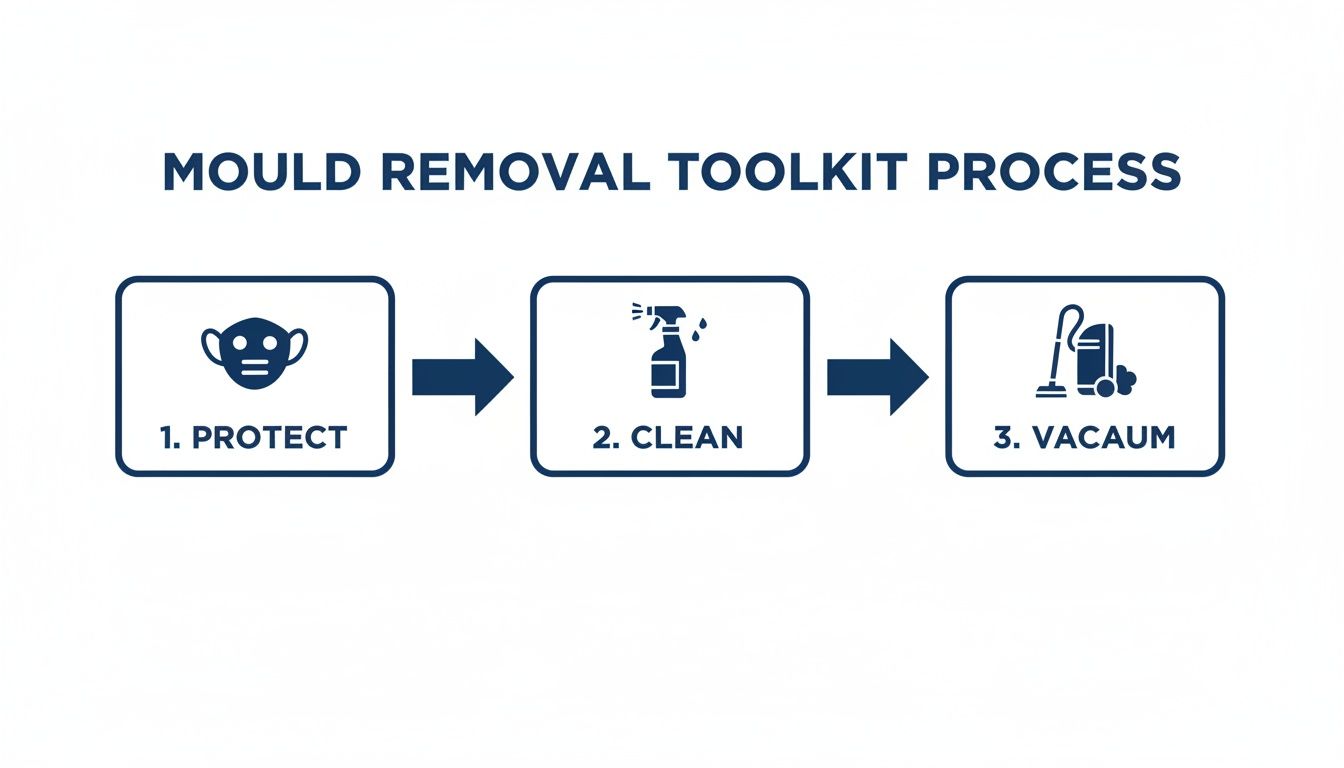
Each step sets you up for the next, making sure you do a thorough job from start to finish.
First, Contain the Area to Stop Spores Spreading
Before you even think about scrubbing or vacuuming, your first job is containment. Mould spores are tiny and get kicked into the air with the slightest disturbance. The last thing you want is for them to take a tour of your entire house.
If you can, shut the door to the room you’re working in. You can even roll up an old towel and stuff it under the door to seal the gap. For an open-plan space, grab some plastic sheeting and tape to create a temporary wall around your work zone.
Cracking a window in the room is also a great idea. It helps create an airflow that pushes any airborne spores outside instead of letting them drift into other rooms. This bit of prep work is absolutely crucial for keeping the air in the rest of your home clean.
Do an Initial Vacuum (With a HEPA Filter!)
Time to grab that HEPA-filter vacuum. The point of this first pass is to suck up as many of the loose, dry mould spores as you can before you add any moisture. It makes the cleaning solution much more effective later on.
Run the vacuum slowly over the entire mouldy patch and the area just around it. It helps to go over the spot from a few different directions to make sure you’re lifting spores from all sides of the carpet fibres. And I can't stress this enough: a standard vacuum will just blow the spores around. A HEPA filter is non-negotiable.
When you're done, take the vacuum outside to empty the canister or swap out the bag. This stops any of those captured spores from making a great escape back into your home.
Apply Your Cleaning Solution
With the loose stuff gone, you can now get your cleaning solution on there. Whether you're using a simple white vinegar mix or a store-bought mould killer, your technique matters. You need the solution to get into the carpet fibres without completely soaking the carpet and the underlay.
A classic mistake is drenching the carpet, thinking more is better. All this does is force moisture deep into the padding, creating the perfect damp environment for mould to grow right back. Dampen it, don't soak it.
Use a spray bottle to give the area a light, even mist. Let it sit for at least 15-20 minutes. This dwell time is what allows the solution to really get to work breaking down and killing the mould.
After it's had time to sit, use a stiff-bristled brush to gently scrub the patch in a circular motion. This helps work the solution in and lift the mould from the carpet fibres. Be firm, but don't go so hard you start pulling up the carpet pile. For more ideas on what works, check out these proven tips for cleaning carpet mould.
Rinse and Blot Away the Residue
The final cleaning step is all about removing the cleaning solution and the gunk it's lifted out. This is just as important as the scrubbing, because any leftover residue can attract more dirt, and any lingering moisture is an open invitation for mould to return.
Start by blotting the area with clean, dry cloths or paper towels. Press down hard to soak up as much moisture and residue as you can. Keep switching to a dry section of the cloth until it's coming up mostly dry.
Next, grab a new clean cloth, dampen it slightly with plain water, and blot the area again. This is basically 'rinsing' any leftover cleaning solution out of the fibres. Stick to blotting, as rubbing can make your carpet look fuzzy and worn.
Finally, go back to your dry cloths for one last press to get out as much water as possible. If you happen to have a wet-dry vac, now is the perfect time to use it for a really thorough extraction. The goal is to get the carpet as dry as you possibly can before you let it air out.
Don't Skip This Part: Drying and Aftercare Are Critical
You’ve scrubbed away and the visible mould is gone. Great job, but don't pack up your gear just yet. The next stage—getting the carpet completely dry and looking after it—is arguably the most important part of the whole process.
This is where a lot of DIY efforts go wrong. You can do a fantastic job cleaning, but if you leave the carpet even slightly damp, you’re just rolling out the welcome mat for a new mould colony. That frustrating, musty smell will be back before you know it.
Think of it this way: you’ve kicked out the current tenants, but you haven't changed the locks. A damp carpet is the perfect breeding ground, practically begging new spores to move in. Getting your carpet bone-dry is how you slam the door shut for good.
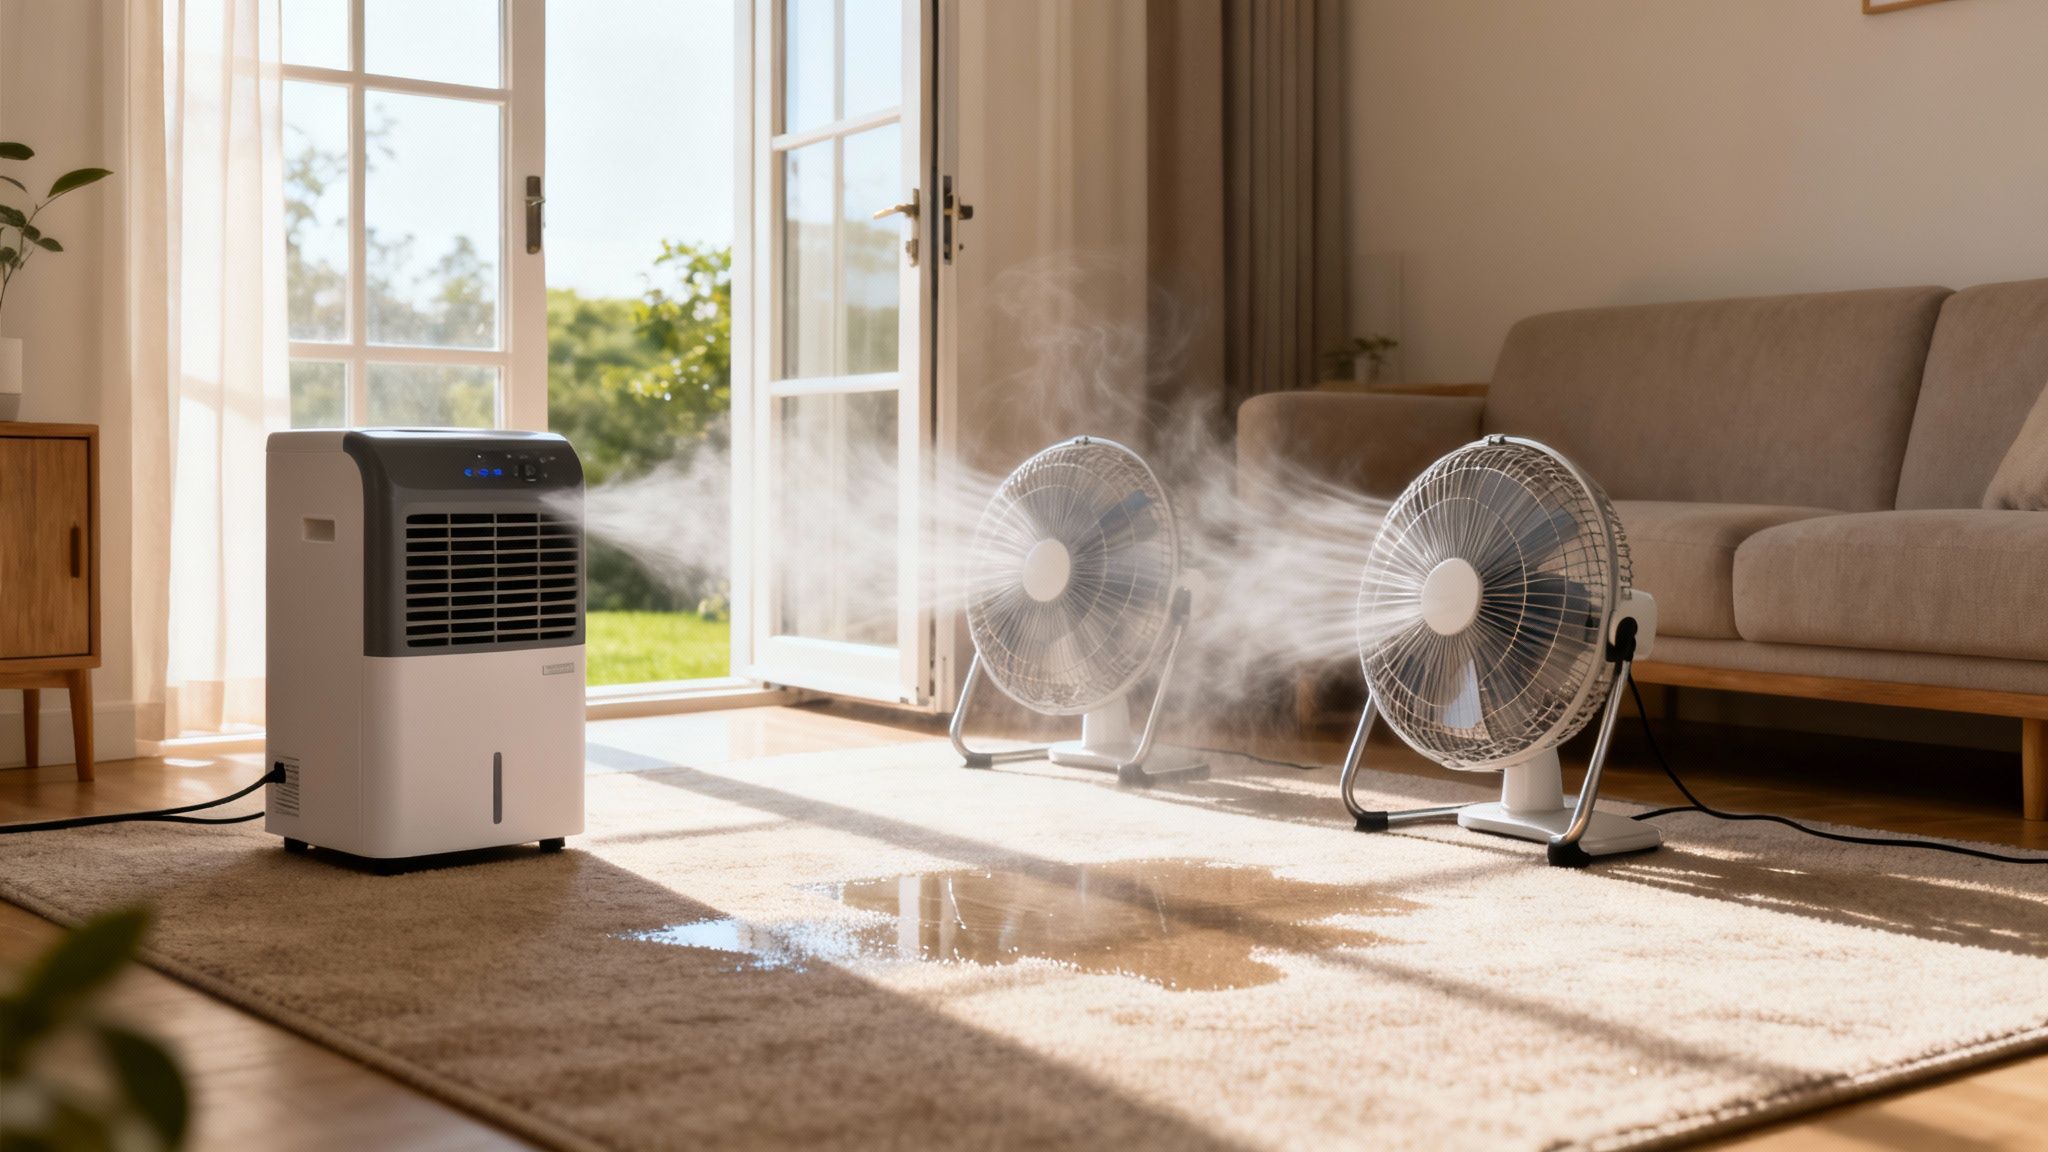
Speeding Up the Drying Process
Just letting a carpet air dry on its own, especially with Melbourne's unpredictable humidity, is a massive gamble. You need to get proactive and pull every last drop of moisture out of those fibres, the underlay, and even the air itself.
Your number one goal is to create serious airflow. Crack open windows on opposite sides of the room to get a good cross-breeze going. Then, it's time to call in some backup.
- Bring in the fans: Grab any pedestal or box fans you have and aim them directly across the damp patch. This constant air movement is brilliant for wicking moisture away as it evaporates.
- Fire up a dehumidifier: This is your secret weapon. A quality dehumidifier will actively suck moisture straight out of the air, which in turn encourages the carpet to dry out much faster.
- Use your heating or air con: Running your home’s climate control system can also help to manage the humidity in the room, giving the drying process another helpful push.
Your target is to get the carpet completely dry within 24 to 48 hours. Any longer than that, and you're creating the perfect window for new mould spores to settle in and start growing all over again.
Even the pros have to be careful with this. Some steam cleaning machines only extract 50-75% of the water they put down, which is more than enough moisture to trigger a new mould problem if it's not dried properly.
Getting Rid of Lingering Stains and Smells
Once the carpet is totally dry to the touch, you might still see a faint, stubborn stain or catch a whiff of that musty smell. That's completely normal. Mould can leave behind pigments and smelly organic compounds even after you've killed it.
For any leftover discolouration, a simple paste of baking soda and a little water can work wonders. Just apply it to the stain, let it dry completely, and then give it a thorough vacuum with your HEPA filter vacuum.
To tackle any lingering odours, sprinkle a generous amount of dry baking soda over the entire area. Let it sit for a few hours—or even overnight if you can spare the time—before vacuuming it up. Baking soda is fantastic because it absorbs those musty smells instead of just covering them up.
Long-Term Prevention and Keeping an Eye on It
Your job doesn’t end once the spot is clean. Now you have to make sure it stays that way. Keep an eye on the area for any signs of the mould returning, especially after a rainy spell or on humid days.
Proper drying and good ventilation are your best defences against mould making a comeback. For a deeper dive into keeping your home dry year-round, check out these great tips on how to prevent damp and condensation. Taking this final step ensures all your hard work pays off with a lasting solution, keeping your carpet fresh and your home healthy.
Knowing When to Call in a Mould Removal Professional
Tackling a small spot of mould yourself can feel like a win, but there’s a clear line between a manageable DIY job and a situation that’s best left to the experts. Knowing your limits is the smartest move you can make for your home and your family's health. This isn't about giving up; it's about making a strategic call to protect your property when the problem gets too big to handle.
Some situations are just too risky for home remedies. Pushing ahead with a DIY approach on a large-scale mould issue can backfire badly—you might spread spores throughout the house, permanently damage your carpet, or miss the underlying moisture problem, guaranteeing the mould will be back with a vengeance.
Recognising the red flags early is key.
Clear Signs It’s Time for Expert Help
Deciding to call a professional can feel like a big step, but certain scenarios make it a non-negotiable one. If you run into any of the following, it’s time to put down the spray bottle and pick up the phone.
- The Mould Patch is Significant: If the affected area is larger than one square metre, that’s the universal signal to call in the pros. A patch this big almost always points to a deeper, underlying moisture problem that a surface clean just won't fix.
- It Keeps Coming Back: You’ve cleaned the area diligently and dried it out completely, but a few weeks later, that familiar musty smell or ugly stain is back. Recurring mould is a classic sign that the root system (mycelia) is embedded deep in the carpet backing or underlay, far beyond the reach of surface treatments.
- The Underlay Feels Spongy: If the carpet feels squishy or damp long after it should be dry, there’s a very high chance the mould has soaked right through to the underlay and possibly even the subfloor. At this point, only a professional can safely lift the carpet, assess the full extent of the damage, and properly treat or replace the compromised layers.
- It’s from Contaminated Water: If the mould appeared after flooding that involved sewage or other contaminated water (often called "black water"), it’s a biohazard. This isn't a job for household cleaners; it requires specialised equipment and safety protocols to handle safely.
Trust your nose. A persistent musty odour that you can't quite pinpoint is often the first and most reliable sign of hidden mould. If a room smells damp and earthy even when everything looks dry, there's a good chance mould is growing somewhere out of sight, like under your carpet.
The Professional Advantage in Melbourne
Deciding whether to tackle mould yourself or bring in a professional can be tricky. It really comes down to the scale and nature of the problem. Below is a quick guide to help you make the right call for your situation.
| Situation | Recommended Action | Reasoning |
|---|---|---|
| A small, isolated spot (smaller than a dinner plate) | DIY | This is usually manageable with home remedies. The mould is likely on the surface and hasn't penetrated deep into the carpet backing or underlay. |
| The mould patch is larger than one square metre | Call a Professional | A large patch indicates a significant underlying moisture issue. Professionals have the tools to find the source and treat the entire affected area safely. |
| Mould reappears after you’ve cleaned it | Call a Professional | This means the mould's roots are deep in the carpet or subfloor. DIY methods can't reach this far, and a professional deep clean is needed to eradicate it for good. |
| Carpet feels spongy or the underlay is wet | Call a Professional | Moisture has penetrated the deeper layers. A professional needs to lift the carpet to dry and treat the underlay and subfloor to prevent structural damage. |
| A strong, persistent musty smell with no visible mould | Call a Professional | This is a classic sign of hidden mould growing under the carpet or behind walls. Experts use moisture meters to locate and treat these hidden infestations. |
| Mould caused by sewage or contaminated floodwater | Call a Professional | This is a biohazard. It requires specialised cleaning equipment and safety gear to handle without risking your health. Don't attempt this yourself. |
| You or family members have allergies or respiratory issues | Call a Professional | For households with vulnerable individuals, it's safer to have professionals handle any mould removal to prevent airborne spores from causing health problems. |
Ultimately, while a small, contained mould spot can often be handled at home, any signs of a larger, recurring, or hidden problem mean it's time to let the experts take over. Their specialised approach ensures the problem is solved completely, not just temporarily hidden.
Hiring a professional mould remediation service in Melbourne isn't just a cost—it's a calculated investment in your home's health. The demand for these services is rising, with the Australian carpet cleaning market projected for steady growth. The cost reflects real value; in Victoria, the average rate for professional carpet mould cleaning is around $31 per hour, a small price to pay compared to potential health issues or serious property damage. For more stats on this industry, you can explore the full market analysis on Grandview Research.
A professional team brings much more than just strong cleaning products. They come equipped with:
- Advanced Equipment: We're talking high-powered, truck-mounted steam cleaners, commercial-grade dehumidifiers, and air scrubbers with HEPA filters that physically capture airborne spores.
- Specialised Techniques: They know how to properly contain the area to stop cross-contamination and use tools like moisture meters to find hidden pockets of dampness you'd never see.
- Expert Knowledge: A trained technician can identify the source of the moisture, advise on necessary repairs, and use the right treatments that won’t bleach or damage your specific type of carpet. They deliver a complete solution that fixes not just the visible mould, but the conditions that let it grow in the first place, giving you real peace of mind.
Common Questions About Carpet Mould
When you're dealing with something as stubborn as mould, it's natural for questions to pop up, even when you have a plan. Getting the right answers helps you tackle the job with confidence and sidestep common mistakes that could actually make things worse.
We've pulled together some of the most common questions Melbourne homeowners ask when they're figuring out how to handle mould in their carpet.
Can I Use Bleach to Clean Mould on My Carpet?
This is a big one, and the answer is a definite no. There's a common myth that bleach is the ultimate solution for mould on any surface, but for carpets, it's one of the worst things you can use.
Sure, bleach works great on non-porous surfaces like tiles or glass. But on porous materials like carpet fibres, it’s a different story. It might kill the mould you can see on the surface, but it won’t penetrate deep enough to get to the roots, known as the mycelia. This all but guarantees the mould will grow back.
On top of that, bleach is a harsh chemical that will likely:
- Permanently strip the colour, leaving you with ugly, faded patches.
- Damage the delicate carpet fibres, making them weak and shortening the life of your flooring.
- Release toxic fumes, which can be dangerous, especially if you accidentally mix it with other cleaning products.
Safer and more effective options, like a simple white vinegar and water solution, are far better suited for the job.
Using bleach on carpet mould is like trying to weed a garden by just snipping off the tops of the weeds. It might look better for a moment, but you haven't touched the root of the problem, and it'll be back before you know it.
How Can I Tell If Mould Is in the Carpet Underlay?
Working out if mould has spread beyond the carpet and into the underlay is critical. If it has, no amount of surface cleaning is going to fix the problem for good.
One of the biggest giveaways is a persistent musty smell that just won't budge, even after you've cleaned and dried the visible spot. That lingering, earthy odour is a dead ringer for trapped moisture and mould lurking underneath.
You might also notice the carpet feels unusually spongy or damp in that area, long after it should have dried. In other cases, the stain you thought you cleaned comes back, or the carpet itself starts to lift or buckle.
The only way to be 100% sure is to carefully pull back a corner of the carpet in a discreet spot (like inside a wardrobe) and have a direct look. If you see black, green, or white stains on the underlay, or if it feels damp to the touch, you’ve found your culprit. At this point, calling in a professional is usually the smartest move to avoid causing more damage.
How Often Should I Professionally Clean My Carpets to Prevent Mould?
When it comes to mould, prevention is your best defence, especially in a climate like Melbourne’s where humidity can be a real issue. Regular professional cleaning does more than just lift dirt; it pulls out the deep-seated moisture and allergens that mould needs to thrive.
For the average Melbourne home, getting a professional steam clean every 12 to 18 months is a solid preventative strategy.
However, you might want to book them in more often if:
- Your home is prone to dampness or has poor ventilation.
- You have pets or young children, who tend to increase moisture and soiling.
- Someone in your family has allergies or asthma, as professionally cleaned carpets can dramatically improve indoor air quality.
For these higher-risk homes, scheduling a clean every 6 to 12 months is a much better approach. And don't forget, after any leak, big spill, or flooding, getting an immediate professional clean is vital to stop mould from getting a foothold in the first place.
Dealing with stubborn or widespread mould can be overwhelming. If your DIY efforts aren't enough, don't hesitate to call in the experts. Right Price Carpet Cleaning offers professional, truck-mounted steam cleaning that effectively removes mould, extracts deep-seated moisture, and restores the health of your carpets. Get an instant online quote and book your service today at https://rightpricecarpetcleaning.com.au.
Recent Comments