
Let's be honest, nobody loves scrubbing the bathtub. But with the right approach, you can get it sparkling clean in no time, preventing that slow build-up of soap scum and grime that makes the job a real chore later on.
It all comes down to a simple, effective routine: clear the decks, apply the right cleaner, give it a good scrub, and rinse it all away. Once you have this down, you’ll be able to keep your tub looking brand new without spending your whole weekend on it.
The Go-To Method for a Sparkling Bathtub
Before we get into specific stains or tub materials, let's cover the fundamental process. This is your roadmap for a quick and effective clean, perfect for regular maintenance or when you just need great results without overthinking it.
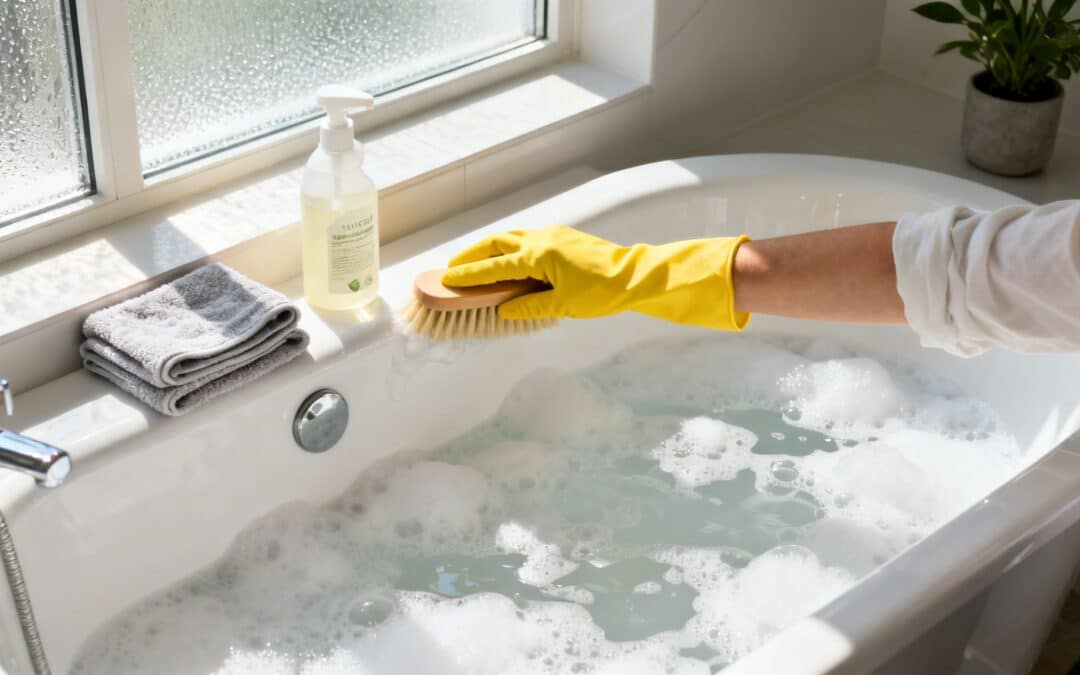
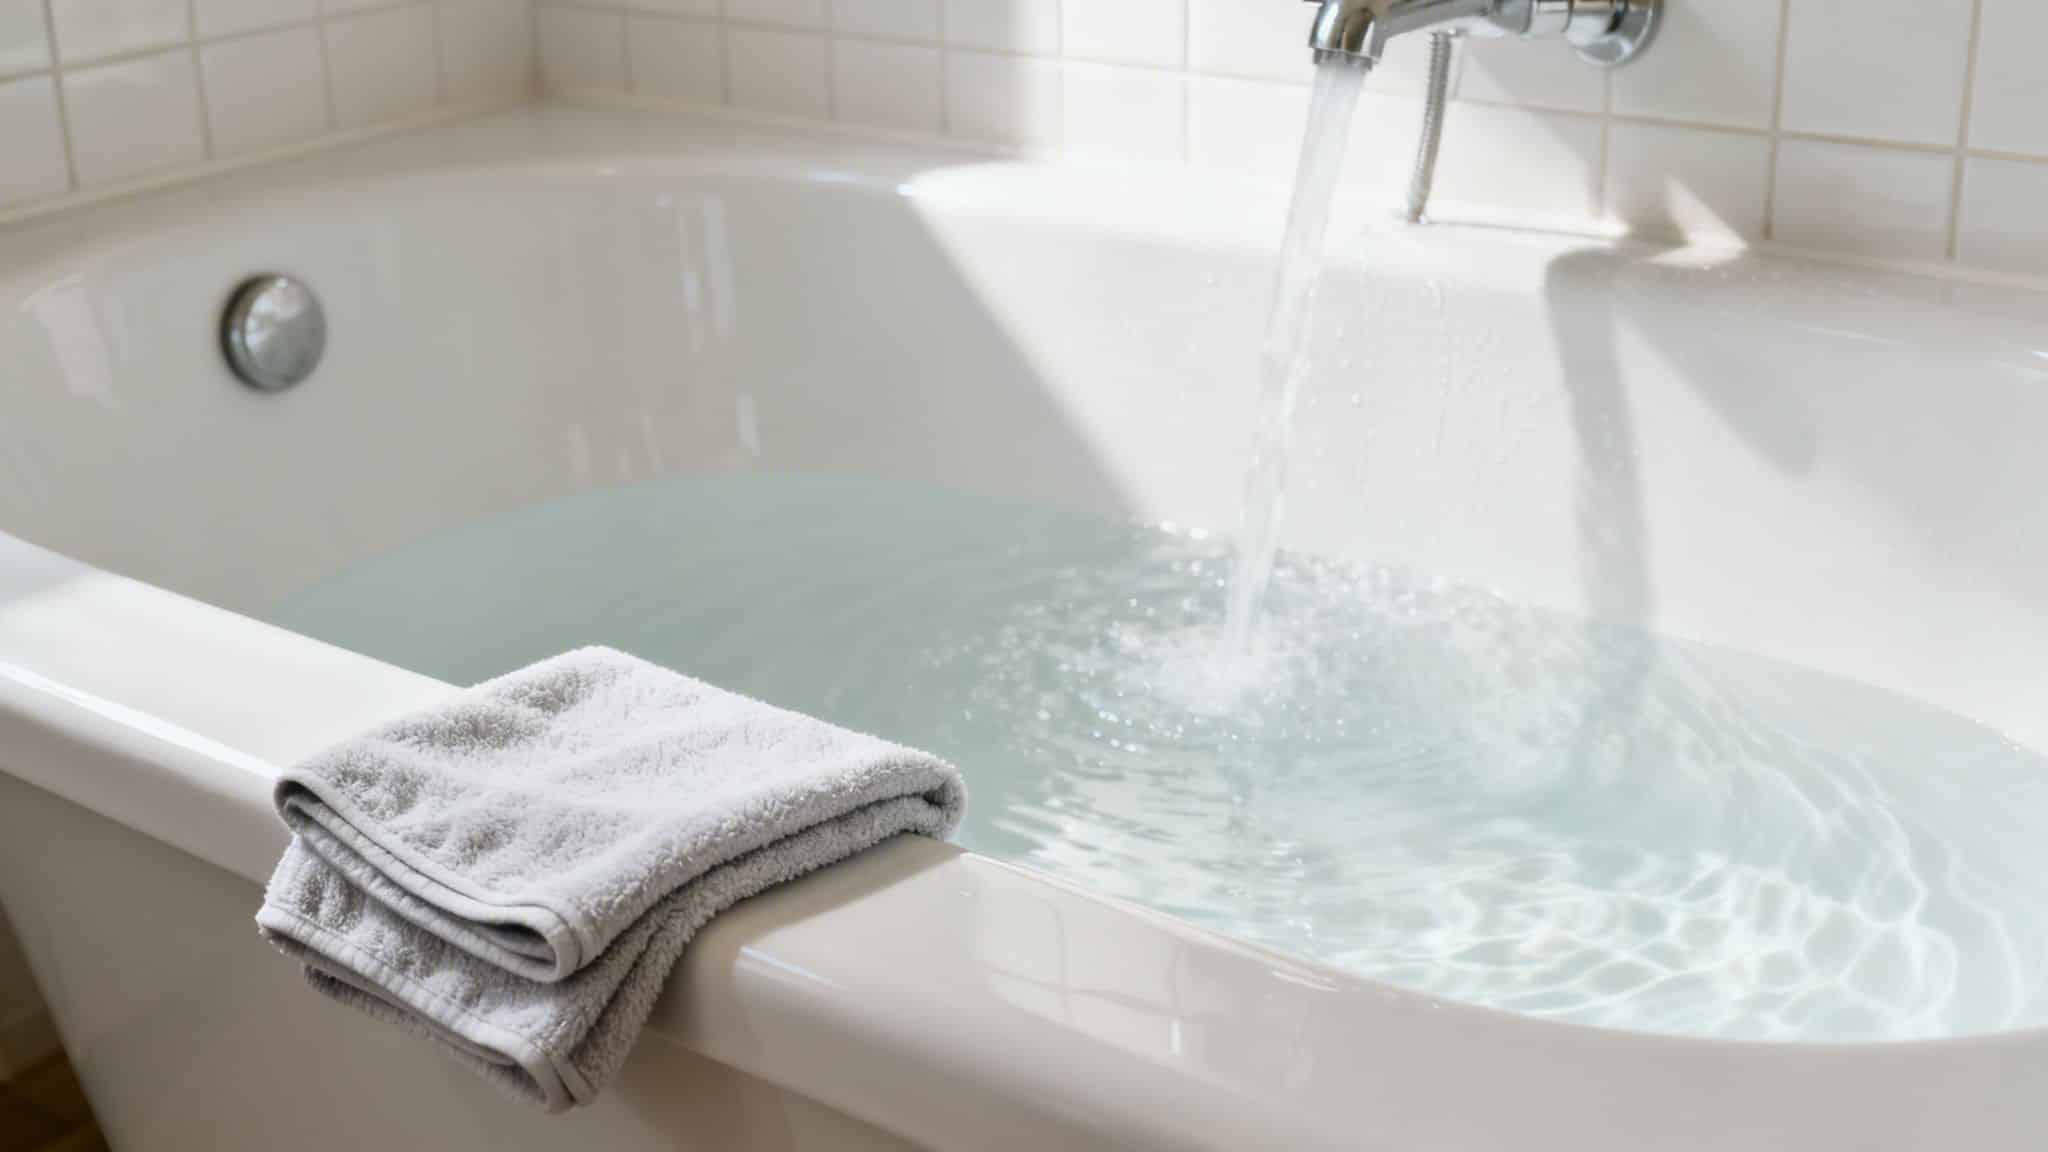
First things first, clear everything out. Get all the shampoo bottles, razors, loofahs, and bath toys off the ledges and out of the tub. You can't clean what you can't reach, and this simple step makes a huge difference. A quick spray with warm water also helps to wet the surface and get it ready for cleaning.
Bathtub Cleaning Essentials At a Glance
For a standard clean, you don't need an arsenal of complicated tools. Here's a quick summary of what we recommend keeping on hand to get the job done right.
| Category | Recommendation | Why It's Important |
|---|---|---|
| Tools | Non-abrasive sponge or soft-bristle brush | Prevents scratching delicate surfaces like acrylic or enamel while still removing grime. |
| Cleaners | All-purpose bathroom cleaner or a DIY mix | A good cleaner needs to break down soap scum and mineral deposits effectively. |
| Safety | Rubber gloves | Protects your skin from cleaning chemicals and keeps your hands dry. |
| Finishing | Microfibre cloth | Dries the surface without leaving streaks or water spots, giving a polished look. |
Having these basics ready means you can tackle the job efficiently without having to stop and search for supplies midway through.
Let Your Cleaner Do the Heavy Lifting
Now it’s time to apply your cleaning solution. Whether you’re using a store-bought spray or a homemade mixture, be generous and coat the entire tub—the basin, the walls, and right up to the fixtures.
Here's the most important part: let it sit for at least 10-15 minutes. This dwell time is what allows the cleaner to break down all that stubborn soap scum and grime, which means a lot less elbow grease for you.
Once the cleaner has worked its magic, grab your non-abrasive sponge or soft-bristle brush and start scrubbing in firm, circular motions. Make sure you hit these common problem spots:
- The waterline where grime and oils tend to build up.
- Around the drain and the overflow plate.
- In the corners and along the caulk or grout lines.
The All-Important Final Rinse
Finally, you need to rinse everything away completely. Use your detachable shower head or a bucket to wash down all the surfaces, making sure no cleaning residue or loosened grime is left behind. If you skimp on the rinse, you’ll be left with a sticky film that actually attracts more dirt, undoing all your hard work.
Pro Tip: After rinsing, take an extra minute to wipe the entire tub dry with a clean microfibre cloth. This simple move prevents water spots and leaves the surface with a brilliant, streak-free shine. It’s the secret to that professionally detailed look.
Assembling Your Bathtub Cleaning Toolkit
Before you dive into cleaning, getting your gear sorted is half the battle. Having the right bathtub cleaning toolkit ready to go turns what can be a frustrating chore into a smooth, satisfying process. This isn’t about buying every fancy gadget you see online; it’s about having a few reliable items that make the job easier, safer, and much more effective.
First things first: protect yourself. Even natural cleaning solutions can irritate your skin with prolonged exposure. A good pair of reusable rubber gloves isn't optional—it's essential. They’ll keep your hands dry and shielded, preventing that awful post-cleaning dryness and irritation.
Choosing Your Scrubbing Tools
The heart of your kit is your scrub brush or sponge, and what you choose here directly affects the long-term health of your tub’s surface. A common mistake I see all the time is people grabbing a generic green scourer, which will absolutely leave permanent micro-scratches on delicate materials like acrylic and fibreglass.
Instead, build your cleaning arsenal based on your tub type:
- Soft-Bristle Brushes: These are your best friends for most situations. They have just enough stiffness to get grime out of grout lines and around fixtures without damaging the tub itself.
- Non-Abrasive Sponges: Absolutely perfect for acrylic, fibreglass, and enamel tubs. These sponges have enough texture to lift stubborn soap scum but won't cause scratches. Just look for anything labelled "non-scratch."
- An Old Toothbrush: Don't ever underestimate this simple tool. It’s invaluable for getting into those really tight spaces like the overflow plate, around the drain, and right at the base of your taps where gunk loves to hide.
Your choice of scrubbing tool should always prioritise protecting the tub's finish. Scratches don't just look bad; they create tiny crevices where dirt and mildew can hide, making every future clean that much harder.
A simple bucket is another must-have. It’s perfect for mixing your cleaning solutions, rinsing out your sponge, or just carrying all your supplies in one go. It saves you from making multiple trips and keeps everything you need right within arm's reach.
The Secret to a Streak-Free Finish
Once all the scrubbing is done, it's the final touches that really make the difference. This is where a couple of high-quality microfibre cloths come into play. A classic rookie error is leaving the tub to air-dry, which almost guarantees you’ll be left with unsightly water spots and streaks, especially if you live in an area with hard water.
After giving the tub a final rinse, a thorough wipe-down with a dry microfibre cloth will absorb every last drop of moisture. Honestly, this one simple step is the secret to achieving that brilliant, polished shine that looks like a professional was just there. I recommend keeping a few cloths dedicated just for this purpose, so you don’t accidentally transfer dirt from other cleaning tasks.
With gloves, the right brushes, a bucket, and microfibre cloths, you’re fully equipped to clean your bathtub efficiently and get a flawless result every single time.
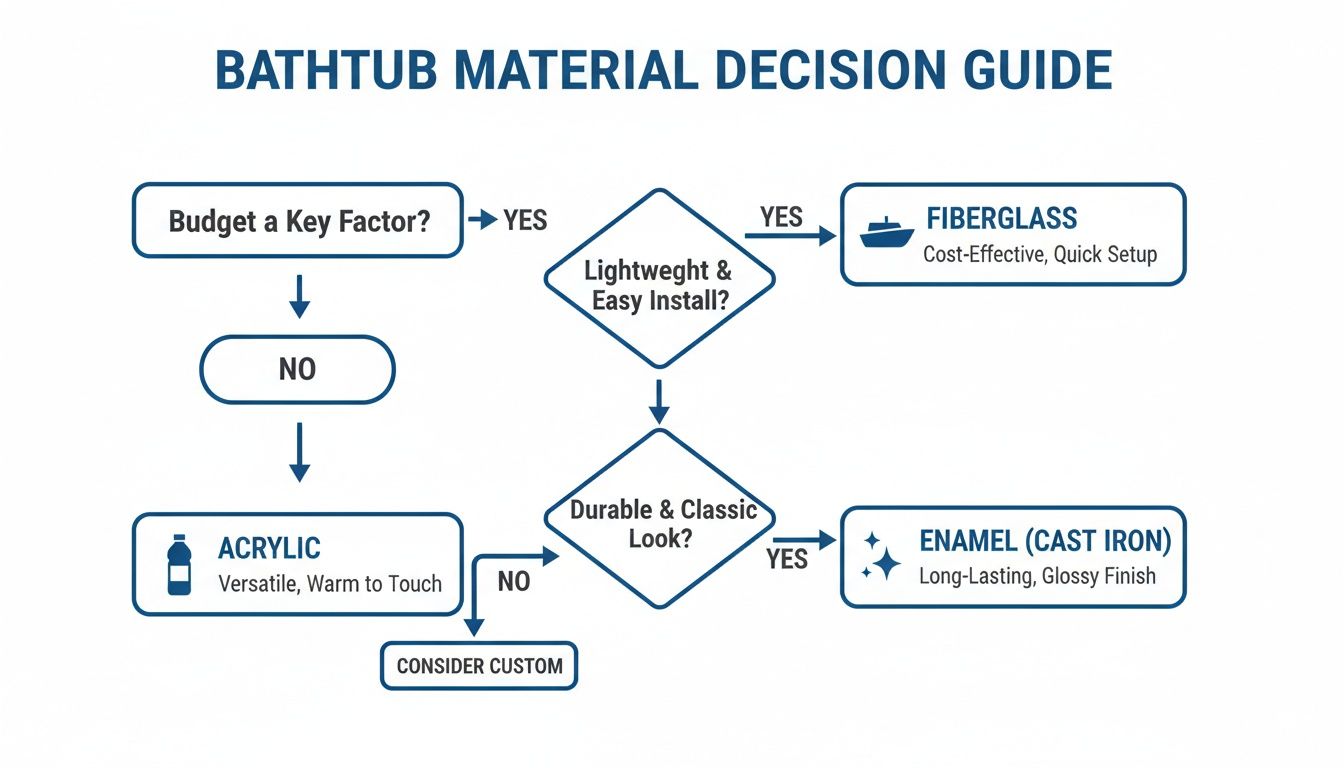
Cleaning Methods for Different Bathtub Materials
Using the wrong cleaner on your bathtub is a fast track to irreversible damage. What makes a vintage porcelain tub shine could permanently scratch or dull a modern acrylic one, so figuring out what your tub is made of is always the first step.
This isn’t just about getting it clean for today. It’s about protecting your investment for the long haul. Using the right approach for your specific tub—whether it’s tough-as-nails porcelain, glossy acrylic, delicate fibreglass, or classic enamel—ensures you’re removing grime without damaging the finish.
This simple guide will help you choose the right cleaning path for your tub's material.
Cleaning a Durable Porcelain Bathtub
If your home is a bit older, there’s a good chance you’ve got a porcelain tub. These are the workhorses of the bathroom world, usually built with a cast iron core and coated in a tough, glass-like porcelain layer. Their best feature is their resilience, which means they can handle slightly more muscle than newer materials.
For most weekly cleans, a simple paste of baking soda and water does the trick beautifully. Just apply it with a non-abrasive sponge, scrub in gentle circles, and rinse it all away. It’s a mild abrasive that lifts soap scum and light stains without being harsh.
For stubborn stains on a white porcelain tub, you can bring out a powdered cleanser containing a mild abrasive. Just be sure to test it on a hidden spot first to make sure it doesn’t dull the finish. Never use these powders on coloured porcelain, as they can wear away the colour over time.
Because porcelain is so hard and non-porous, it holds up against most common bathroom messes, making it a very forgiving surface to work with.
How to Clean a Modern Acrylic Bathtub
Lightweight and available in all sorts of shapes and sizes, acrylic tubs are a popular choice in new builds and renovations. At its core, an acrylic tub is a sheet of plastic that has been moulded into shape, which makes its surface much softer and far more prone to scratching than old-school porcelain.
Abrasive cleaners are the number one enemy of acrylic bathtubs. Steer clear of all scouring powders, gritty cream cleansers, and harsh scrubbing pads (like those green scourers). They will leave behind a network of fine scratches that not only dulls the shine but also traps more dirt, making the tub even harder to clean next time.
Instead, stick to gentle, non-abrasive options:
- Liquid Cleaners: Simple liquid dish soap, an all-purpose bathroom spray, or a solution of equal parts white vinegar and water are your best friends here.
- Soft Tools: Only use soft sponges, microfibre cloths, or brushes with soft bristles.
- DIY Paste: A baking soda and water paste is okay, but you need to scrub very gently to avoid creating micro-abrasions.
Let the cleaner do the heavy lifting for you. Spray your chosen solution on the tub and let it sit for 15–20 minutes. This gives it time to break down the soap scum and grime before you even start wiping.
Maintaining a Fibreglass Bathtub
Fibreglass tubs are a lot like acrylic ones—they’re light and budget-friendly. The key difference is their gelcoat finish, which is even more delicate and susceptible to both scratching and discolouration. Harsh chemicals, particularly bleach, are notorious for causing yellowing and breaking down that protective top layer.
The best approach here is to use mild, non-abrasive cleaners. For a quick weekly wipe-down, liquid dish soap is often all you need. If you’re tackling more significant grime, a spray bottle filled with a 50/50 mix of white vinegar and water is a fantastic, safe option.
Because that gelcoat is so sensitive, you must avoid all scouring powders and abrasive pads. If you run into a stubborn spot that needs a bit more elbow grease, a paste made from baking soda and water applied with a soft sponge is the safest way to go. With fibreglass, regular, gentle cleaning is the secret to avoiding the need for harsh methods later.
Caring for Enamel-Coated Bathtubs
Enamel tubs, which are typically made from cast iron or steel with a baked-on enamel coating, are famous for their hard, glossy finish. While they are quite tough, the finish can chip if you drop something heavy on it. More importantly, abrasive cleaners will slowly wear it down, eventually exposing the metal underneath.
Your best bet is to treat an enamel tub much like an acrylic one—with care. Abrasives will gradually eat away at that beautiful gloss, leaving it looking dull and feeling porous.
- Stick to non-abrasive liquid or spray cleaners.
- A baking soda paste is a safe choice for light scrubbing.
- For stains, try a solution of hydrogen peroxide and water as a safer alternative to harsh bleach.
A well-maintained enamel tub can look great for decades, but its lifespan really depends on avoiding abrasive cleaning habits. Of course, a sparkling tub looks best with clean surroundings. For tips on that, check out our guide on how to clean shower grout to keep the whole area looking pristine.
How to Tackle the Toughest Bathtub Stains and Grime
Even with a consistent cleaning schedule, some bathtub stains just don’t want to budge. This is when you have to switch gears from general upkeep to a more targeted attack. We're going to break down how to beat the four most common culprits of a less-than-sparkling tub: soap scum, mildew, hard water lines, and those dreaded rust marks.
Knowing what causes these stains is half the battle. With the right approach and a few simple ingredients, you can lift even the most stubborn grime and bring back your tub’s original shine.
Battling Stubborn Soap Scum
That chalky, greyish film clinging to your tub? That’s soap scum. It builds up when the fatty acids and talc in bar soap react with the minerals in your tap water, creating a sticky residue that’s surprisingly tough to shift.
For a light build-up, a quick spray of equal parts white vinegar and warm water mixed with a dash of dish soap often does the trick. Let it sit for about 15 minutes to start dissolving the scum, then give it a good scrub with a non-abrasive sponge.
But for those thick, stubborn layers, you’ll need a bit more power. First, hit it with the vinegar spray and let it soak in for at least 20 minutes. This starts breaking down the surface. Next, make a thick paste from baking soda and water and apply it directly over the vinegar-soaked areas. The baking soda acts as a gentle abrasive, lifting the softened scum without scratching the tub’s surface.
Scrub using firm, circular motions before rinsing everything away. This one-two punch is my go-to method because it safely gets rid of a problem that many chemical cleaners just can't handle.
Eliminating Mould and Mildew
Mould and mildew absolutely love damp, dark places, which makes the corners and caulk lines of your bathtub prime real estate. These fungal growths are more than just an eyesore; they can also affect your home's air quality.
If you’ve caught it early, a simple vinegar spray is a great first defence. Vinegar's acidity is effective at killing over 80% of mould species. Just spray it directly on the problem spots, leave it for an hour without rinsing, and make sure the bathroom is well-ventilated.
For more established mould, especially on grout or caulk, you may need to step it up.
- Hydrogen Peroxide: Grab a spray bottle and fill it with 3% hydrogen peroxide, then saturate the mouldy areas. You’ll see it start to bubble—that means it’s working. Let it sit for 10–15 minutes before scrubbing with an old toothbrush and rinsing clean.
- Bleach (With Caution): On non-porous surfaces like white porcelain or fibreglass, a solution of one part bleach to 10 parts water works wonders. Spray it on, let it sit for 15 minutes, and rinse completely. Just be warned: never use bleach on acrylic or coloured tubs, as it can lead to permanent yellowing or discolouration.
Safety First: Never, ever mix bleach with other cleaners, especially anything containing ammonia or vinegar. This combination creates toxic chloramine gas, which is incredibly dangerous to breathe in. If you use bleach, open a window, turn on the fan, and rinse the surface thoroughly before any other product comes near it.
Erasing Hard Water Stains
If you’re seeing cloudy white rings or chalky lines around your tub and fixtures, you've got hard water stains. These are mineral deposits, mostly calcium and magnesium, that get left behind as water evaporates. Once they calcify, they can be a real pain to remove.
The secret to defeating hard water stains is acid, which dissolves the mineral deposits. And for that, white vinegar is your best friend.
For stains on flat surfaces, a 50/50 vinegar-and-water solution is a good start. But for those really tough lines, try this trick: soak a few paper towels in pure white vinegar and press them directly onto the stains. Leave them there for at least an hour—or even overnight if the stains are severe.
This prolonged contact gives the vinegar plenty of time to break down the hardened minerals. Once you remove the towels, a quick scrub with a soft brush should take care of any remaining residue. For a deeper dive, you can learn more about how to remove hard water stains and stop them from coming back.
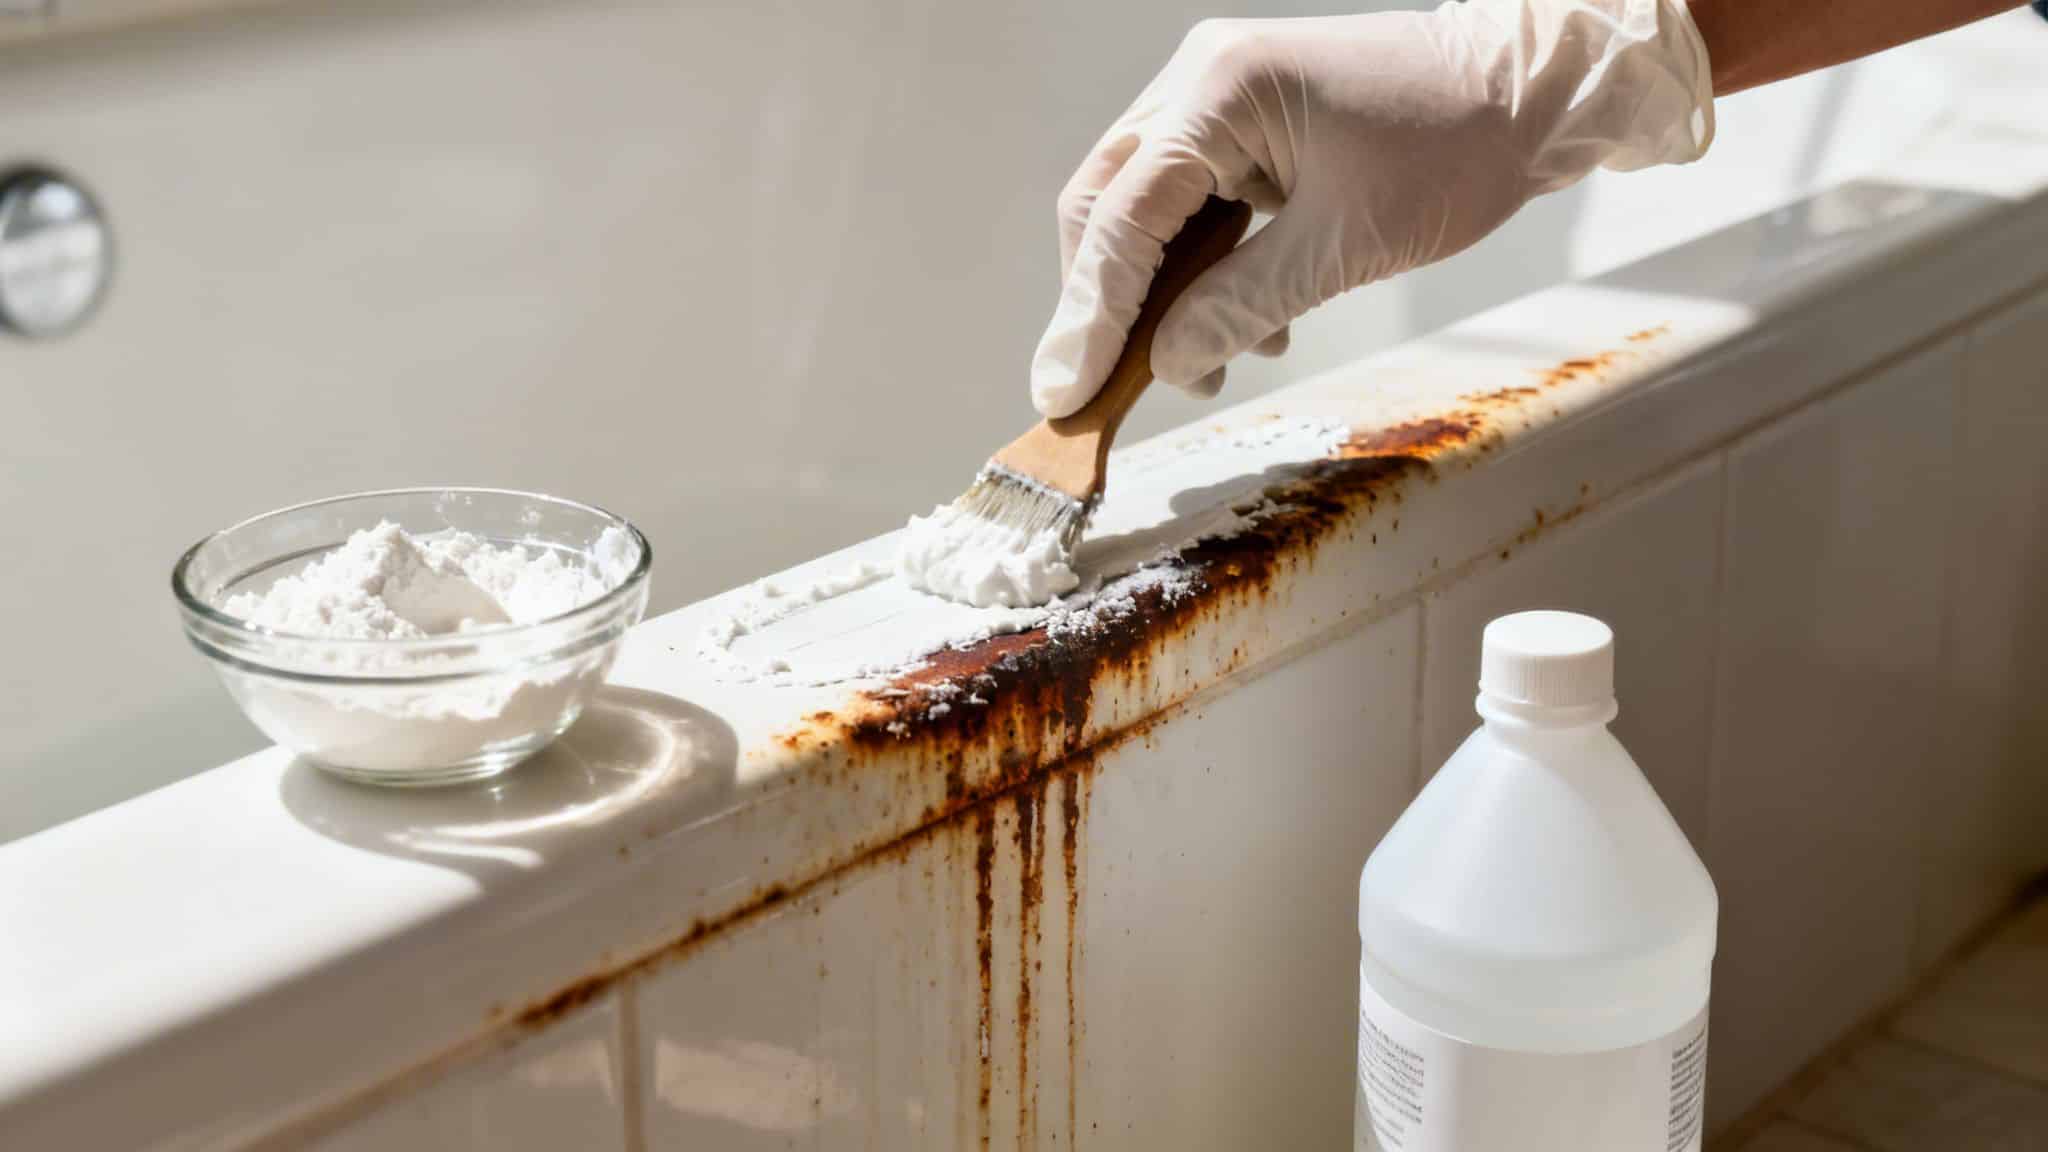
Tackling Ugly Rust Marks
Those reddish-brown marks can look alarming, but they're often just a sign of an underlying issue, like a leaky tap, a metal shaving cream can left on the tub's edge, or high iron levels in your water. The good news is, they are surprisingly manageable.
Whatever you do, stay away from chlorine bleach. Bleach can actually react with rust and set the stain permanently into porcelain and enamel. Instead, try one of these two safe and effective methods.
The Baking Soda Paste Method
- Mix baking soda with a small amount of water to create a thick paste.
- Cover the rust stain completely with a generous layer of the paste.
- Let it sit for about an hour to work its magic.
- Scrub the area with a soft-bristle brush and rinse it all away.
The Lemon and Salt Method
- Sprinkle a good amount of table salt directly onto the rust stain.
- Squeeze fresh lemon juice over the salt until it's fully saturated, creating a gritty slurry.
- Let this mixture sit for several hours; the acid in the lemon will slowly dissolve the rust.
- Before rinsing, use the lemon rind itself as a natural scrubber to work the mixture into the stain, then rinse thoroughly.
Sometimes, stubborn grime and slow drains go hand-in-hand. If you’re dealing with persistent issues, understanding the value of a professional drain cleaning and inspection could be the key to preventing future problems before they start.
Simple Habits to Keep Your Bathtub Cleaner for Longer
There’s nothing more frustrating than finishing a deep clean, only to see that familiar film of soap scum start creeping back almost immediately. The real secret isn't scrubbing harder; it's working smarter.
By adding a few simple habits to your routine, you can stop grime before it even starts. It’s all about preventing soap residue, water minerals, and moisture from getting a foothold, which makes your next big scrub faster and far less of a chore.
Make a Quick Rinse Your New Routine
The single most effective thing you can do is give the tub a quick rinse right after you use it. Every time you bathe or shower, a thin layer of soap, body oils, and water minerals is left behind. When that dries, it becomes the stubborn, chalky film we all know as soap scum.
Grabbing the shower head and giving the tub a quick spray-down takes less than 30 seconds. This simple action washes away most of the fresh residue before it has a chance to harden, dramatically cutting down on future scrubbing.
Want to take it a step further? Keep a squeegee in your shower. After rinsing, a few quick passes with the squeegee will remove nearly all the water droplets. This is a game-changer for preventing hard water spots and slowing mildew growth. While you're at it, don't forget the glass—good shower door maintenance prevents spots and complements a sparkling clean tub.
Proactive Changes That Prevent Grime
Beyond the daily rinse-down, a few smart adjustments can stop stains and buildup right at the source. Think of these as set-and-forget changes that do the hard work for you.
- Switch to Liquid Soap: Bar soaps are often the main culprit behind soap scum, thanks to the talc and fats they contain. Switching to a liquid body wash or shower gel can cut down on that chalky residue by over 90%, as they are detergent-based and rinse away cleanly.
- Fix Leaky Taps: That constant drip, drip, drip isn't just annoying—it's the direct cause of those ugly rust and hard water stains. A dripping tap continuously deposits minerals and iron onto one spot, creating stubborn discolouration. Fixing the leak is a permanent fix that stops these stains from ever forming.
- Improve Ventilation: Mildew absolutely thrives in damp, stagnant air. Make it a habit to run your bathroom's exhaust fan during your shower and for at least 20-30 minutes afterwards. If you don’t have a fan, cracking a window open helps. Good air circulation is your best defence against mould and mildew.
By focusing on keeping your tub dry and residue-free on a daily basis, you transition from a cycle of heavy-duty cleaning to one of simple, effortless maintenance.
This proactive approach not only keeps your tub looking pristine but also helps you manage moisture across the entire bathroom. To tackle moisture issues head-on, you can read our detailed guide on how to eliminate bathroom mold and create a healthier home environment.
Frequently Asked Questions About Bathtub Cleaning
Even after you've got the basics down, a few tricky questions always seem to pop up when it's time to get the tub sparkling. Here are some of the most common queries we hear, with straightforward answers to help you clean with confidence.
How Often Should I Deep Clean My Bathtub?
For everyday hygiene, a quick weekly wipe-down using an all-purpose bathroom cleaner is a fantastic habit to get into. A proper deep clean, however, should be done at least once a month.
This more focused effort is what stops soap scum, hard water scale, and general grime from building up into a real problem. If you’re in a humid part of Australia where mildew is a constant battle, you might need to do a deep clean every fortnight to keep things fresh.
Can I Use Bleach on Any Type of Bathtub?
Definitely not. This is a common mistake that can end up being very expensive to fix. While chlorine bleach can be great for whitening an old, white porcelain or certain fibreglass tubs, it’s a total disaster for others.
- Acrylic Tubs: Bleach can cause the plastic to turn an ugly, irreversible yellow and even weaken the material over time.
- Coloured Enamel: It can easily strip the colour right off and permanently ruin the finish.
When you're in doubt, just skip the bleach altogether. Safer options like white vinegar, hydrogen peroxide, or a good oxygen bleach will often give you the same whitening and disinfecting power without the risk of destroying your tub's surface.
What Is the Best Way to Remove Tough Soap Scum?
For that stubborn, chalky soap scum, the best approach is a one-two punch that dissolves the grime first, then scrubs it away.
Start by spraying the problem spots with a 50/50 mix of white vinegar and warm water. You need to give it time to work, so let it sit for at least 20 minutes. The acid in the vinegar will start breaking down the buildup. Then, without rinsing, apply a thick paste of baking soda and water and get scrubbing. The baking soda acts as a gentle abrasive that lifts the softened scum without scratching your tub.
Is It Safe to Mix Different Cleaning Products?
No, this is incredibly dangerous and something you should never, ever do. Mixing cleaning products can trigger unexpected and hazardous chemical reactions right in your bathroom.
The most notorious combination to avoid is bleach and ammonia, which creates toxic chloramine gas. To keep yourself safe, always stick to one cleaning product at a time. If you do need to switch cleaners, make sure you give the bathtub a thorough rinse with plain water first.
Even with the best DIY methods, some jobs are just too tough to handle alone. For deep-set tile and grout stains or a whole-home refresh, trust the experts at Right Price Carpet Cleaning. Get your instant quote online today!
Recent Comments